


Review: 100% S2 Sunglasses
In the past, cycling glasses haven’t appealed to me, but I was excited to try out the 100% S2 sunglasses when given the opportunity. After using them for the past five weeks, I'm seldom seen without them. After the signing of Peter Sagan, the popularity of 100% eyewear grew exponentially. They now offer an extensive range which covers all aspects of performance, protection, and prescription glasses.
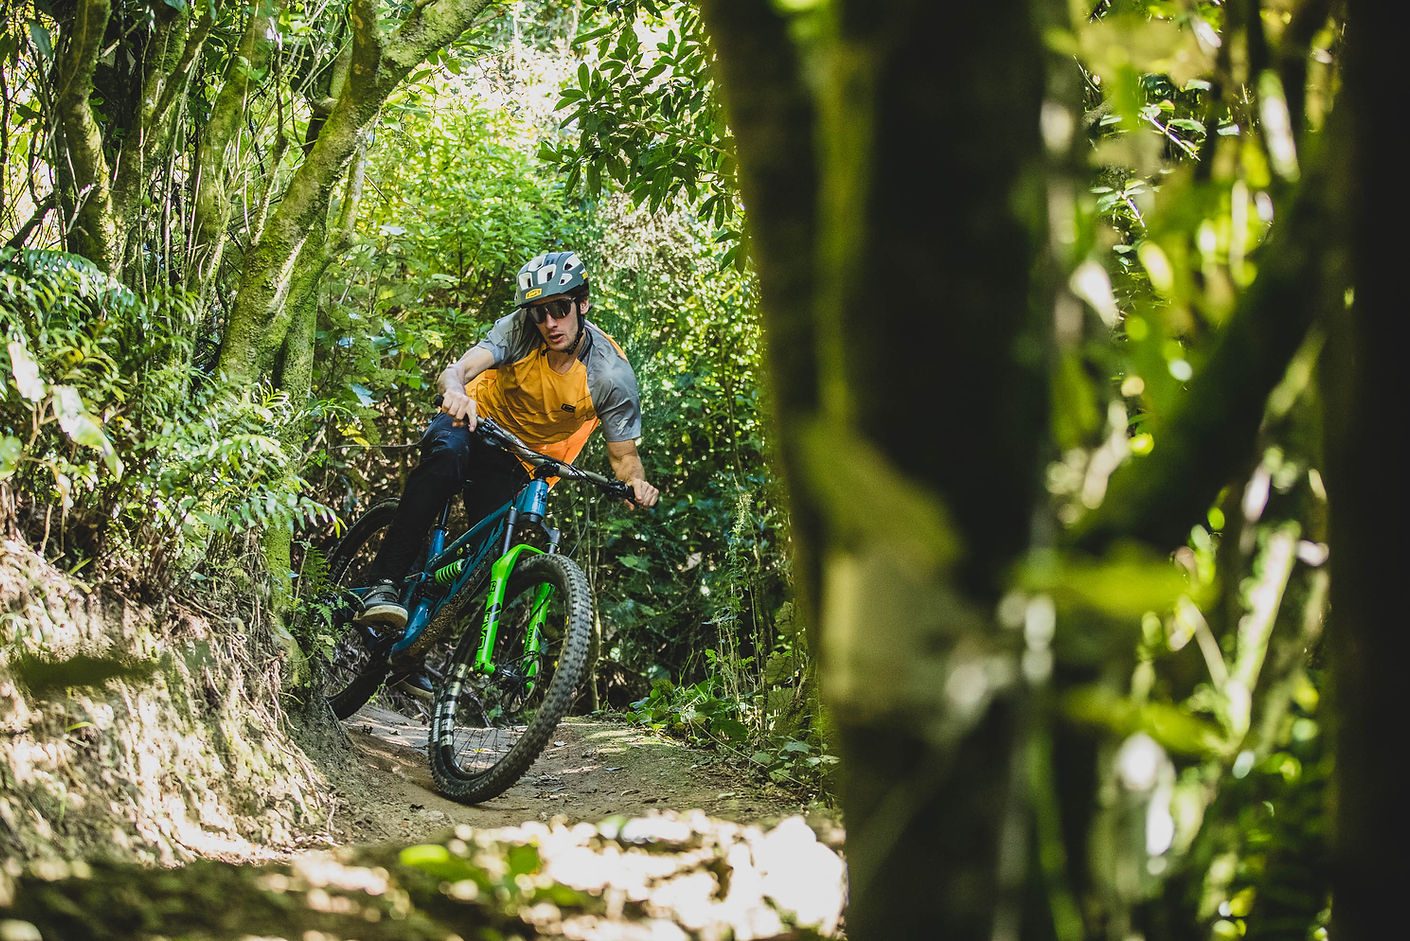
The polished glasses I've been testing came equipped with a mirrored silver lens and a back up clear lens. I have yet to need the clear lens as the mirrored one adapts to changes in light very quickly. The lens has not fogged up, and after many clumsy trail moments there are no marks on the impact resistant Hydroio lens. Initially, I ran them only on mountain bike rides but have since tried them on the road bike and even at a cyclocross race, and found the generous size and shape to keep unwanted air and mud away from my eyes. On the road and trail I've found them to make obstacles appear very sharp, almost enhancing my vision. The addition of ultra-grip rubber on the arms and nose piece meant, once they were where I wanted them, there was no movement whatsoever. I've often seen cyclists with glasses that don’t contrast well with their helmet, however these are not those; I have tested them with five different helmets from varying brands and they look amazing. A couple of times, whilst driving, I have picked them up to block the harsh sun – I’ve also received compliments on how good they look.
The price tag of $334 seems scary for something you think you may not need, but I can assure you these will up your steeze factor and are a good investment for a durable pair of multi-use glasses. Would I recommend these? Absolutely. If you want to stand out amongst your friends, be a style god, and keep shit out of your eyes, look no further than the 100% S2 shades.
Distributor: FE Sports
Words: Jesse Cseh
Images: Caleb Smith

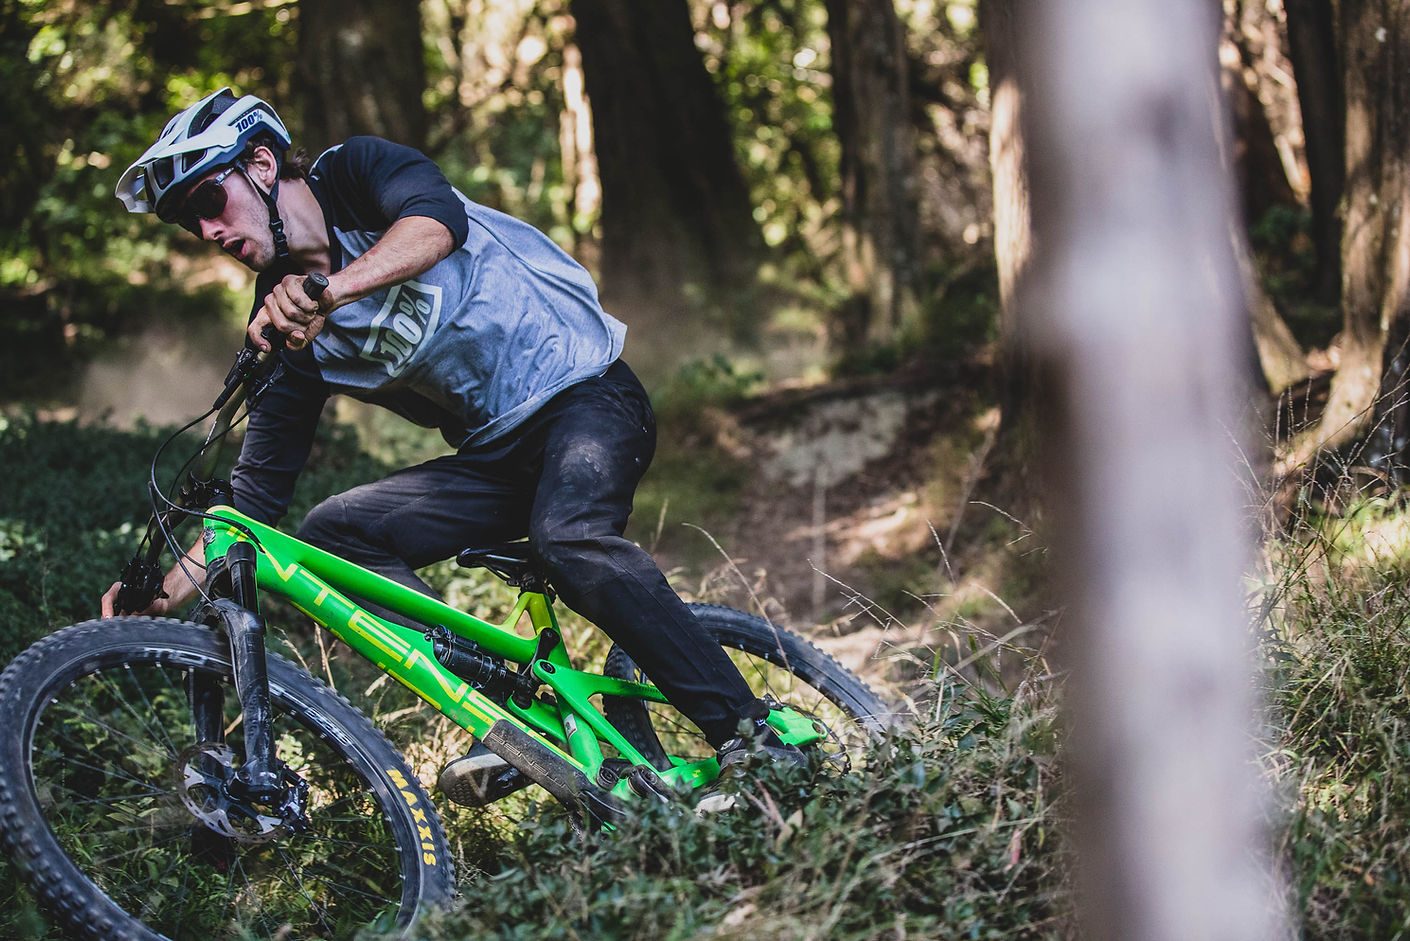
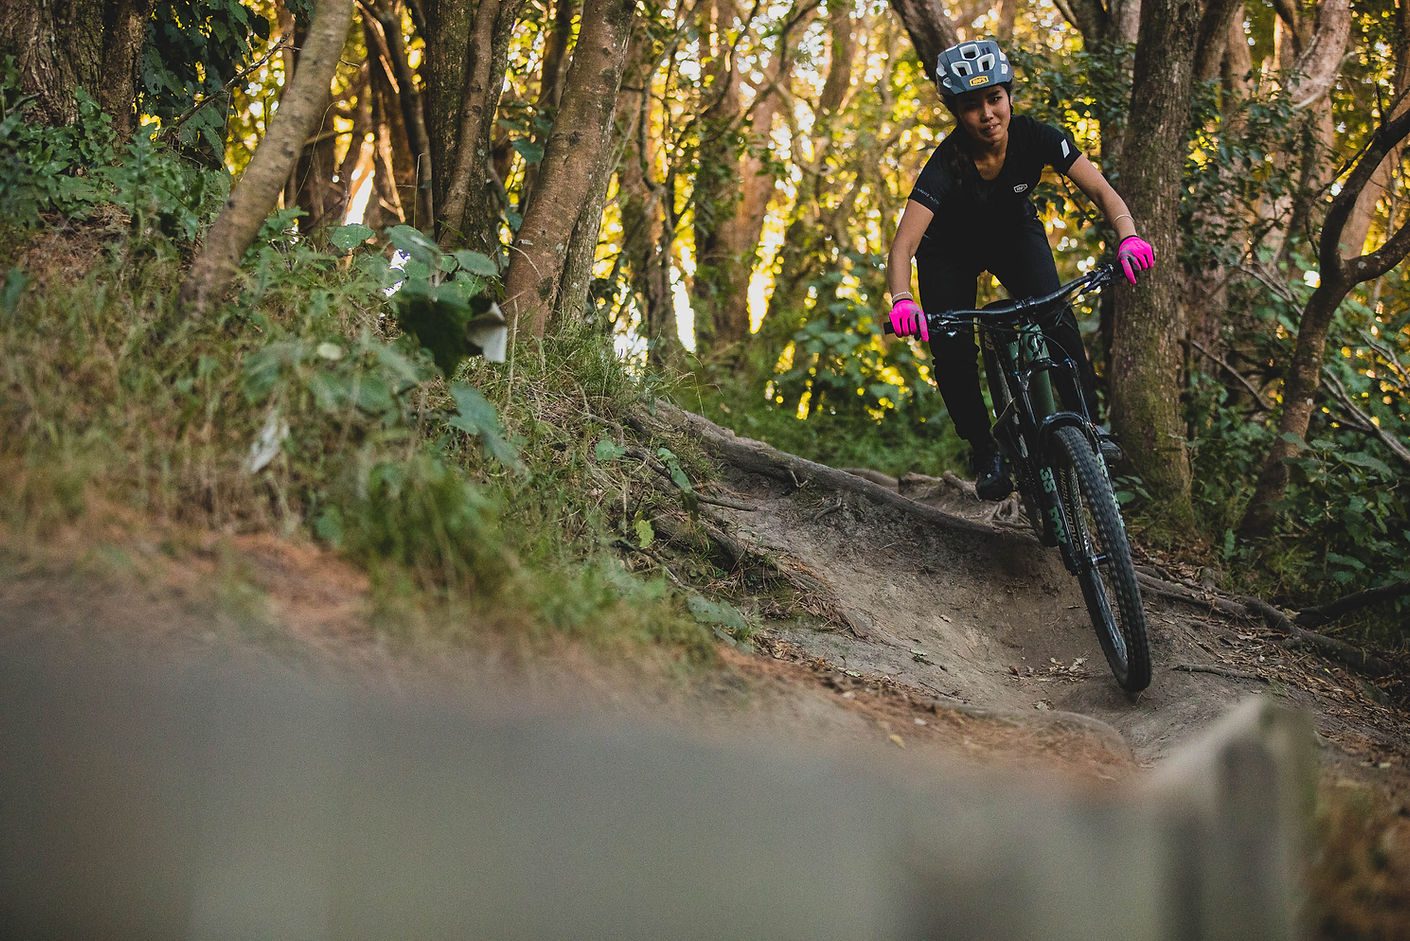
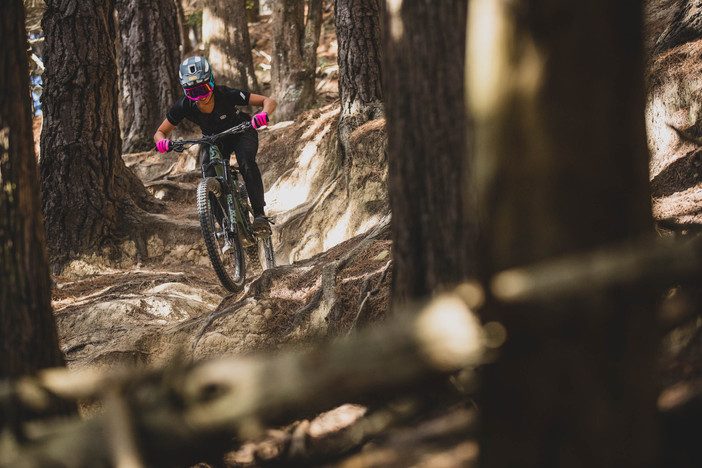
Review: 100% Teratec Knee Guards
So, as they say, it’s best to use protection?! Nah, you really should, especially when it comes to riding mountain bikes. If you’re like me and fall every so often then you want to protect yourself. So, yea, use protection. 100% have made a real impact on the scene but in years gone by they made simple accessories for MX, nowadays they’re a global player. You can see their googles on the heads of racers but recently they’ve become known and well-established for apparel and helmets. The brand continues to grow, and over the past few months, I’ve had the opportunity of testing some of their protection; Teratec Knee Guards.
The Teratec uses a lightweight design, they’re comfortable in use, and the overall stability of this protector is excellent. It’s got a fairly generous cut with enough sleeve up the top of the pad to ensure it stays in place. The protective pad works as its meant to – soft and flexible allowing for movement but robust enough when you crash on it. I found the guards needed a bit of ‘breaking’ in order to make the material a little more pliable. After the first few rides, they started to fit better. Fit wise, I lean towards a medium and sometimes large but with these, I’d recommend trying before you buy. These do a run a little tighter and for me, the medium was a touch small – this was mainly around the cuff at the top. But that maybe because I’ve got thick thighs?! You be the judge, but some riders may want to size up. That said the elastic/rubber cuffs at the top and bottom do fit very tight, but the pads stay in place well. And throughout all my rides with them, they stayed in place. However, I would like a little more rubber above the knee pad with a touch more roominess if I’m being picky.
In regard to the actual protection, the removable insert is super solid. And I’ve had a couple of offs to thoroughly validate this. There’s good coverage across the entire knee including some of the upper shin. For me, the pads didn’t get overly hot and they’re fine when it’s cold out. After a few rides, they do stench so best to whip the pads out and chuck em’ in the wash with your other riding gear. Having this easy option is a huge bonus and means you keep your riding buddies.
Above all the Teratec Knee Guards do their job well. They’re comfortable to wear all day on the bike and offer good protection and comfort. Wearing them I felt faster. Perhaps I just looked faster or because I had such good protection, I had more confidence to push myself harder.
Words: Liam Friary
Images: Cameron Mackenzie
Review: 100% R-Core X Pant
Riding pants have come a long way since I was a kid. I remember the first set was a grey set of Fox 180 Moto pants I got for Christmas. I thought they were the coolest things ever. I would ride everywhere in them. They were thick, heavy and probably would still be around with the cockroach if the world went up in flames in a nuclear war.
Fast forward to 2021., I may not still own them Fox pants but I still think riding pants are the coolest thing out. Lucky riding pants have come a long way since I was young. We now have a vast range of them out there designed around mountain biking specifically.
I was lucky enough to be given a set of 100 percent R-Core X pants to test. 100 percent has a rich motocross history dating back to the 1980s but more recently has moved into the mountain bike scene. This history and knowledge show in their products: well-designed features, fit, ventilation and materials.
The R-Core X pants are aimed at the trail enduroish market., They are packed with clever features. The first thing you notice when you put the pants on is just how much airflow they have. There were many times I put them on and thought there I must have put a rip in the crotch purely from the breeze passing through them. Fit wise, they sit in the middle of the range - not too tight and not too baggy, enough room to move and also fit kneepads on underneath. A mixture of four-way stretch spandex and DWR coated polyester provide stretch and strength where you need them most. Silicon gripper pads on the back of the waist help keep the pants up while you do up the fantastic boa on the front. Why don’t more people do this? It makes a lot more sense than buttons or straps. The boa allows for micro-adjustment on the tightness and I personally love the way it looks. Rounding out these pants are two well-placed zip pockets on the front - big enough to get a phone and a small tool in one pocket.
I've spent about a month and a half putting these pants through their paces, from punishing wet rides in the rain to six-hour rides into the bush for overnight missions and quick laps around my local spots. They tend to be the go-to set I grab when I'm heading out riding due to their lightweight feel and overall comfort. All the ventilation helps you not overheat, the fabric stays pretty dry on the wet rides.
What I have noticed on days where it is a bit warmer is that the material used isn't the most breathable. I’d often pull my phone out of my pocket mid-ride and it would be covered in sweat. Not an ideal thing for an electronic device but pop your phone in a sandwich bag before you go riding and you’ll be sweet. Would this put me off buying these pants? Absolutely not. As much as the material might not be the most breathable, the vents keep you cool on warm days. The fit and comfort are fantastic. You almost forget you are wearing them. Fantastic features such as the boa, silicon grippers and vents add up to a great versatile set of durable riding pants that work all year round and won’t let you down.
Distributor: FE Sports
Words: Jake Hood
Images: Caleb Smith

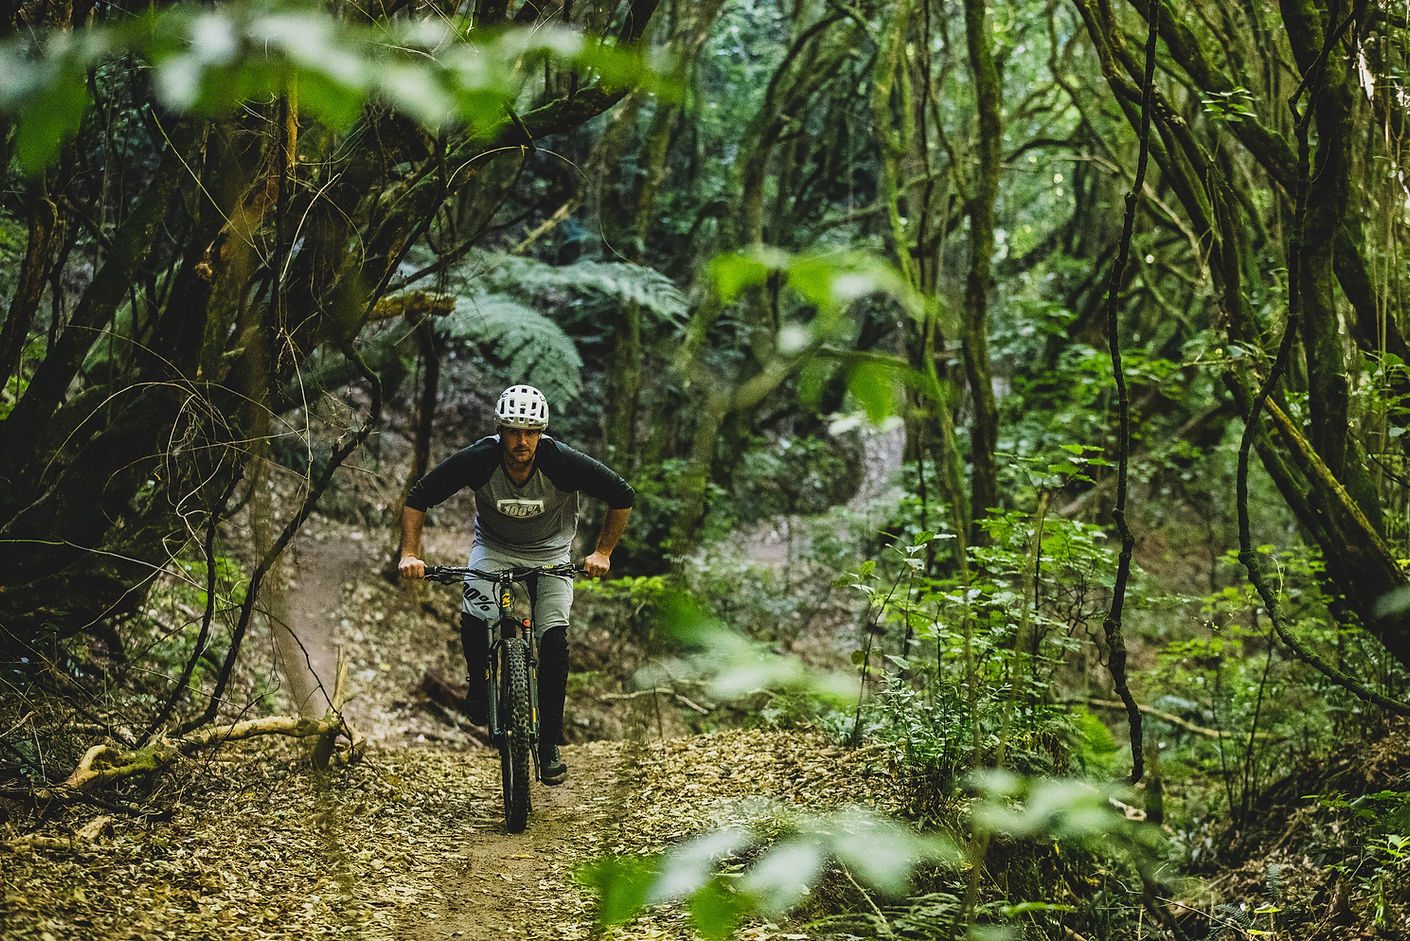
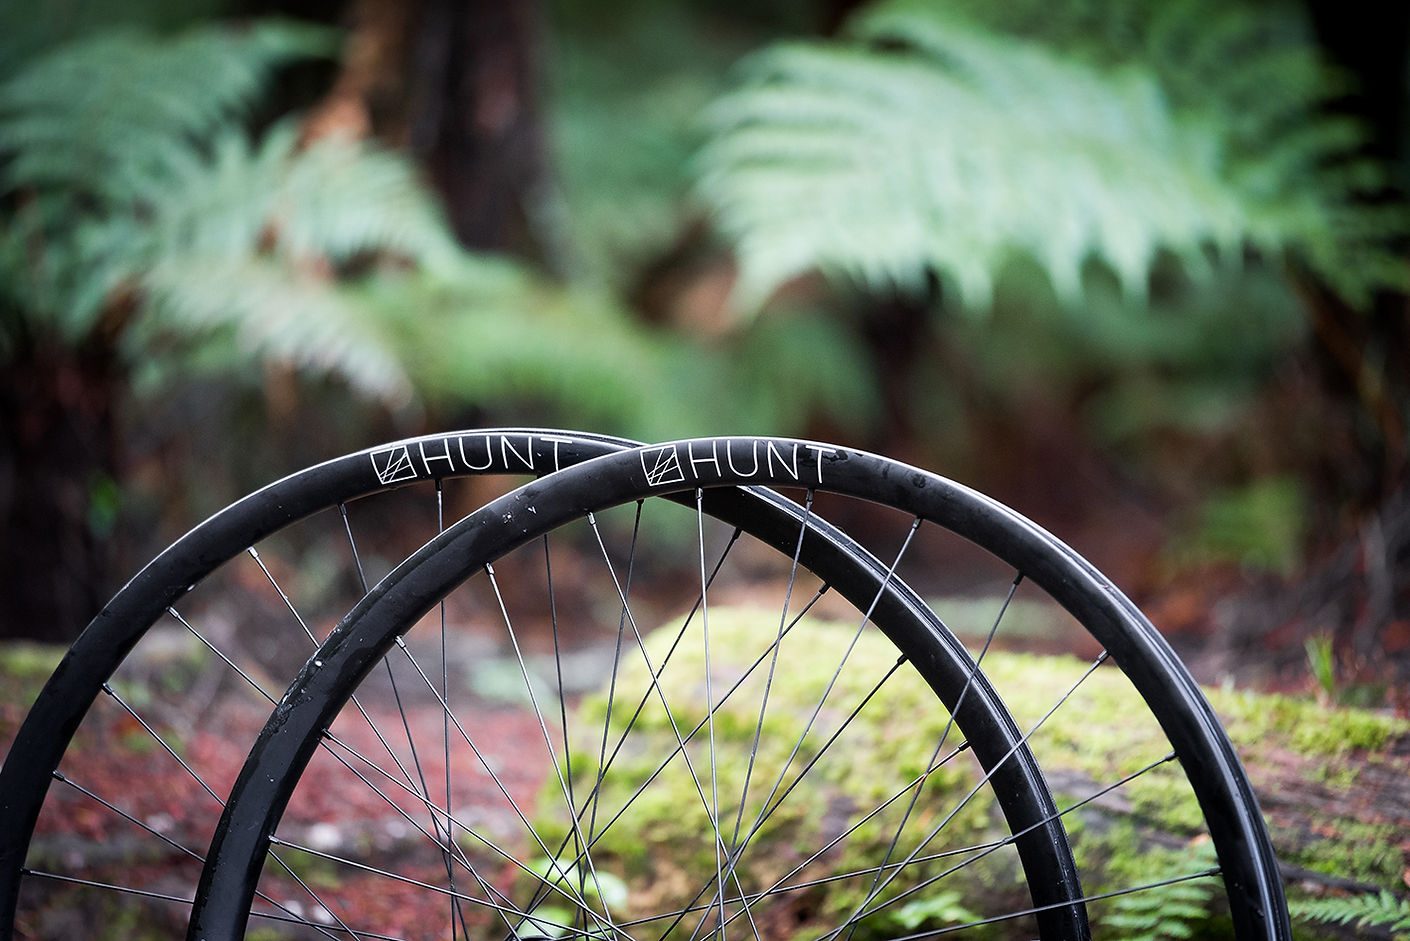
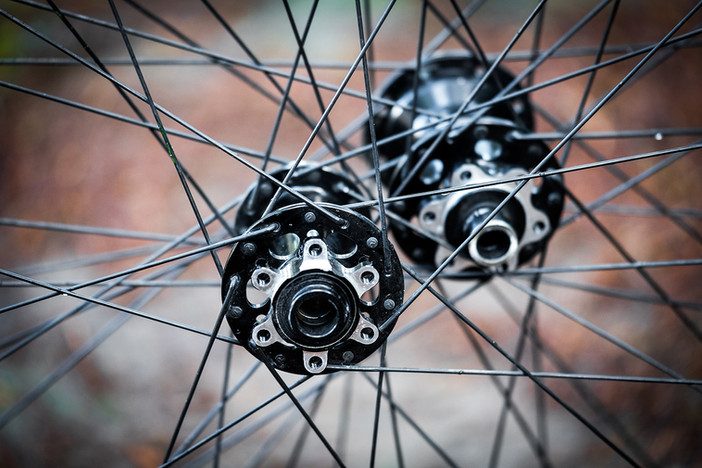
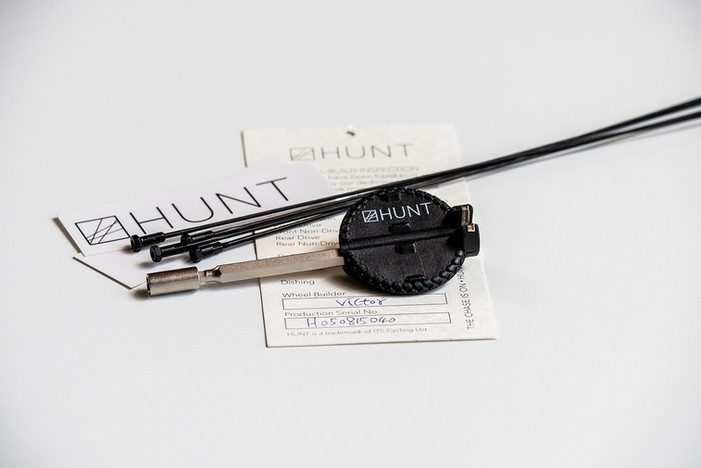
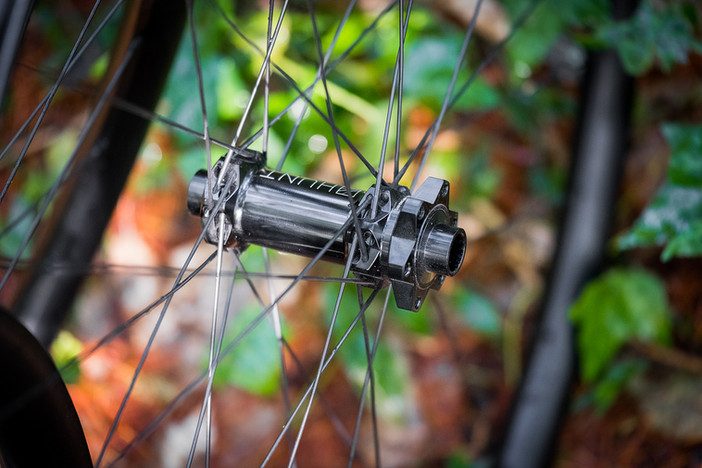
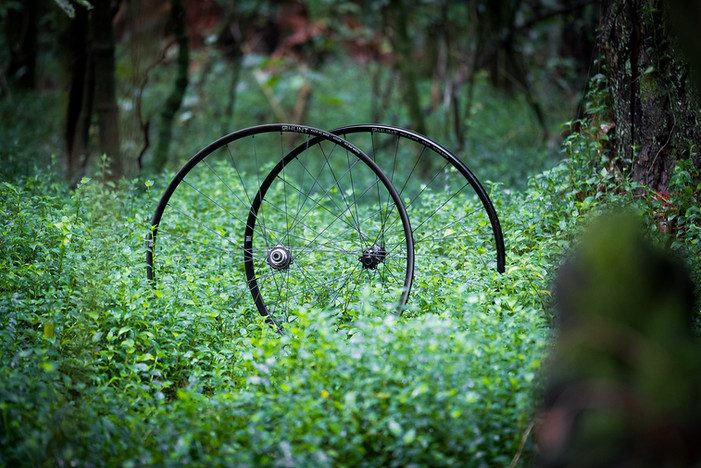
Review: Hunt Wheels
On the Hunt for stock wheel upgrades.
Apologies for the dad joke…. Usually the guide of ‘cheap/fast/good - pick two’ holds true. In the context of that saying, fast means speed of delivery, but in our mountain-biking world we take it to mean fast rolling. No-one seems to have told Hunt Wheels that their budget-minded offerings should make any sacrifice in order to hit price-points though. There’s no denying Hunt’s pricing structure is at the lower end of the range for aftermarket mountain bike wheelsets, but this is not a bad thing when the trade-offs with quality and performance are minimal - perhaps even non-existent.
This review is a little different in that we’re covering two styles of wheelsets - not in a direct head-to-head conflict style, but with the view that both products provide a budget-conscious offering for riders upgrading their stock wheels. The wheelsets in question are the alloy Hunt XC Wide, and the Hunt All Mountain Carbon. Although the XC wheelset is legitimately an option for riders who are all about the climbs (lightweight and relatively narrow by current standards) they’re an equally valid consideration for all-round trail riders who simply want to ride up, down, around and over all sorts of terrain, without a focus on pure climbing performance.
At face value, one wheelset is XC labeled – alloy and lightweight – while the other is trail oriented – carbon with a performance carbon design. What makes these worth speaking about together, really comes down to pricing. For a rider looking to upgrade their stock OEM wheelset of no-name, or house-brand rims and hubs, both these options are feasible considerations. Keep in mind, the XC Wide is only available in 29, while the carbon All Mountain is offered in both 29 and 27.5 guises.
Alloy - modest, but capable of embarrassing much fancier, more expensive offerings. First up, the alloy XC Race Wide wheelset. At $700 including shipping, these are available at a sharp price, largely due to Hunt’s online, direct-to-consumer model, which is increasingly common these days. When ordering online, you choose a SRAM XC, Shimano or Microspline driver. Your wheels arrive with tubeless rim tape and valves installed, along with the driver you specified. You’ll also get four spare spokes, of the correct length, for each wheel/side and a spoke key with inset tool specific to the wheelset. You’ll also receive a couple of stickers for your toolbox, your kid’s lunchbox or the neighbour’s letterbox.
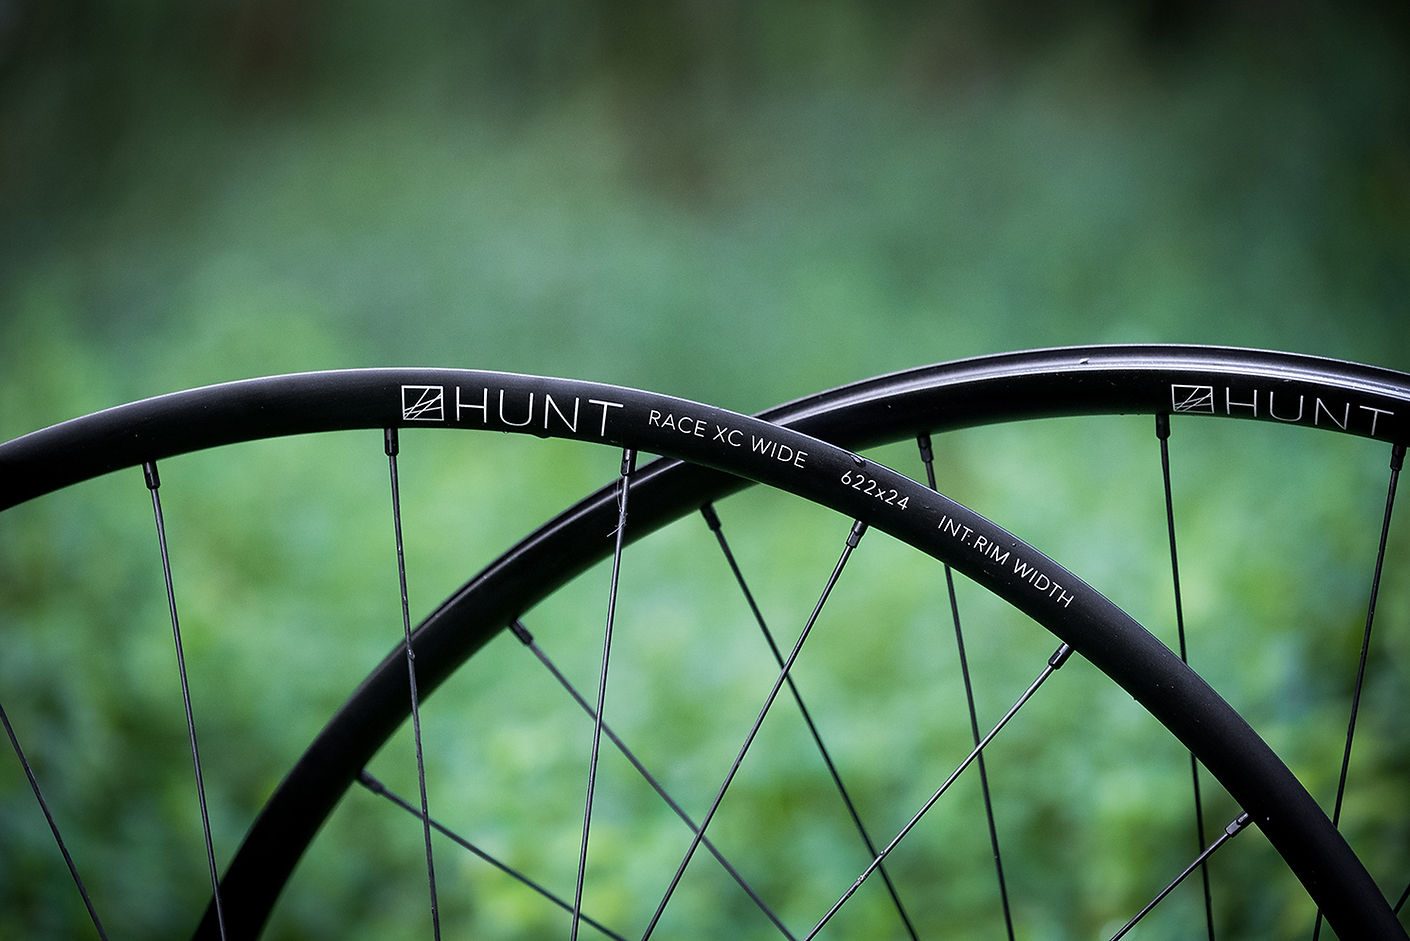
The XC Race Wides utilise 28h front and rear with straight pull spokes. Those spokes benefit by being weight saving, but the downside is that they’re a little tougher to true. Alloy nipples offer a weight saving over brass, but are not my personal favourite as they can eventually round off with repeated truing. These are hard-anodised though, so long-term truing shouldn’t involve too much swearing… hopefully. Their weight, with rim tape and driver mounted (but no valve or discs), is 820g for the rear and 780g for the front - giving a flat 1500g total for the 29er wheelset. That is only 17g off their claimed weight and remarkably lighter than competitors in the same price bracket. If the rider’s goal was to achieve a lighter wheelset than that, it would invariably mean going carbon, at quadruple the price - or more. These are on par with the lightest alloy wheelsets available. In-the-field testing show the wheels hold up reliably on a go-everywhere trail bike, but there are limitations to the nature of narrow, stiff alloy rims.
It is worth noting that the XC Wides use 6069-T6 heat-treated alloy, rather than 6061-T6 some competitors use. 6069 essentially claims to offer significantly greater tensile strength at 60+%. This results in Hunt using less material - and therefore less weight for comparable strength. With regard to rim width, a 2.3 trail tyre, inflated to the same pressure, is 68mm wide on the XC Wide’s 24mm I.D. rim, compared to the same tyres’ 70mm inflated width on a 28mm I.D. rim. There is a difference and it is noticeable, but it’s not night and day. Hunt recommend 2.1 to 2.35 tyres. I ran 2.0s and 2.4s because I like to push the boundaries of what I’m told to do. Somewhat predictably, I ended up running 2.3s which felt the most natural, given the rim’s width. Strike one for the rebel spirit. The mounting of all tubeless was painless, with a modest home garage floor-pump set up.
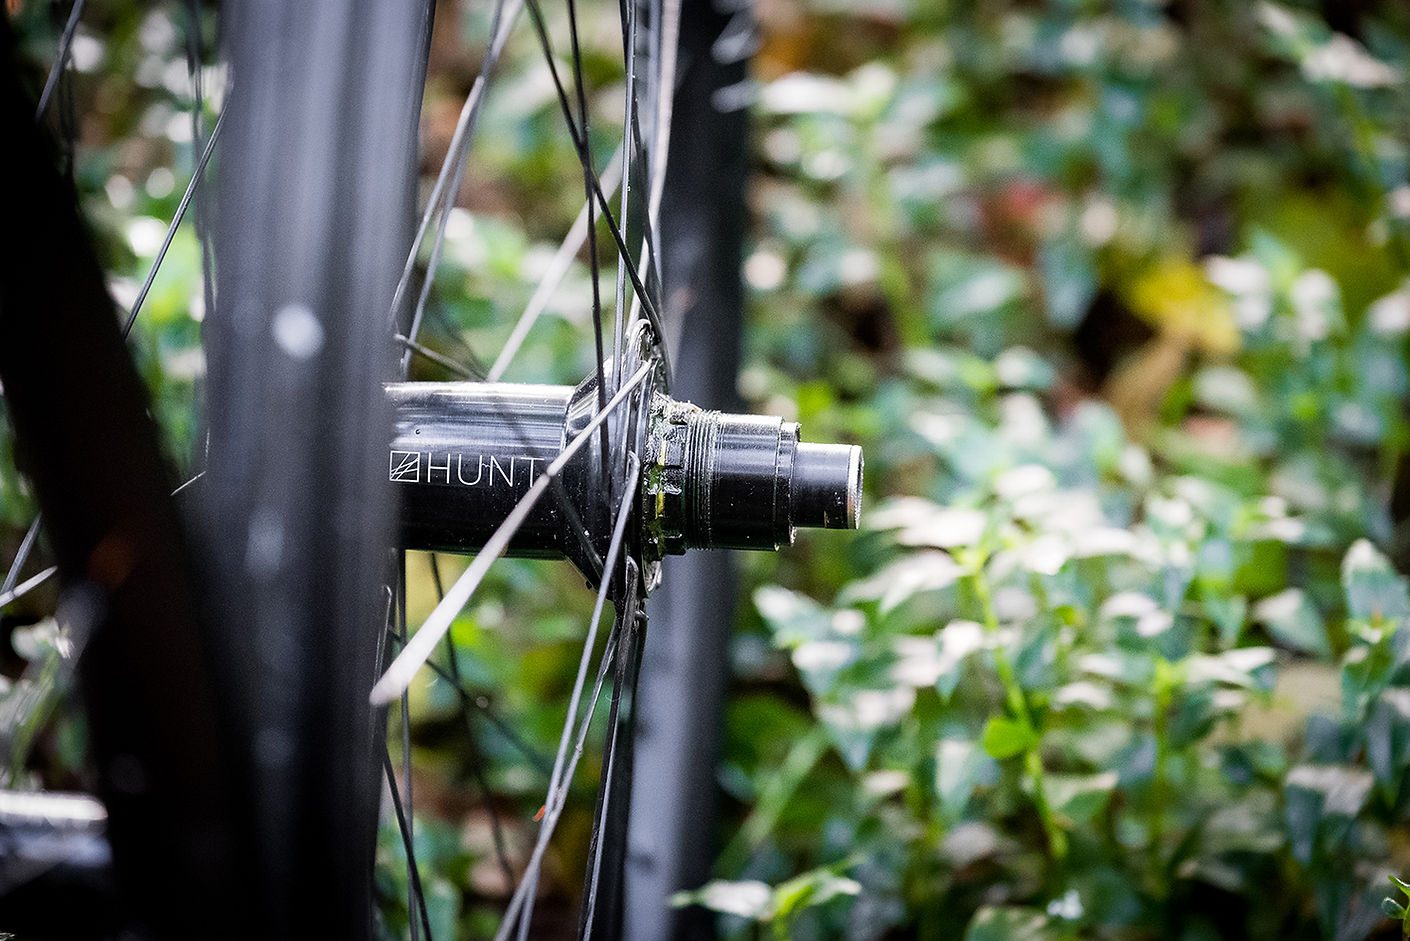
Hunt’s six pawl rear hub, with 72 engagement points, sounds appropriately refined when freewheeling.
In practice, the alloy XC Wides are fantastic - and average, and sub-par! Any review of a product is influenced by the point of reference - what the product is being compared with and measured against, as well as the rider’s intent on how it should be used. If pitching the XC Wides against competitors of far higher cost, of course they’re not quite going to measure up in performance. Likewise, measuring them against any quality carbon wheelset - as we’re about to do here with their trail carbon brethren - is an unbalanced comparison. But, compare them to stock wheels - that come equipped on otherwise capable trail bikes - and we’re talking real improvements, both in terms of weight, long-lasting quality and riding performance. It’s for this reason we’re showcasing the XC Wides as a valid trail bike option, not just a niche XC-racing only product.
It’s not all roses though. The nature of narrow-ish alloy wheels is relatively abrupt tyre profiles (comparing the same sized tyres on wider rims) leading to sudden release of traction when cornering aggressively, and harsher lateral ‘feel’ on choppy terrain. Those couple of millimetres that the Vernier calipers show in inflated tyre width, are negligible on paper but noticeable in use. The feel is difficult, if not impossible, to quantify - apart from relying on anecdotal feedback about how it feels compared to other wheelset options, on sections of trail I know like the back of my hand. They’re just a bit harsh, pinging off deflections of trail surface. It’s an incredibly fine line, but an observable one if you’ve experienced other options. This serves to segue into our feedback on the Hunt Carbon All Mountain wheelset.
Carbon - done right. This is maximum performance without extravagant brand packaging. The price of these is double that of Hunt’s alloy XC Wides. The performance, however, is not double, but is considerable. It’s a prime example of the benefit of diminishing returns. Improvements are evident, but not by the multiples of dollar value. For those who don’t demand the most performance - and its corresponding price-tag - or who value light weight with an emphasis on the benefits it offers, the XC Wides should be high on their list of considerations.
Back to the Carbons… for those with higher expectations of their wheels, and the budget to suit, the All Mountain Carbons have a lot to offer. Overall, the Hunt Carbons have the following characteristics (they’re pitched as ‘features’, but some of them are only features if they are important to you). POE (Points of Engagement) of the freewheel are a case in point. On one hand, the three-degree POE means you have minimal delay in the feeling of getting on the gas. Also, they make a high-tech buzzy sound without being ridiculously loud, like the swarm-of-wasps some of their premium brand competitors seem to be aiming for with their acoustics. It’s nice to have the instant-on kind of pickup, but not really a game changer for a general trail rider. If you’re riding very technical pedalling sections that benefit from trail-like pedalling responsiveness, then sure, it’s a feature. But that’s about 0.1% of the trail riders I’ve ever encountered. Like their alloy stablemates, tubeless tyres mount up easily with a reasonably tight fit in the Carbon rim’s channels. I’d far rather put in a little more effort getting the bead over the rim initially, with subsequently fast and easy inflation/mounting, than having tyres mount up easily then need finessing to fit correctly.
At around $1600 including shipping, they are way sharper priced than their big-name brand competitors. That is not at the expense of performance - I can categorically say their performance is high. My initial rides were as I always approach review items: completely cold, meaning I hadn’t sought out online reviews or any other feedback from my riding buddies or industry friends. Instead, I rode them purely with a blank slate, on trails I know well, to form impressions of their characteristics. I’m no Rainman, but I can tell a good product from a not-so-good one pretty quickly. Part of not being a Rainman, is being analytical enough to hopefully string together some coherent sentences to convey that intangible ‘feel’ – the way a product affects a ride experience.
Before the subjective ride impression, there were a few factors to consider: conventional ‘J’ spokes in a 32 spoke rear and 28 spoke front format are a little more user-friendly than straight-pulls for truing, in the long term. This isn’t a factor in the early years of a wheelset’s life, but for good quality wheels that stick around to see the comings and goings of multiple frames through a rider’s garage, simple details like this eventually become apparent. The weight of our review Carbons, with rim tape and driver in place but no valves or discs, comes in at 1120g for the rear and 820g for the front (1940g total) against the claimed 1878g. The weight of the rear reflects the heavier rear hub and more spokes, of course, but also the heavier rim layup - built for longevity. The weight of the front rim is not the primary thing of interest - that would be the way the front rim handles. Before covering the front though, the back is worth speaking about a little more. Well, kind of – it’s a bit boring. It’s simply rock solid. Our testing took it from varieties of rock-layered South Island trails to high speed, native bush single-tracks in the Central North Island - with their resident sniper roots ready to surprise any unsuspecting rider with a gut-wrenching thump at high speed, when least expected.

Apart from the 28 spoke front and 32 spoke front format, there is a great deal more going on with the rims. Hunt’s focus on purposeful front and rear specific wheel characteristics, is largely down to their rims. With both rims using carbon laid up specifically for their purpose, the rear is essentially stronger and stiffer. It doesn’t have any particular ‘feel’ when riding, apart from being solid when loading up the rear end on high-speed corner exits. It also offers a great deal of confidence with its ability to suck up the occasional case of coming up short on a double jump - or unexpected slam through a rock garden with a muted ‘thunk’ - rather than the dinner-bell ringing ‘gong’ that alloy rims offer.
The front is where the magic happens, though. Like a few of its prestigious high-dollar competitors, the Hunt’s front rim is lighter, with a lower material density lay-up. It sounds like a real estate agent wrote the marketing copy when brands start talking about improved compliance and better grip due to a rim/wheel. Obviously the tyre has a massive influence on those features, but I couldn’t honestly say I felt any particular difference in front wheel/rim flex, or compliance, when riding these wheels. What I can say, is the front end feels more forgiving. Not necessarily a marked difference in the feeling of grip, but definitely the feeling of having a fraction more control over where the front end is pointing and tracking. It’s especially noticeable at the edges of rider ability - the feeling of being able to point-and-shoot, almost like time slowing slightly so that you’re in complete control of where you’re aiming, even while you’re riding at the razor edge of your ability. That’s the primary reason why these wheels punch well above their weight, given the price-point they’re offered at. Sure, the POE and quality hubs are great, and the lifetime crash replacement for the first owner is awesome, but it’s that front rim with the corresponding wheel-building format, with spokes/lacing specific to front and rear, that lifts them to another level. As said before; the difference is not night and day, but is noticeable nonetheless, especially when pushing the boundaries.
As a final detail, they’re available with oil slick spoke colours at a premium price. Pretty, but with no performance impact. If this kind of thing floats your boat - choice, go for it. There is nothing wrong with paying a little more to make your bike look how you want it to.
Overall
If your focus is grounded on bang-for-your-buck and how wheels can change your bike for the better, either set of Hunts are a solid contender for anyone upgrading from stock wheels. Depending on the value of your bike, and your intentions, either could be a smart way to spend money on improving the quality and durability of your bike’s performance. Of course, the carbons are better - get them if you can afford them, and your riding will take advantage of them - but don’t discount the XC Race Wides. For the money, they’re a viable upgrade for many riders. Hunt have managed to hit the fabled three - which shouldn’t be possible - with ‘cheap, fast and good’ being an apt description for these offerings.
Distributor: Hunt Wheels
Words and Images: Nick Lambert

Review: 100% Airmatic Pants
100% has always been a brand heavily correlated to American motocross racing, producing top of the line apparel, products and racing equipment for riders on the track. Over the past few years, 100% have expanded their range to incorporate products for everyday mountain bikers, like myself. The new Airmatic pant is a welcome addition to their ever-expanding array of mountain biking product. This pant has you covered through any conditions the trail wants to throw at you. 100% have combined the fitment of their popular R-Core-X pant with the 4-way stretch material and the reliable, mountaineering buckle system featured on the Airmatic Short. This new Airmatic pant promises to deliver warmth, flexibility, ventilation and most importantly comfort.
Personally, I’ve found it challenging to find the perfect pair of riding shorts that are comfortable and also flattering. I’d never considered riding pants to be an option, as I have always opted for the classic short and knee pad combo. However, the 100% Airmatic pants have been a total game-changer. With a tapered leg cut, a hassle-free adjustable belt latch and two zippered pockets on each side, the pants are my new go-to for trail riding. Both side pockets were large enough to fit my phone, with an inner mesh pocket to hold your phone in place when riding, barely noticing the phone when pedalling. Bonus!
Made of four-way stretch material, the pants are lightweight, pliant and have proven to be incredibly comfortable and pedal-friendly. At first ride, I was sceptical of how lightweight the pants were and whether they would be prone to ripping, however, they proved to be super durable having survived a couple of crash tests without tearing, proving the fabric to be tough and reliable.
The Airmatic pants play well with knee pads, fitting under the pants comfortably, whilst still offering the right amount of stretch without feeling restricted in your movements. However, I found that there wasn’t an awful amount of stretch or adjustment in the waistband, as the pants don’t have adjustable velcro on the sides as most riding shorts and pants have. This just means that you must buy the pants true to size.


Overall, the 100% Airmatic pants are functional and fitting. The tapered cut of the pants keeps cuffs out of drivetrains whilst earning major points in the style department. They up my swagger game when I’m rocking them, well at least that’s what I think?! And, I’ve found them to be a comfortable and fly-looking pair of pants off the bike too whilst doing repairs on my bike or grabbing a craft beer at the local bar. The Airmatic pants are definitely good all-rounder pants, rain or shine and have so far, kept the chill off the autumn Wellington wind.
Distributor: FE Sports
Words: Khulan Tumen
Images: Caleb Smith
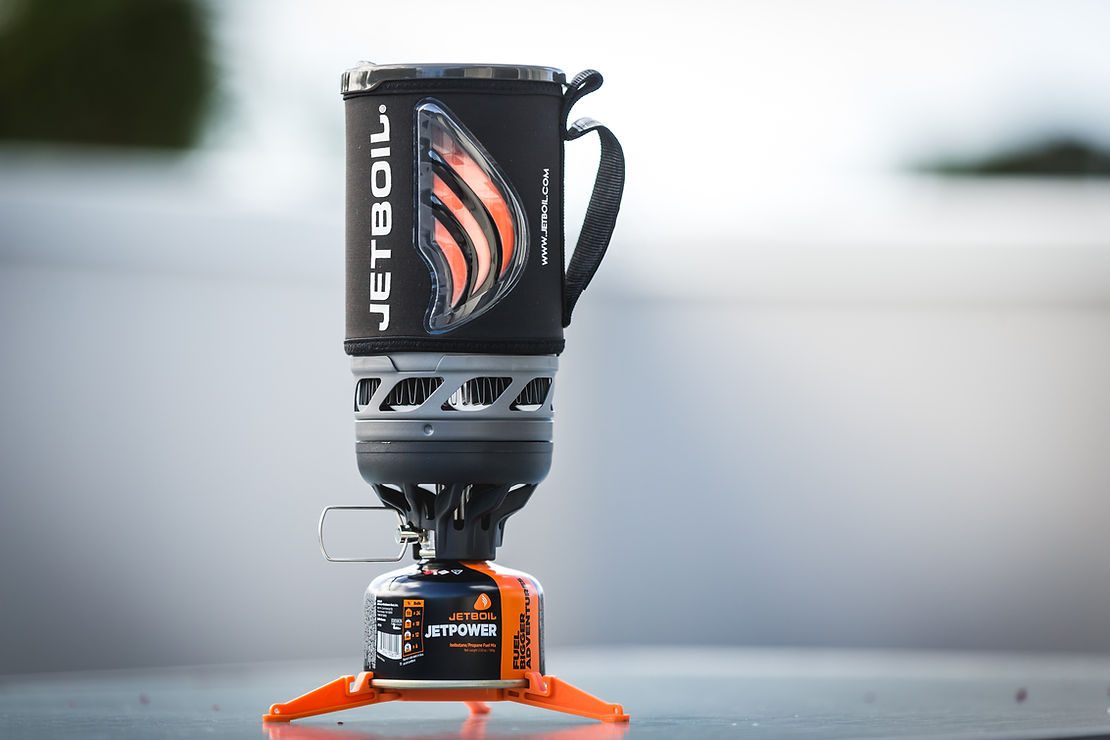
Review: Jetboil Flash
I always saw a Jetboil as a ‘nice to have’, never a necessity. Nothing was wrong with my tried and true billy and cooker - hell, it even had character - but when I saw my mate pull a Jetboil out of his pack on a recent adventure, ‘nice to have’ became need. The Jetboil completely rethinks how a camp cooker works. It still utilises the same gas canister and burner arrangement, but features new tech in the bottom of the pot, using FluxRing – which has a similar appearance to honeycomb - to create more surface area, allowing for much more heat dissipation. In turn, this equals lightning-fast boiling and greater heat control.
I’ll admit, I thought the whole concept was a little gimmicky at first, but upon using the Flash for the first time myself, I quickly understood what it was all about. Using the Jetboil is straightforward, and it’s clear the integration and usability has been well thought out. The whole unit; gas canister, stand, burner and cup, all pack inside the main flask for easy transportation. Say goodbye to wet matches or a broken lighter, because this burner has push-button ignition.
Using the Jetboil
Using the Jetboil is straightforward. After you’ve got the hang of the setup and breakdown process, using it in the field is simple. The base assembles easily by threading the burner and gas canister together then clipping the stand on - make sure you do this in a well ventilated area as it does hiss a little bit of gas. The flask and burner slide together and create a secure fitting which leaves you feeling assured that no matter how delirious you are after your day’s effort, you won’t knock two cups of boiling water over yourself without trying really hard.
It will surprise you how quickly it brings water to the boil, but the neoprene sleeve on the flask has a brilliant, built-in temperature gauge that ascends in an orange color to show you how close to boiling it is. My suggestion is to leave the vented lid on while bringing ingredients to the boil, as it can spill over very quickly and make turning the heat down very difficult. I learnt that out the hard way...
Is it worth the money and is it right for me?
If all you’re only eating freeze-dried meals or drinking hot beverages while out in remote areas, then this is all you need. If you’re looking to cook or fry food, then the addition of their traditional pot holder and a conventional pot/billy would be better suited. Either way, the Jetboil flash system is all I will be taking with me from now on, for speed, portability and ease of use.
Words & Image: Cameron Mackenzie
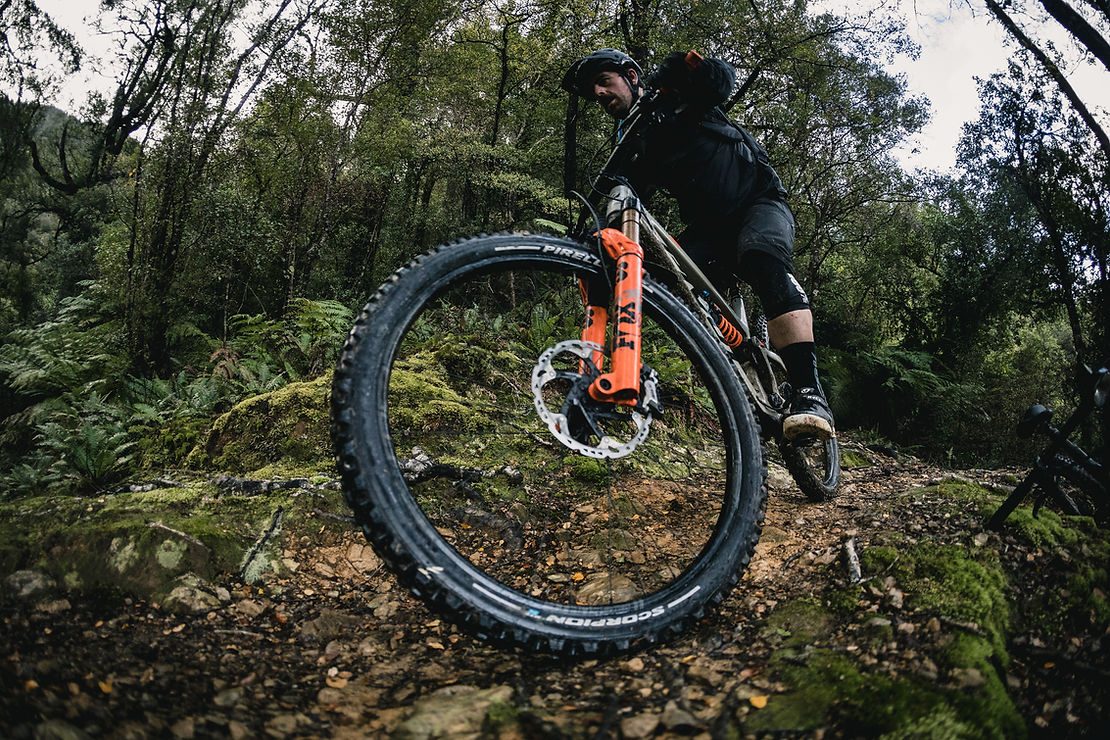
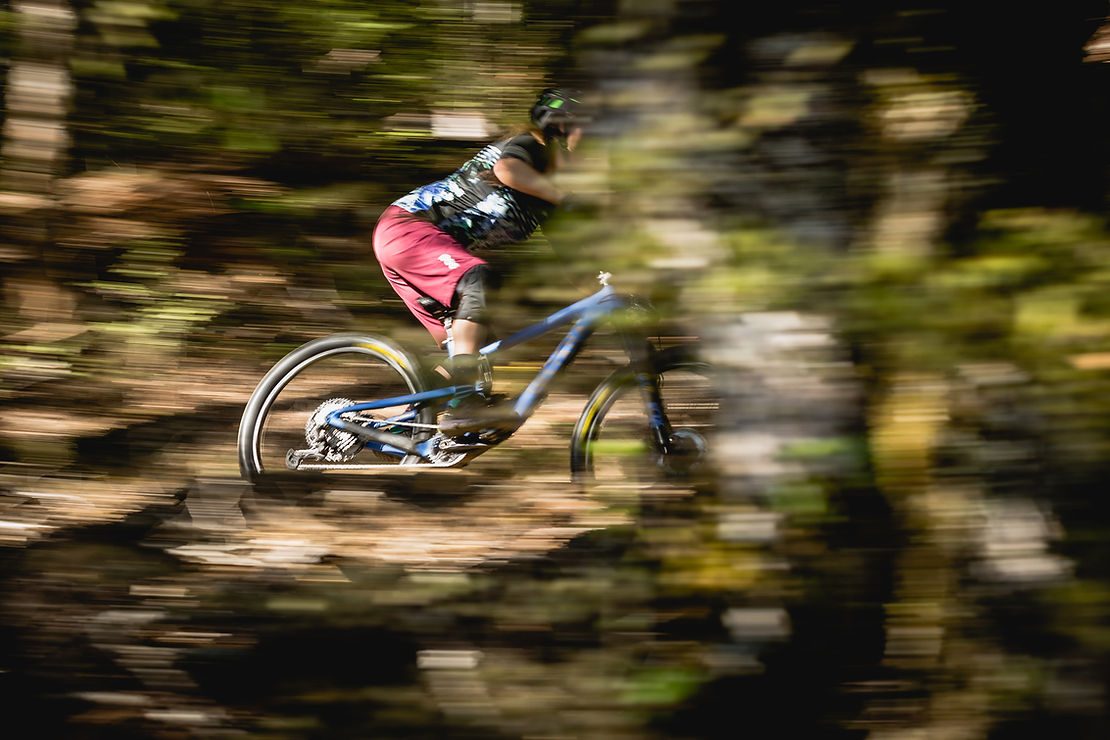
Review: Pirelli Scorpion Tyres
Read Part 1 here.
I was happily surprised with the way the Pirellis handled things. The front end didn’t flinch, the bike heading straight where I pointed it. Any deviation was my fault. By halfway down I was feeling pretty confident, and the biggest root tangle was successfully navigated, delivering me to the small shelf I was hoping to get to, avoiding a slither into the quagmire that is the low-line on the trail. I ducked out of the trail and headed back up the hill, to take a run through the glorious Tuhoto Ariki, three kilometres or so of similar country, with a decent climb in the middle. The climb has a few sections that require your rubber to provide a firm grasp of the planet. Once again, no worries at all. I couldn’t get the rear tyre to let go. Near the end of the ride, I took a detour to an old section of trail that climbs steeply up a 50-metre straight. It would be an eye-watering climb without the tangle of pine tree roots that crisscross the surface. They are at a variety of angles, and feature a variety of height above the dirt - if I am fresh and feeling my oats I can get to the top about eight times out of ten, but that’s when it’s dry. I have to approach it in a series of tacks, slowing almost to a standstill between tricky bits to avoid passing out. How did we go? Very well, thank you. Once again, the front end was sure footed and the rear tyre provided drive with zero slippage.
Within 24 hours the trails were gold. Dry trails in a Whakarewarewa winter are about as good as dirt gets. I expected the wide open spacing of the front tread to be a liability but was actually amazed by the grip. I am not the fastest thing in the woods by any stretch, but it is all relative and at my version of warp speed the Pirellis were very impressive. I had dropped the pressure a little more, to around 17psi on the digital gauge, and that is where the tyres really started to shine.
The Trail tyre range has a beefy sidewall reinforcement to prevent the tyres from changing their shape as they are tipped over. The round profile gives a firm grip even when leaning hard, and a turn delivers a pleasant buzz of rubber grappling with the surface.

For the final round of testing, we were lucky enough to be able to evaluate a 27.5 X 2.6 set of Pirellis on a different bike, this time an Ibis Mojo 4, and on foreign country, three days in the Marlborough Sounds. Over the next three days we rode on just about every conceivable surface: the Queen Charlotte Track has loose rock, hardpacked clay (both dry and wet), mud, regular dirt, and grass. The trails to Nydia Bay and beyond featured rock, big lumps of loose rock, smaller lumps of same, the muscular wild cousins of the tame roots we have up north, and all manner of dirt - as well as hefty helping of pine needle carpet for dessert. If you want a long weekend to test tyres, you will struggle to find a better venue.
I went directly to a low pressure setting, and pretty much stopped thinking about tyres. Complete confidence was achieved on the first climb (loose, fairly small bits of rock) and subsequent descent (similar, with some hard packed clay and junior roots).
We had mercifully trouble-free rides, I had one crash which had nothing whatsoever to do with the tyres, and no flats on trail that must have claimed some scalps. If you are looking for burly tyres that do their job with minimal fuss, give the Pirelli Scorpions a go.
Pirelli Store Locater is here
Words: Gary Sullivan
Images: Cameron Mackenzie
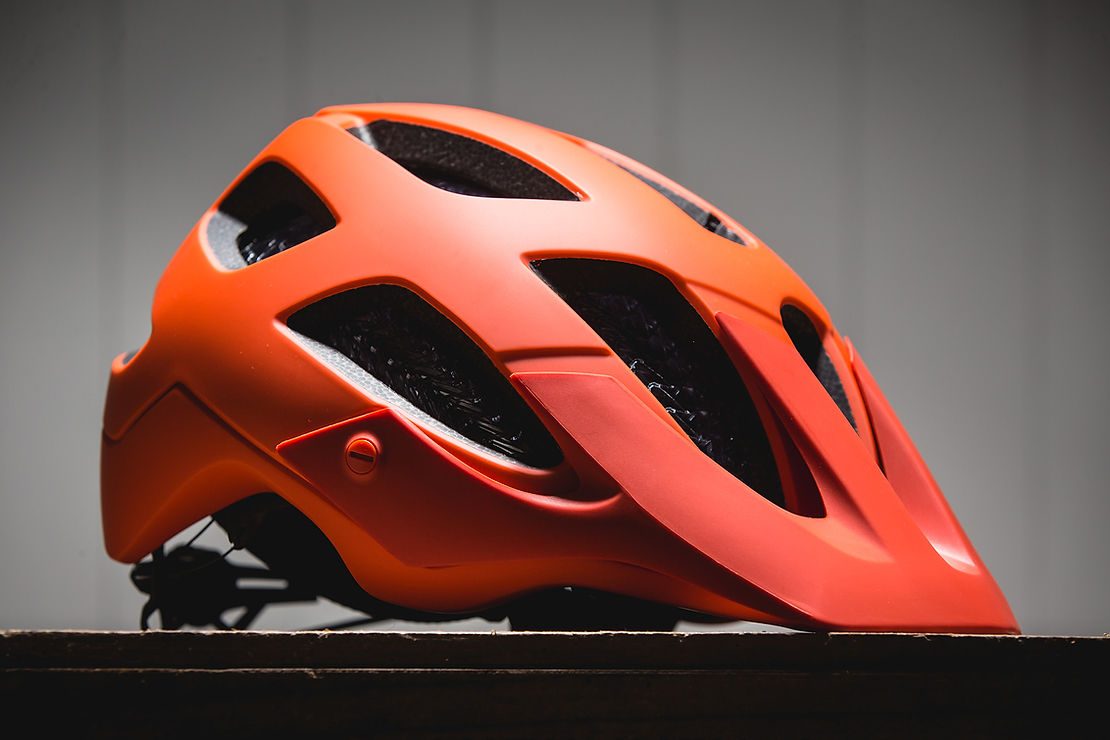
Review: Bontrager Blaze WaveCel Helmet
Let’s face facts: helmets are intended for safety. Yes, there are all kinds of other benefits and style factors, but ultimately, they’re built to protect your noggin. For the past few years, head safety and brain protection has been a big topic - not only in the MTB scene, but across the board in most action and impact sports. The major point of discussion is concussion. Bontrager has captured some attention recently with the launch of its new line of WaveCel helmets, which is said to majorly prevent concussions. This is the company’s take on MIPS technology (which is the protection system seen in other helmets). The new WaveCel helmets rely on a semi-flexible mesh structure for shock absorption. WaveCel technology, specifically developed by Bontrager, is a collapsible cellular material which works to shear, dent and crumple in response to angled impacts. Bontrager says their new product deals with both angular and linear impacts, without the need of an additional liner. Now, whatever the protection, I’m all for brands working on safety features, especially where the head is concerned - after all, you only get one, so it pays to look after it!
The Blaze is made for trail and enduro riders and has a few nifty features to accompany the most important feature: WaveCel. The lid has a Boa dial to adjust the cradle and a clever magnetic Fidlock fastener under the chip. Whilst I state the Fidlock is a clever feature, it does take a few goes to get it. This is simply down to it not being the same as most other helmets on the market,however, it’s really good once you’ve got it sorted. Other features include: a magnetic mount system compatible with the brands’ own lights; GoPros; a three-position adjustable peak; a ledge for goggle strap placement; and fully adjustable chip straps. Another good addition is the spare set of pads with a silicone strip on the forehead section. This means you can choose between the regular pads and these ones that aim to channel sweat away from the eyes - great if you sweat a lot or are riding in summer.
On the trails, the lid feels good. The fit is excellent - comfortable, with no pressure points even after a few hours rolling around the trails of Taranaki’s Lake Mangamahoe. The strap design is dialled and there’s no unwelcome flapping in the wind. The boa dial is easy to adjust when pedalling the trails. The rear coverage offered me the protection I needed in case I ‘sent it’ (or tried to send it) on the flow trails. I particularly liked the adjustable visor - sometimes I have found these to get in the way of my vision, but having the ability to click the visor into a higher position allowed me to easily see my way down the trails. On the recent rides I’ve done, it seems to vent well, but of course, I haven’t been testing the lid in the height of summer.
It should be noted: the new lids are at the higher end of the price scale but what’s the price of head protection?! These lids have a crash replacement policy - Bontrager will replace (for free) any crash-damaged WaveCel helmet up to one year after purchase. Lastly, the WaveCel is not a multi-impact system. Like a standard foam bicycle helmet, you need to replace it after any impact, or if any of the material is deformed, crushed or cracked.
Words: Liam Friary
Image: Cameron Mackenzie
Review: Giro Roust Jersey
I thought writing my C.V was hard, but to write a review for all our readers…. the pressure was on.
And by pressure, I mean the always-efficient production team had a lapse and were not-so-efficient, throwing me my first ever written piece a few hours before the print deadline. Nothing like a deadline to boost efficiency though, right? One thing I have learnt, working within this small team, is that everyone does a little bit of everything, so getting stuck into your first ever review (that will be read by thousands!) should be no different.
The first thing I knew - and loved - about this Giro Roust Jersey, was that Giro had jumped on the rotating wheel of environmentally friendly, low impact products and created their Renew Series, which this jersey is a part of. The Renew series is a clothing line made with recycled polyester, elastane and nylon, including Econyl and Lycra made from reclaimed fishing nets. Yes, it’s a bit of a cliché, but if you wanna keep riding your trails, it starts with these small yet effective changes.
What jumps out at me whilst wearing the jersey is the slight fitted shape of it, even though it’s supposed to be more of a loose, relaxed style. It wears as a somewhat fitted cut but for me personally, this is not a bad thing. Women’s bike jerseys need to stay away from the dreaded boxy style, so it’s good to see the Roust’s sides are pinched in ever so slightly to give a bit of shape, but still provide room everywhere else. It doesn’t feel tight around the areas where the importance of movement is needed. I ride with and without a hydration pack, and found the longer length at the back provided good cover and didn’t have the tendency to bunch, catch on things or ride up my back.
The Roust jersey is lightweight and suited for warmer season riding. Light fabric, mesh panelling on the sides and the breathable, moisture-wicking fabric does a good job in keeping you cool and not so sweaty. The lens cleaner on the inside is handy for wiping away all the grit and grime, especially if you are someone who makes a splash going through some of those wet areas.
For reference, the Roust jersey I wore was the Blue Marble colour and short sleeved but it also comes in three other designs; they are trendy, but not as loud as your mum’s ‘telling off’ voice. With lots of ride time in the Roust jersey, the colours have held well, the fabric has kept its shape and, more importantly, it has not taken on odours from all of the hard slogging.
Words: Helen Mowry
Images: Cameron Mackenzie

Review: Granite Stash Steerer Tool
OneUp Components pioneered the world of steerer tube tools. In fact, their EDC tool took the mountain biking world by storm when it was released. The OneUp tool requires threading your steerer tube, which can void your fork’s warranty, although you can now also purchase OneUp’s EDC Stem which negates this. If you don’t want to splash out on a stem and multi-tool, but still wanna stash tools inside your steerer, Granite Design’s Stash Tool may just be the ticket.
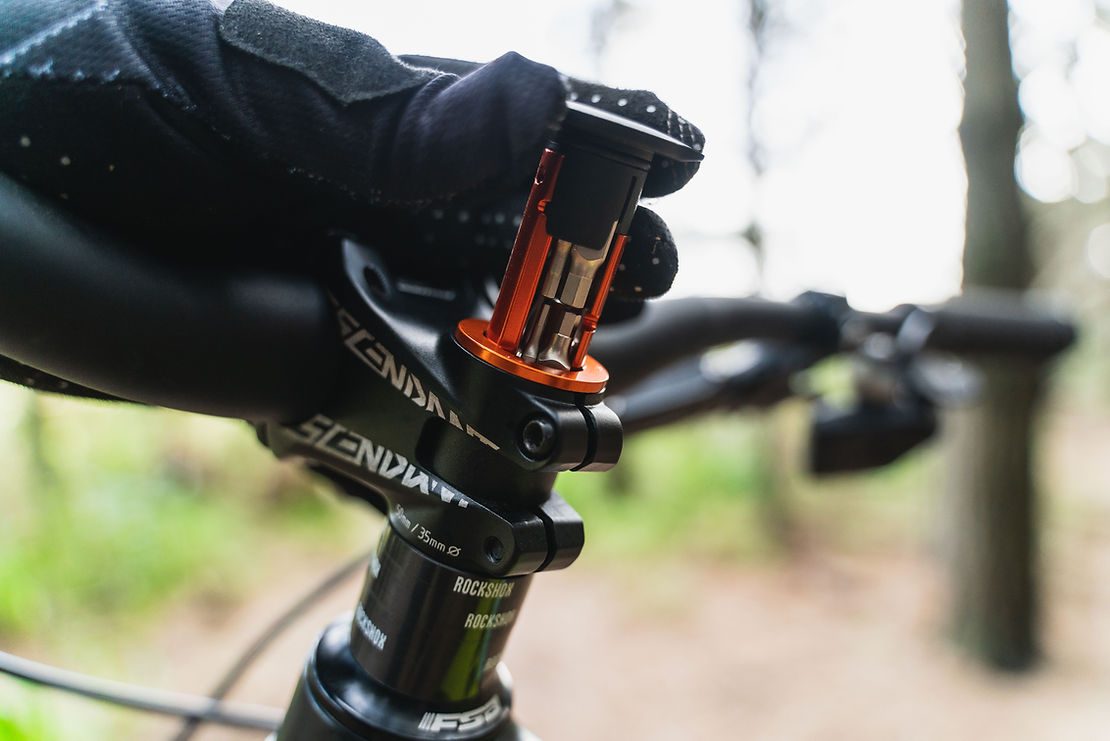
The Stash Tool mounts cleverly inside your steerer, without the need for threading your steerer tube. Instead, the Stash includes two pieces, a tool housing and a threaded plug, that go inside your steerer tube and thread together via a bolt. Remove your existing star nut (or simply don’t install it if it’s a new fork), install the tool housing in the top of your fork not steerer – making sure it’s either sitting on a headset spacer or the top of your stem – and then drop the included bolt down your tool housing and pinch it up ‘til your headset is secure and there’s no play. Drop the multi-tool into the tool housing, press it in and you’re good to go.
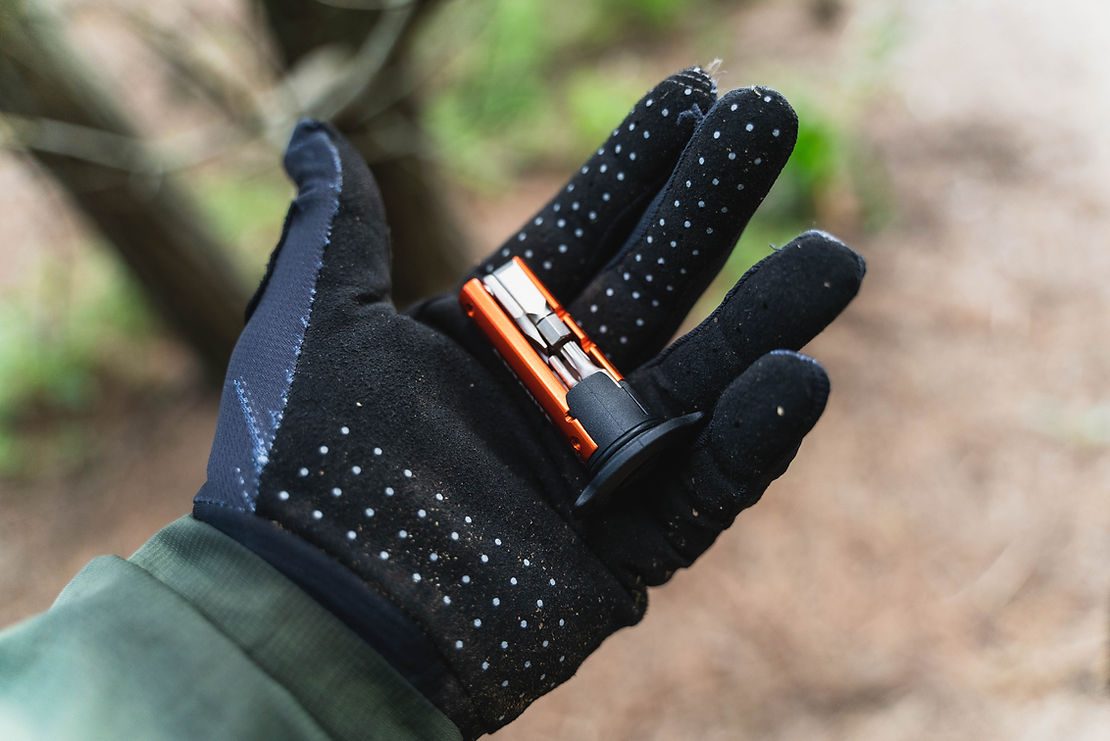
The multi-tool itself consists of a 2mm, 2.5mm, 3mm, 4mm, 5mm and 6mm hex key, along with a flat-blade screwdriver and a T25 Torx key. The tool also includes a 0, 1, 2, 3 and 4 size spoke key, that can remove valve cores. The tools are well made, durable, and all fit their corresponding snuggly without risk of damaging the heads. If orange isn’t your vibe, the tool is also offered in black.
I’ve already made the comparison to the EDC tool, and no doubt that’s what you’ll be comparing the Stash to as well. As far as quality goes, both are much-of-a-muchness, but when it comes to usage I’d say the EDC has a slight edge, with a little bit more leverage and a bit more reach on each tool. In practice, this doesn’t make a huge difference, but for that odd bolt that’s seized, or perhaps a recessed derailleur bolt, this could make a difference out on the trails. The Stash wins points back on ease of installation, considering there is no threading, and the fact that you don’t have to worry about warranty issues. It also comes in at a cheaper price, when you consider that with the EDC tool you’ll either have to buy the tap for your steerer (if you don’t have a buddy with one), pay a bike shop to tap your steerer for you, or fork out additional money for the EDC stem.
The Granite Design Stash is a great way to carry tools out on the trail, especially when combined with the Stash Chain Tool (also reviewed in this issue) and the Stash Tyre Plug kit. Installation is trouble-free and I haven’t had the headset loosen once. The tool stashes away securely and doesn’t rattle loose. All in all, a set-and-forget experience.
Words & Images: Cam Baker