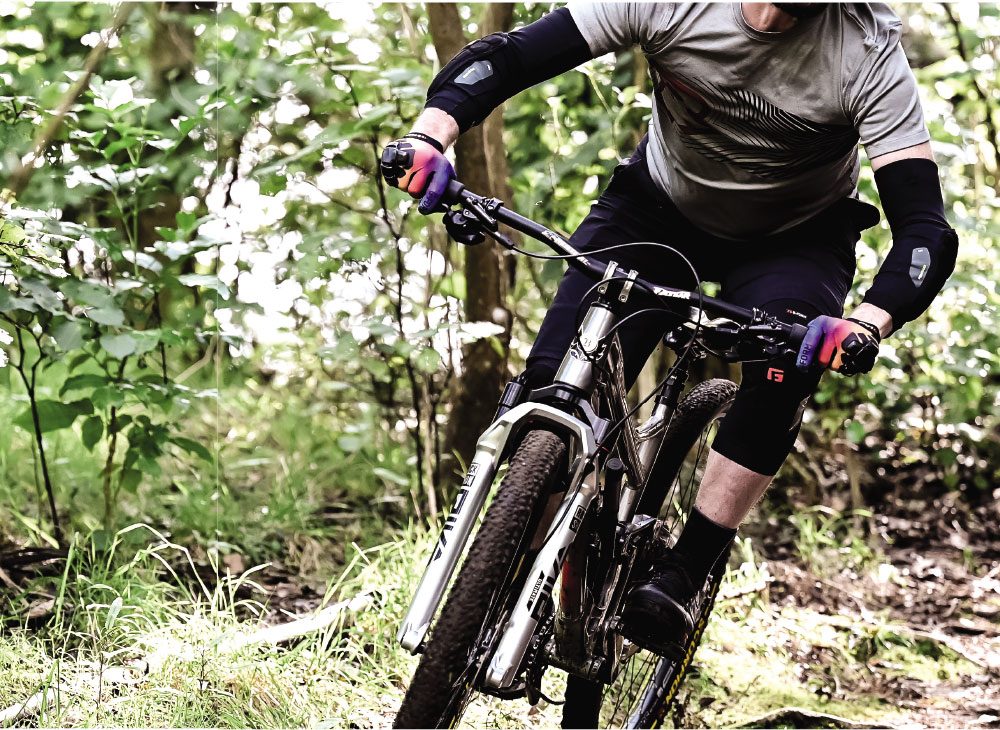
Bike Review: Norco Fluid FS A1
WORDS: GAZ SULLIVAN
PHOTOGRAPHY: SAVANNA GUET
DISTRIBUTOR: ADVANCE TRADERS
RRP: $5,599

“The Norco Fluid FS A1 was something of a revelation.”
I was looking forward to getting on the bike. Some mates in Australia had almost convinced me to get a Norco a few years back and, while I didn’t follow their advice, I was curious to find out what they were on about – and what I was missing out on.
I spent a month and a half on it – riding every other day, trying to figure out what made it feel so good.
As a representative of today’s mid-price mountain bike, it is a great example. Whether you think a hair over five and a half grand is mid-priced depends on a lot of things, but in a world of five figure builds, some of which start with a two, it seems pretty economical.
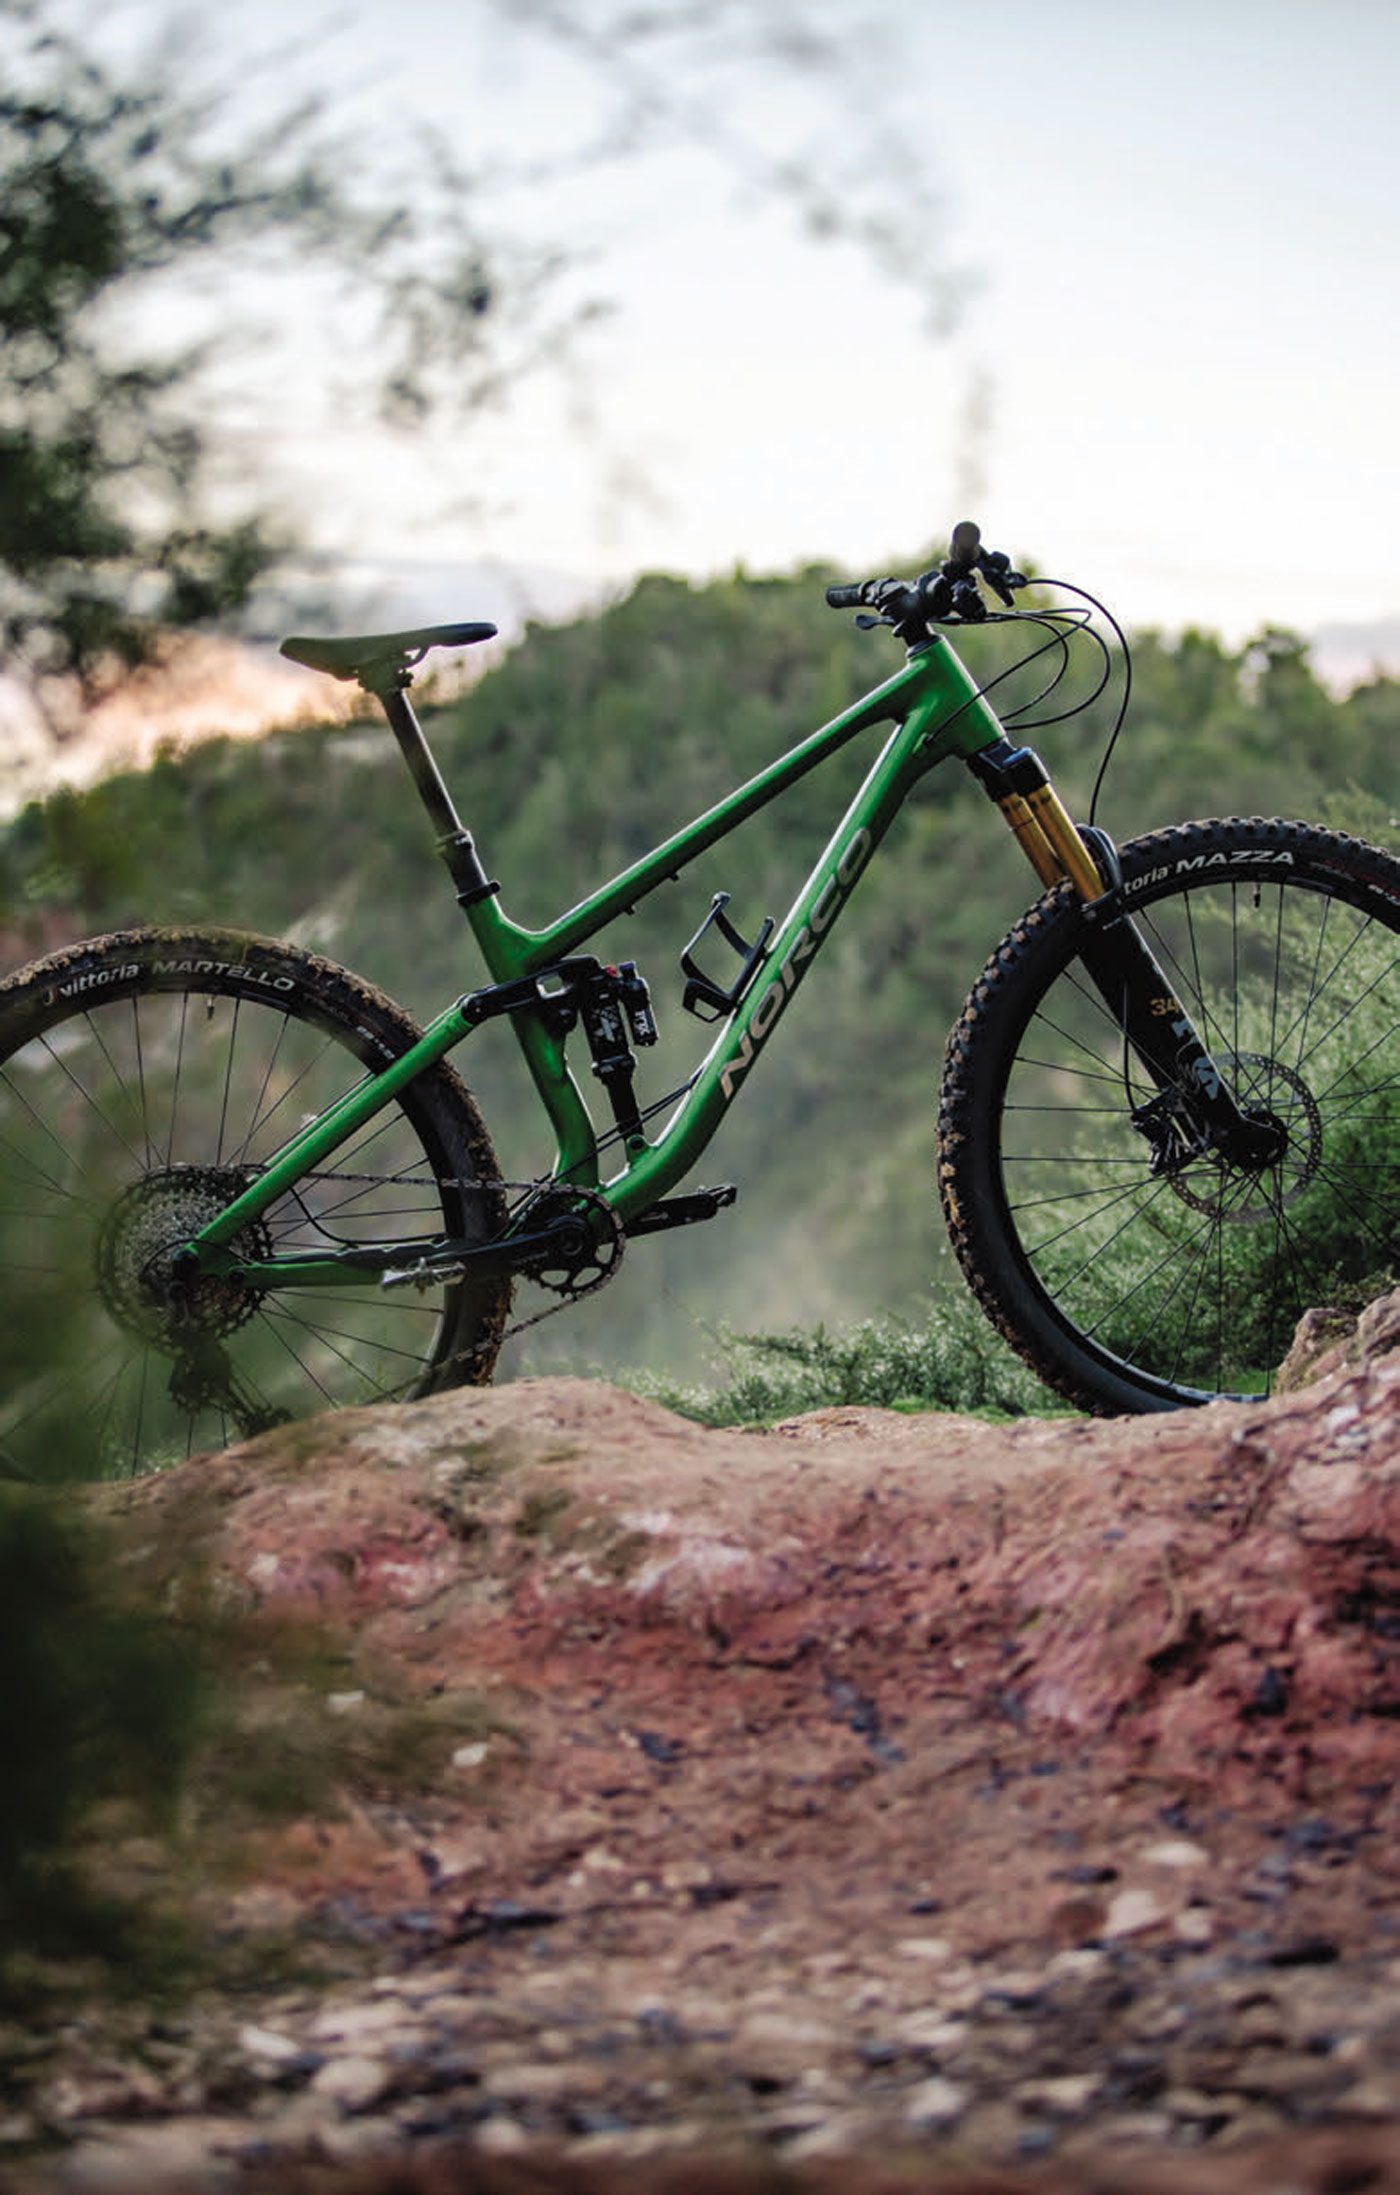
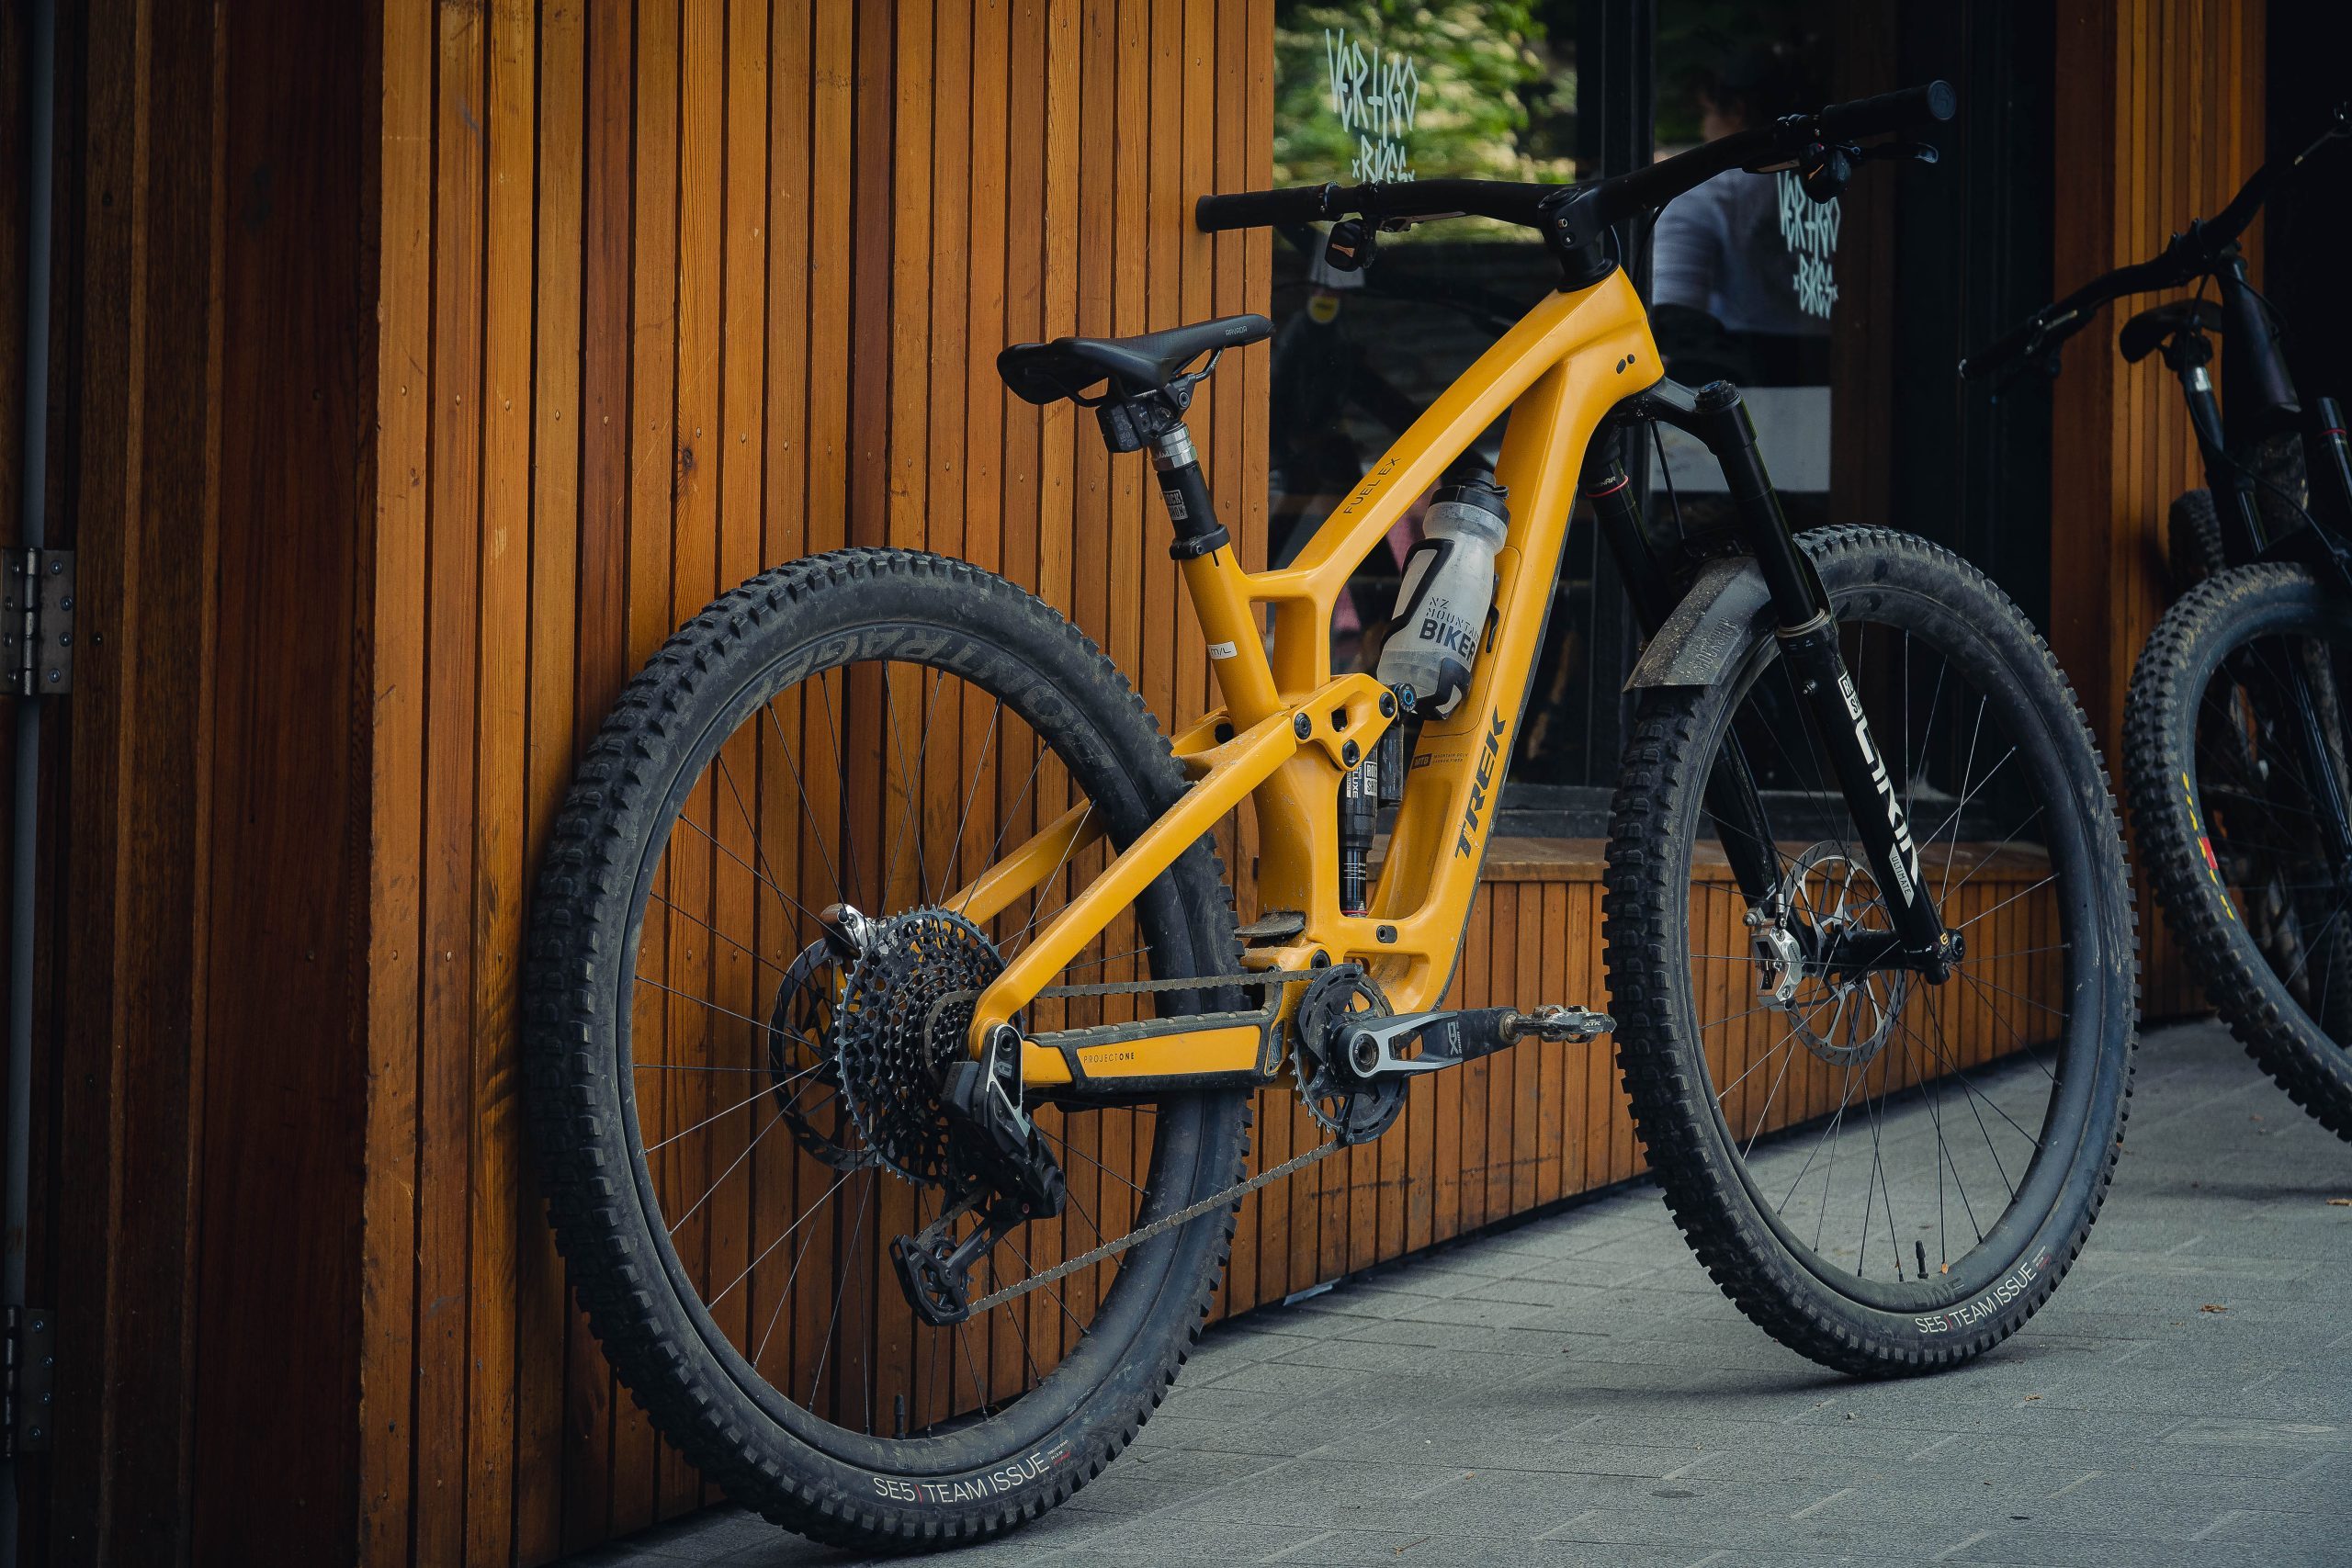
The first thing that needs saying is how good the bike looks. Obviously subjective, but a sparkly green paint job with chrome stickers does it for me.
It’s a very nice piece of design and execution. Subtly formed tubes, seamless junctions, and that lustrous paint job look really great.
The rear end finish is industrial by contrast – no effort has been made to smooth out the welds. Again, personal opinion, but I like that.
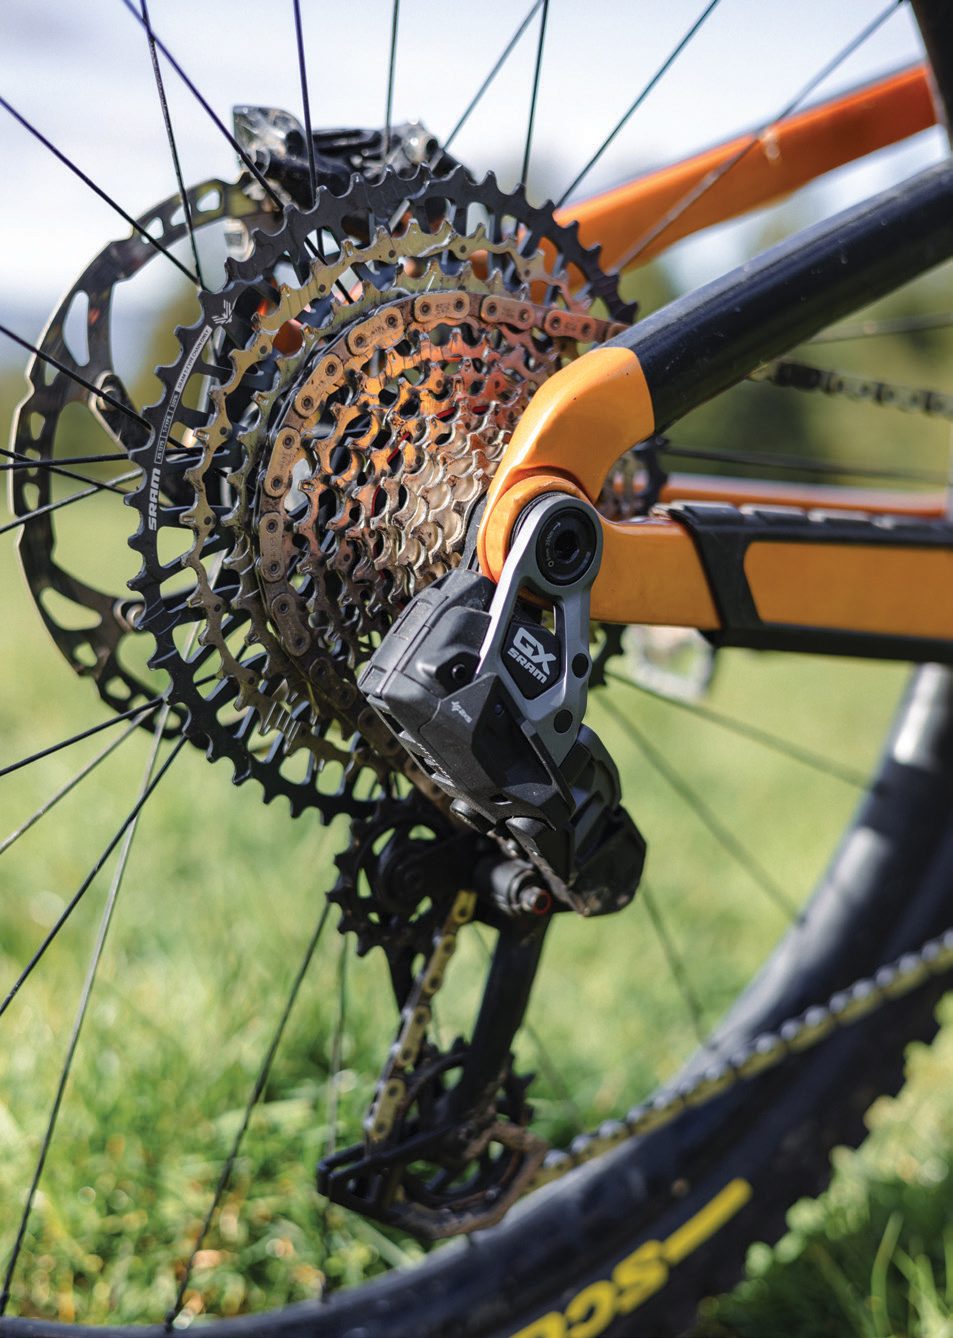
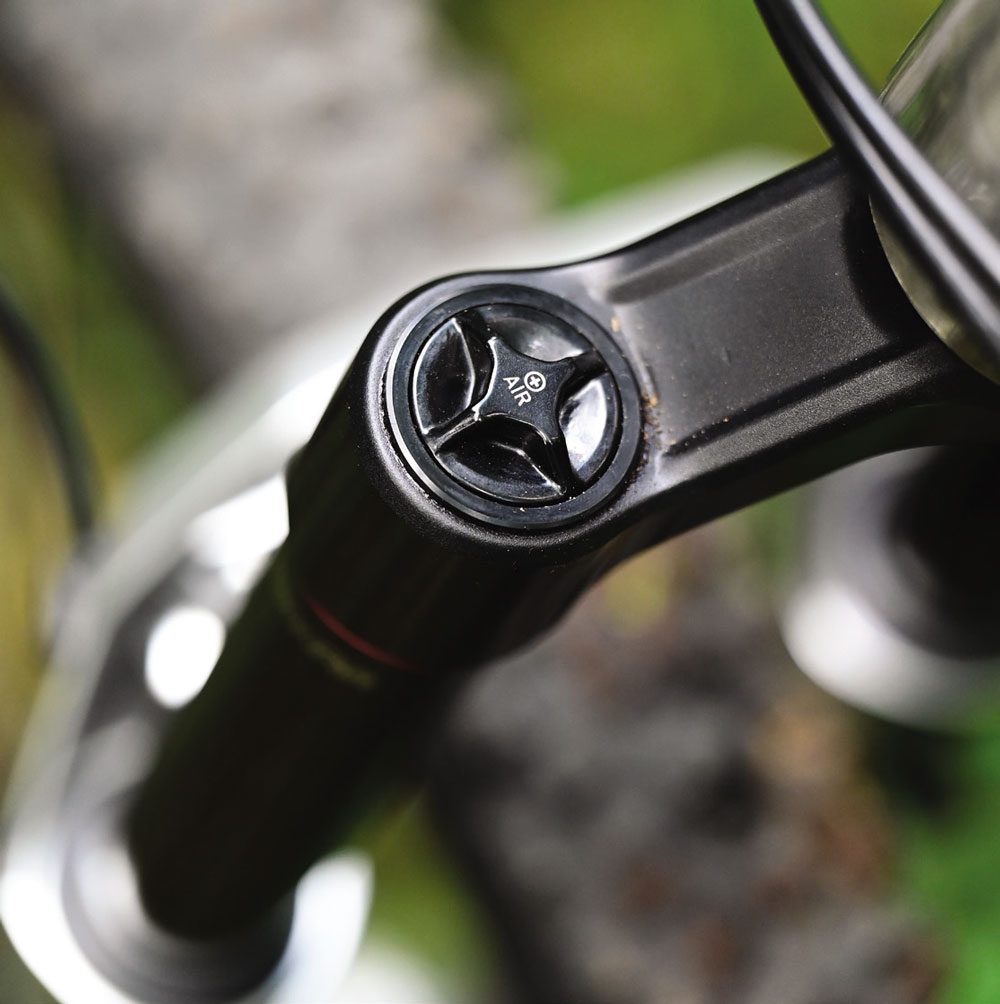
The Norco fitout has quality where it counts. Suspension is handled by Fox FLOAT components at both ends. The Factory 34 GRIP2 fork gives 140mm travel up front, and the X Performance Elite shock provides 130mm at the back end – pretty much the perfect setup for most trail riding.
The ultra-reliable Shimano XT drivetrain pairs up with a Praxis G2 crankset, with a 30 tooth chainring driving a 10-51 XT cassette. They even spec’d an XT chain.
The less critical parts are not from the big guys, or flashy boutique brands. As you might expect, they are from the more budget oriented end of things.
But that doesn’t mean they are not up to the job.
TRP supplied the brakes and the seat dropper. The brakes are Trail EVO, a four piston design hauling on a 203mm rotor up front and a 180 at the back. They worked really well while I was on the bike. The seat dropper was also well-behaved, and generous in both width at 34.9mm and travel, a handy 170mm on the Medium and Large size bikes.
While we are on that subject, the bike comes in five sizes, S to XXL, with a few tweaks along the size range. The S comes with 170mm cranks, the rest of the line-up have 175s. The seat dropper moves 150mm on the S, and 200mm on the XL and XXL.
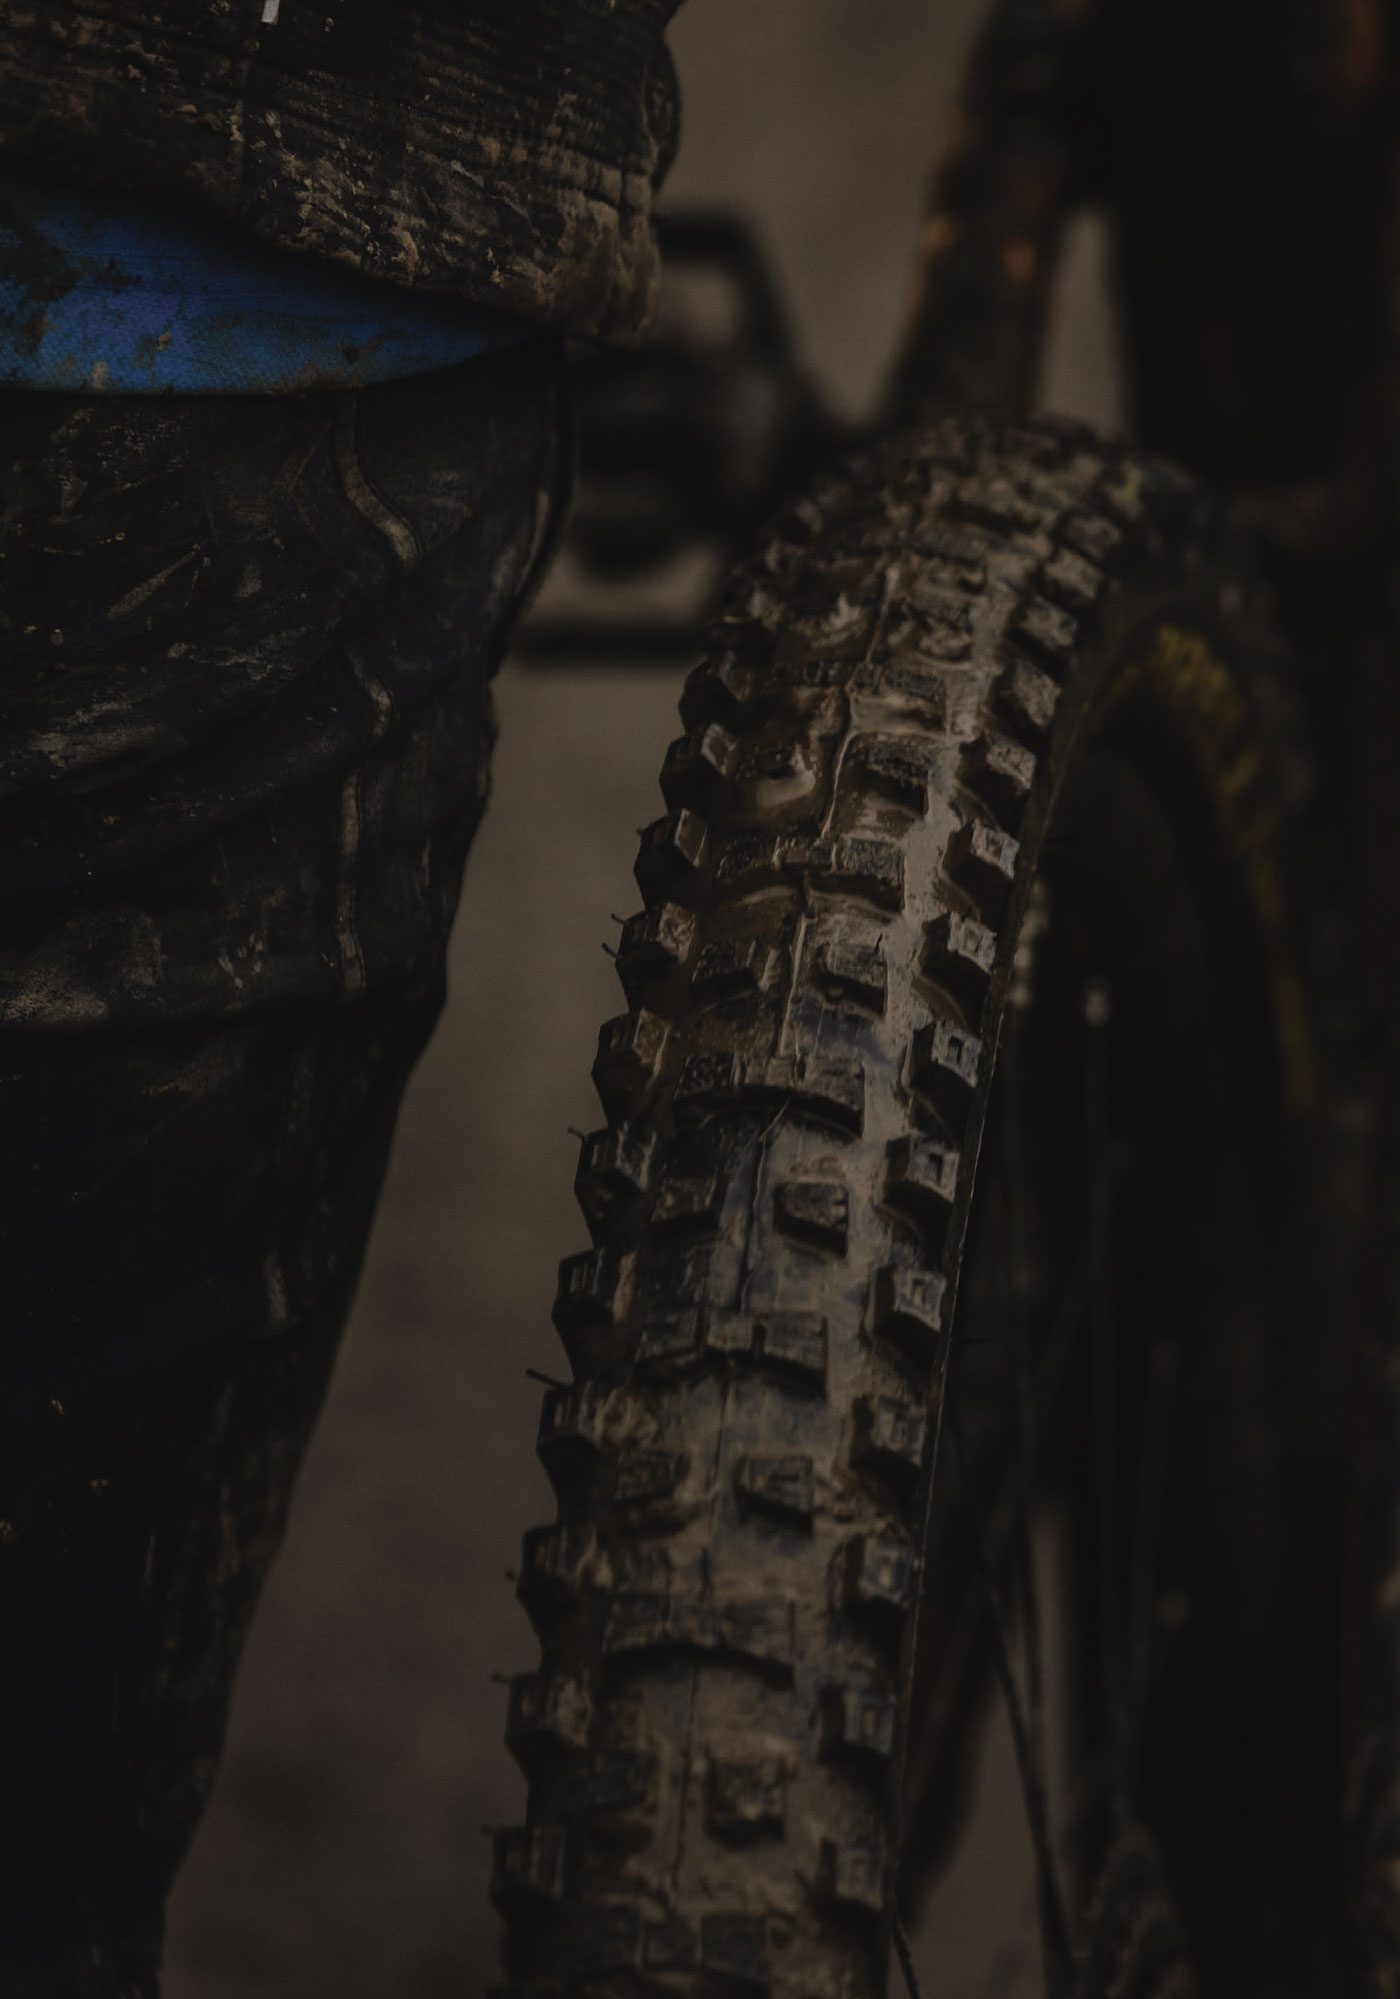
The wheel set has Stan’s Flow S1 rims on boost hubs, and come fitted with Vittoria tyres.
So, that is the basic stuff you could find online out of the way. A bit more of a web- crawl would reveal some very positive information from the bike media – the machine is Pinkbike’s Value Bike of the Year, Vital MTB’s Bike of the Year, and Bicycling Magazine’s Best Value Trail Bike.
All good.
The stuff you can’t find online is what I thought of it.

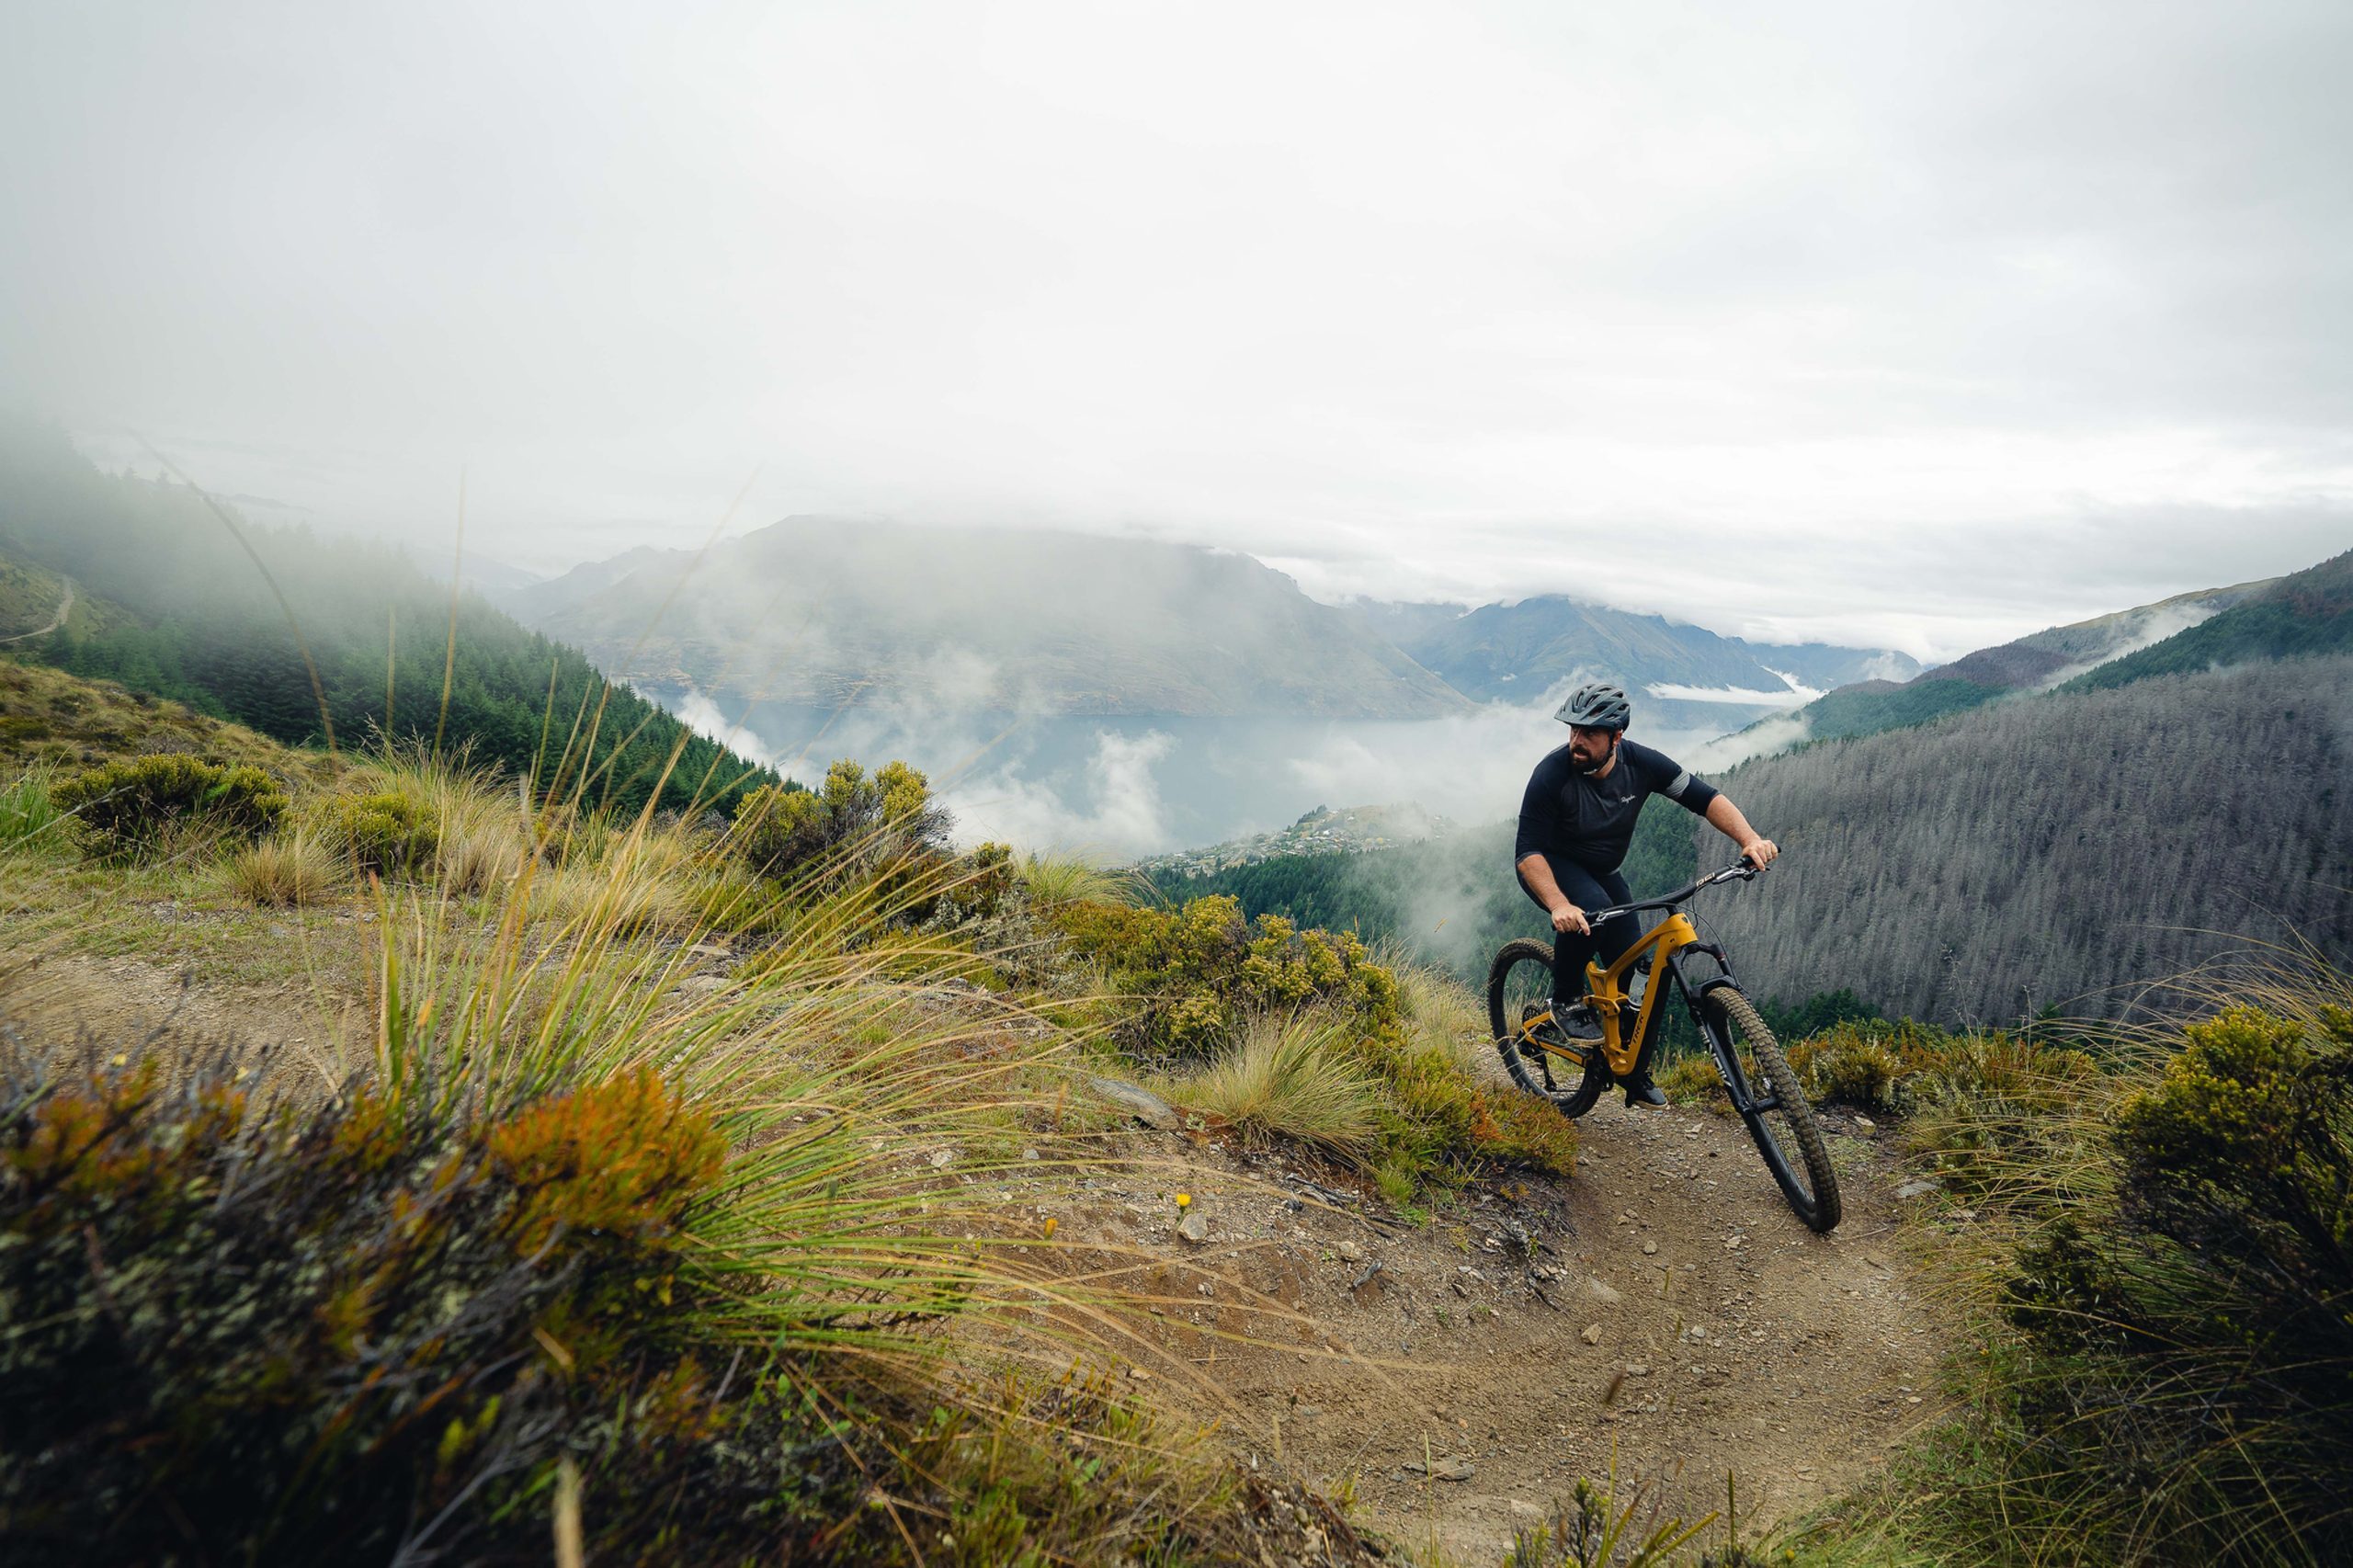
My first ride was out the door and onto a fairly long singletrack climb. The bike is not particularly light, mid 15s in kilograms. It feels light, though. The suspension design and shock combine to make a solid pedalling platform, and the bike goes uphill as well as any bike with the handicap of having me on top of it.
A steep 76.6 degree seat tube put me in the ideal position for climbing a trail that has a lot of little obstacles and tight turns.
Turning directly into a downhill trail at the top of the first climb was a snap decision – this particular trail is a favourite, because it is at the top end of what I consider to be within my comfort zone. Normally I would go somewhere else until I felt at home on a strange new bike, but the Norco felt very familiar from the first few pedal strokes.
As much as climbing on the bike felt better than the weight would have you expect, going downhill was better than the mid-travel suspension promised.
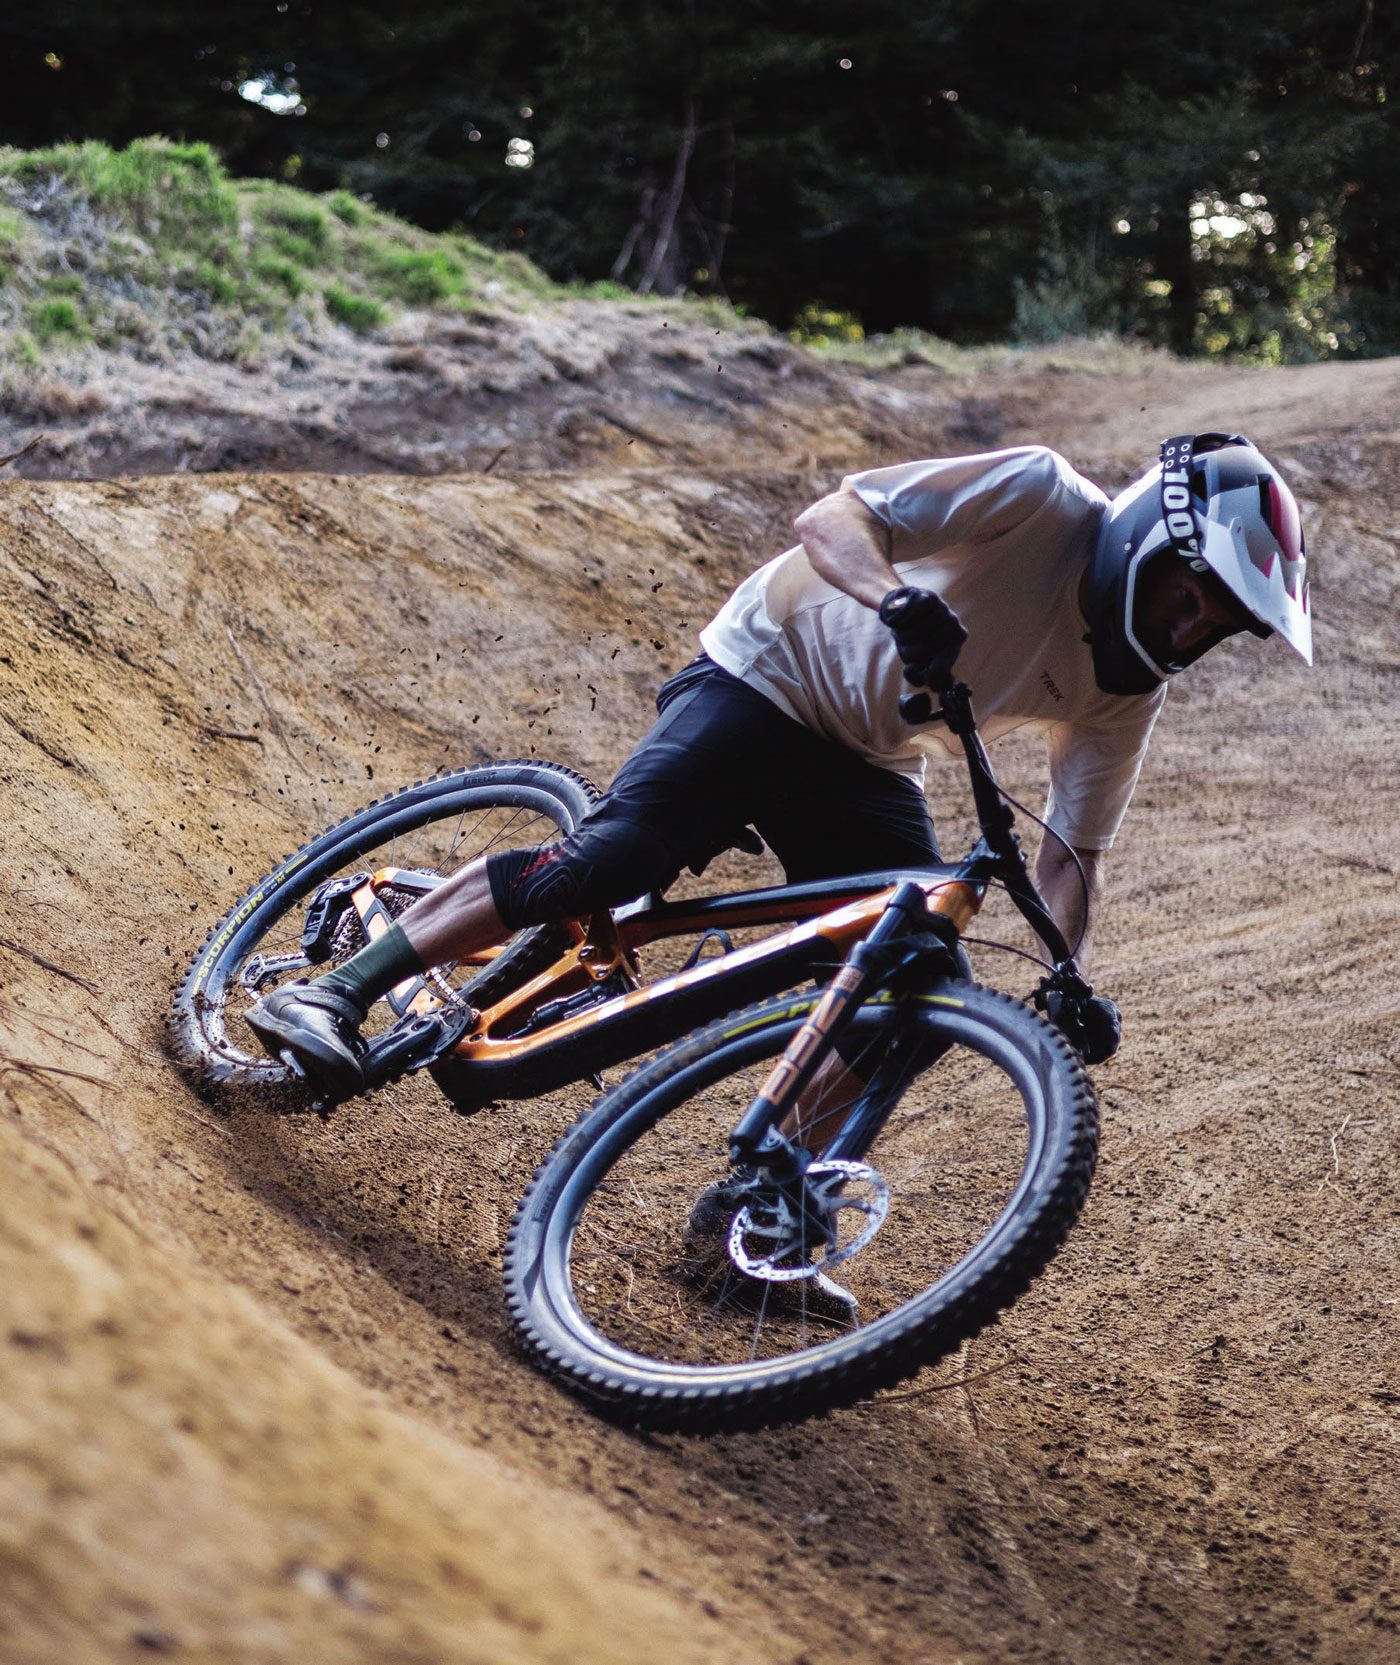
Going down the trail, the bike was surefooted, relaxed, and felt quietly capable. The rear suspension is a very solid feeling platform and the long 480mm reach, (in size large), combined with a fairly slack 65 degree head tube, made everything I came across on the trails I like easy to ride with confidence.
The tyres were new to me, although Vittoria and I go way back – like, almost fifty years – to a couple of pairs of track tubulars I liked in a previous life. I have been very happy with a couple of sets of road tyres from the bicycle-only tyre company, but I had never tried their mountain bike rubber before.

The bike came with a 2.4 Mazza on the front and a 2.35 Martello on the rear. I think part of the sprightly feeling the bike had on the climbs and rolling along cross country trails may be down to them. Like the bike, they are not particularly light, and they are not the fastest rolling tyres around, but they were reliable on the fairly wet trails we encountered during my time aboard the Fluid.
I found the more I rode it, the more I liked it.
The Fluid is a bike that straddles the divide between a cross-country style bike and a more enduro oriented rig. For an all-day ride with a bit of everything, it’s hard to imagine what it could do better.
Pirelli Scorpion Race DH & Enduro Tyres
WORDS: LESTER PERRY
DISTRIBUTOR: FE SPORTS
RRP: $149 (RACE DH), $159 (ENDURO)
“The first day of testing was about as testing for a rider as a tyre…”
‘Pick a tyre brand and be a dick about it.’ This phrase rings true in the MTB world – getting riders to try a new tyre brand is a tough ask. If what you’ve got works, why should you change it?
It’s fair to say the tried and true tyre brands have rested on their rubbery laurels over recent years, with no groundbreaking leaps forward in technology. Recently though, newer brands have entered the fray, and existing brands are innovating hard – in Pirelli’s case, they’re drawing on years of motorsport experience to shortcut the development process and take on the major players.
Pirelli has quietly toiled away for the last couple of years, developing their line of gravity focussed tyres, bringing over 150 years of motorsport prowess and synergising with MTB legend and development specialist – not to mention ex-World DH Champ – Fabian Barel alongside numerous test riders worldwide.
The perfect rubber compound is similar to Goldilocks’s porridge: when it’s not quite right, it’s not right at all. When conditions are prime, traction comes easy; it could roll well but then come unstuck on roots, rock or hardpack, feeling like you’re being “pinged” offline. Too soft and it will sap your speed and likely wear excessively quickly. What we’re after is the best of both worlds. When it comes to tyre carcass, we all want the lightest but most puncture-proof casing possible – again, the best of everything and an impossible task!
Once the Italians at Pirelli’s HQ in Milan finally woke from their afternoon ‘riposo’ (rest) we were shipped out two sets of their newly released ‘Scorpion’ gravity treads; a pair each of the new Enduro M in 29”, DH in 27.5”, and 29” to set up mullet.
Scorpion Race DH
Front: M (Mixed) Dual Wall+, Evo 42a dual compound, 29×2.5”
Rear: T (Traction) Dual Wall+, Evo 42a dual compound 27.5×2.5”
The Scorpion Race DH tyres feature a full 62tpi DualWall+ casing and a rubber insert at the bead to help prevent pinch flats. Designed with a heavy-hitting, all-out gravity focus, these tyres leave no question as to their intended use, with large knobs and huge, loud logos screaming, “Go fast and hit stuff”!
The best constructed tyre can be let down by the rubber attached to it, and it’s no secret most tyre brands fail at this when they enter the gravity market. Fortunately, it’s not Pirelli’s first rubber rodeo and they’ve nailed their compound. The Evo Dual Compound is soft and sticky, with a slow – but not sluggish – rebound characteristic. That sounds very subjective but it’s abundantly obvious when a brand gets the compound just right, and plenty have got it wrong.
Mounting these up on my enduro bike was a pleasant surprise. Comfortably edging them onto the rims by hand, then snapping them into place with a regular track pump – no tyre levers, sweaty brow or sprained thumbs required.
Rolling down the driveway, a few hops up and down the curb then some aggressive turns on the grassy verge gave a few instant impressions. They roll well for an out-and-out downhill race tyre, with no feeling like they’re sapping rolling speed and, while they’re noticeably heavier than the trail tyres I had been running, the weight is in line with their intended use and their competition. The first day of testing was about as testing for a rider as a tyre – a wet, but fortunately not too cold, day in Christchurch’s Port Hills. With slippery chutes and wet rocks aplenty, this was the perfect zone to get a feel for the treads in some challenging conditions. After all, what good is a tyre reviewed in prime conditions?
The first stop was the Christchurch Adventure Park and some sections of ‘The GC’ DH track. A few turns in the trail hooked right and straight across a slick off- camber; as I glided across the face I thought, “OK, these hook up well”. In control and comfortably upright, not something I’d expect to come so easily in these conditions.
You can’t tell a great deal how a tyre will perform by simply looking at the tread pattern, but you can make some assumptions about it will likely ride. The Scorpion ‘M’ tread has aggressive ramping on the lead edge of the centre knobs, helping it roll well and maintain speed. There’s a line of transition knobs to fill the void when tipping over to the side knobs from the centre, helping keep the feel consistent. Siping (small cuts in the knobs) are added to help the knobs conform to firm surfaces, adding extra edges for just that little more grip, as well as helping the designers somewhat tune the feel of a tyre. The M tread is reasonably open and clears mud well even at pretty low speeds, and the side knobs offer plenty of support and a consistent drift once they do break loose.
On the rear, the ‘T’ tread speaks of its motocross heritage. The main feature of the tread is a wide central knob – it’s super effective under brakes, and without the ramps of the ‘M’ tread it offers exceptional power transfer but higher rolling resistance – it’s a downhill focussed tyre after all, so not really a big deal. The central knob is designed to have the centre portion cut out of it to optimise for softer conditions or use as a front tyre. For the uninitiated, tread cutting is a common sight on the World Cup Downhill circuit. The side knobs are nearly identical to those on the ‘M’ series and have a similar consistent feel.
After a couple of days aboard the Scorpion DH tyres, sampling Christchurch’s Port Hills in winter conditions, I’d happily recommend them to those seeking a full-blown DH race or park option, those looking for a heavy-duty Enduro setup riding rocky courses, or aggressive ‘Clydesdales’ aboard e-bikes looking for extra grip and puncture protection.
Scorpion Race Enduro
Front: M (Mixed) Dual Wall, Evo 42a dual compound, 29×2.5”
Rear: M (Mixed) Dual Wall+, Evo 42a dual compound, 29×2.5”
Back on home turf in the Waikato, I unpacked my bike after the Christchurch stint and mounted up the Enduro cased tyres. Just like the DH tyres, these were a cinch to mount up.
Front and rear I had the ‘M’ tread. The same tread and compound as the DH front tyre I’d ridden the week prior, but a more supple ‘Dual Wall’ 120tpi casing and rubber insert like the DH tyres. According to Pirelli’s documentation, these tyres knock around 190g off the DH versions in 29”, so certainly a big difference in weight.
Testing these in the middle of a Waikato winter it’s a sure thing there will be lots of moisture around and with our local trails a mix of hardpack clay, slippery roots and moist leaf rot, there’s plenty of variety to make an assessment – we’re just missing sections of chunky rock. Riding around this area can be sketchy at best of times, in the winter, so any shortcomings in either bike setup or skills will quickly be highlighted.
The lighter weight of the Enduro tyres was welcomed after running the heavier DH versions. The Enduro ‘DualWall’ casing gives more trail feel, and the lighter weight was certainly noticeable when hopping over trail features or accelerating out of slow corners. These things offer confidence in spades, particularly when the going gets fast and rough – after all, that’s precisely what they’re designed for. They allow you to more confidently head for the ideal line, not just the one dictated to you by the conditions or your tyres.
Descending on these is a blast. Charging on familiar trails and headlong into some sketchy root sections, I was thankful for how well the tyres held their line; the soft compound offering confidence on the roots where my normal tyres would let go. Cornering feels very natural, with no discernible gap from being ‘upright’ to leaning in, something I’ve struck on tyres in the past. There’s a positive, almost locked-in feel about them, thanks to the strategically placed, large sticky knobs.
All traction comes to an end at some point, and the Scorpions give a consistent drift rather than a “you’ve just hit ice” sort of surprise once they do let go. I noticed this several times when the tread would let go in a controlled manner and then hook up again, no big sketchy surprises here.
Braking was awesome, largely down to the large knobs, but equally down to the rubber compound and carcass, all damping trail chatter and allowing the tyre to bite and conform without breaking traction.
Climbing was where I found the only chink in the Scorpion ‘M’ armour. With the central knobs so heavily ramped on the leading edge, there’s no square sharp edge to bite in when climbing. ‘Slippery when wet’ surfaces require being conscious of where and when you’re putting the power down to prevent wheel spin. It’s not a big deal on a tyre of this genre, as they’re designed for all-out enduro speed, not taking uphill KOM’s. This trait may be more noticeable on an eBike so opting for the ‘T’ tread could be ideal.
All the acronyms and hyperbole mean nothing if you’re bouncing off roots and can’t hold a line confidently. The combination of tread pattern, rubber compound and casing on these inspire speed and confidence. If you’re an enduro racer or eMTB rider looking for a hard-hitting, but not overly heavy or sluggish set of tyres to use all year round, these should be on your ‘must-buy’ list.
Are the Pirelli Scorpion gravity series a game-changer? It’s hard to say they’re head and shoulders above the established competition, but they’re easily on par or fractionally better and certainly a very worthy opponent. If you’re looking to change things up and try something fresh, these tyres would be a great place to start. You might well find an advantage over what you’ve been used to – I certainly have.
Trek Evoke Clothing
WORDS: LESTER PERRY
DISTRIBUTOR: TREK NZ
RRP: $239 (SHORTS), $79 (TECH TEE)
“I reach for the same few pieces of kit each time I’m headed out to the trails; the cream rises to the top…”
Even though I have a fair mountain of riding kit in my cupboard, I’m beginning to realise how little of it I actually regularly use. I reach for the same few pieces each time I’m headed out to the trails. The cream rises to the top and, provided I’ve done my laundry, then it’s unlikely I’ll delve too deep into the pile to use anything other than my unintended favourites. Recently, a new set of kit has made its way into my rotation, though: the Trek Evoke tech tee and the Trek Evoke shorts have become some of my regulars for trail riding.
TREK EVOKE SHORTS
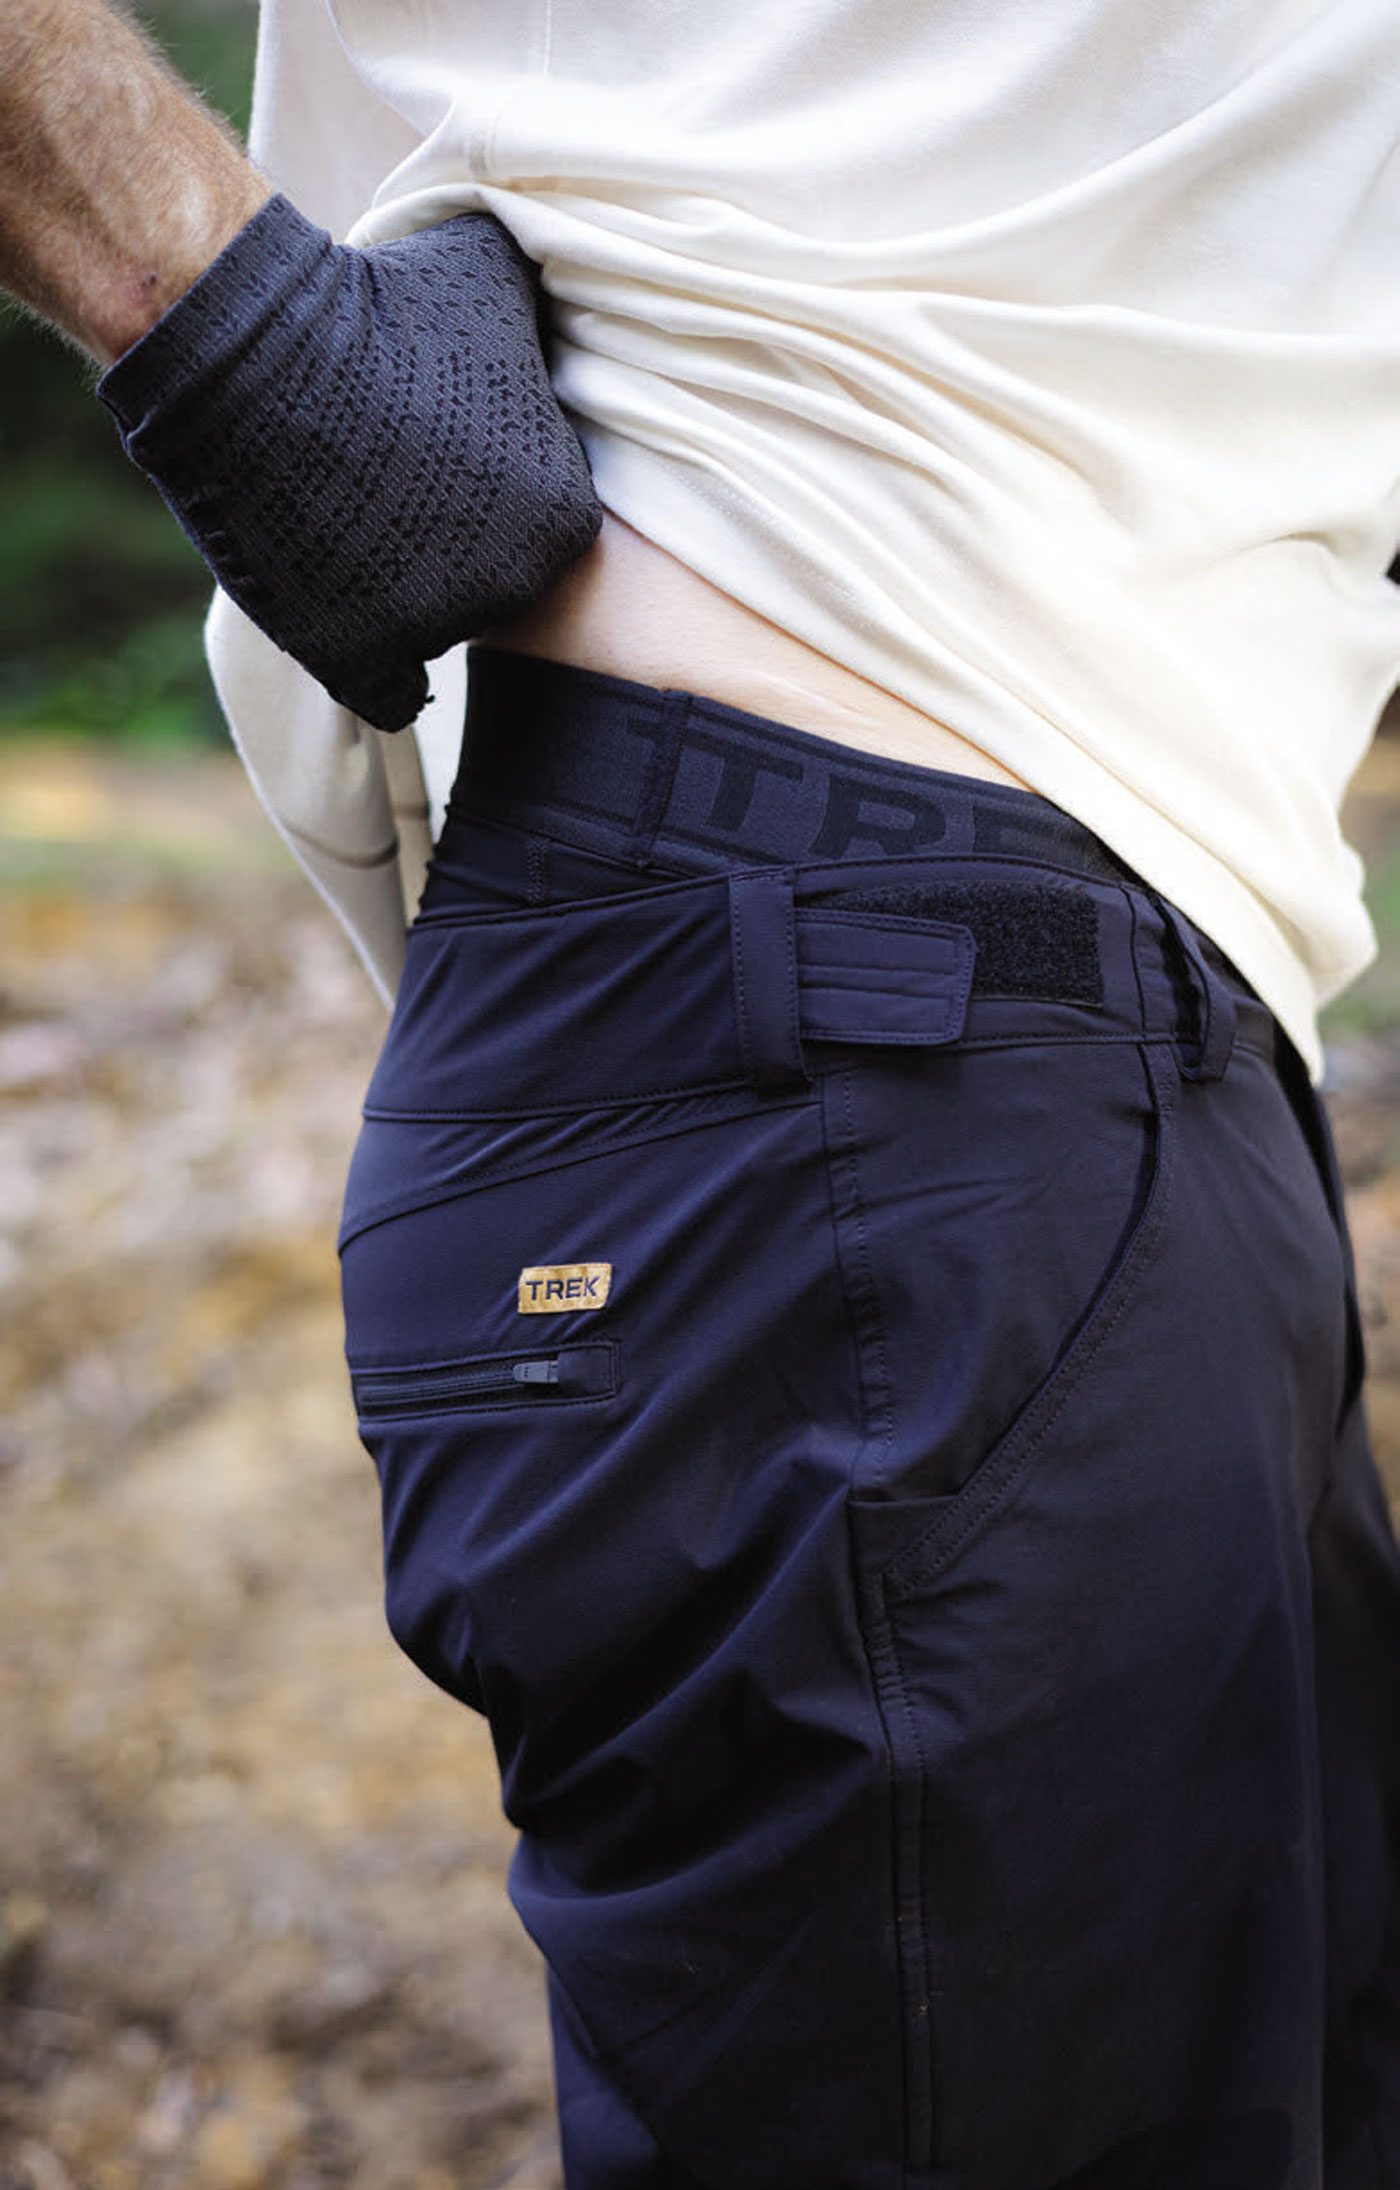
Trek has stepped up its game and featured a lightweight two-way stretch material on the outer short, that’s not only made up of 65% recycled materials but tested for harmful substances through the STANDARD 100 by OEKO-TEX® test as well. It’s soft to handle and plush against the skin.
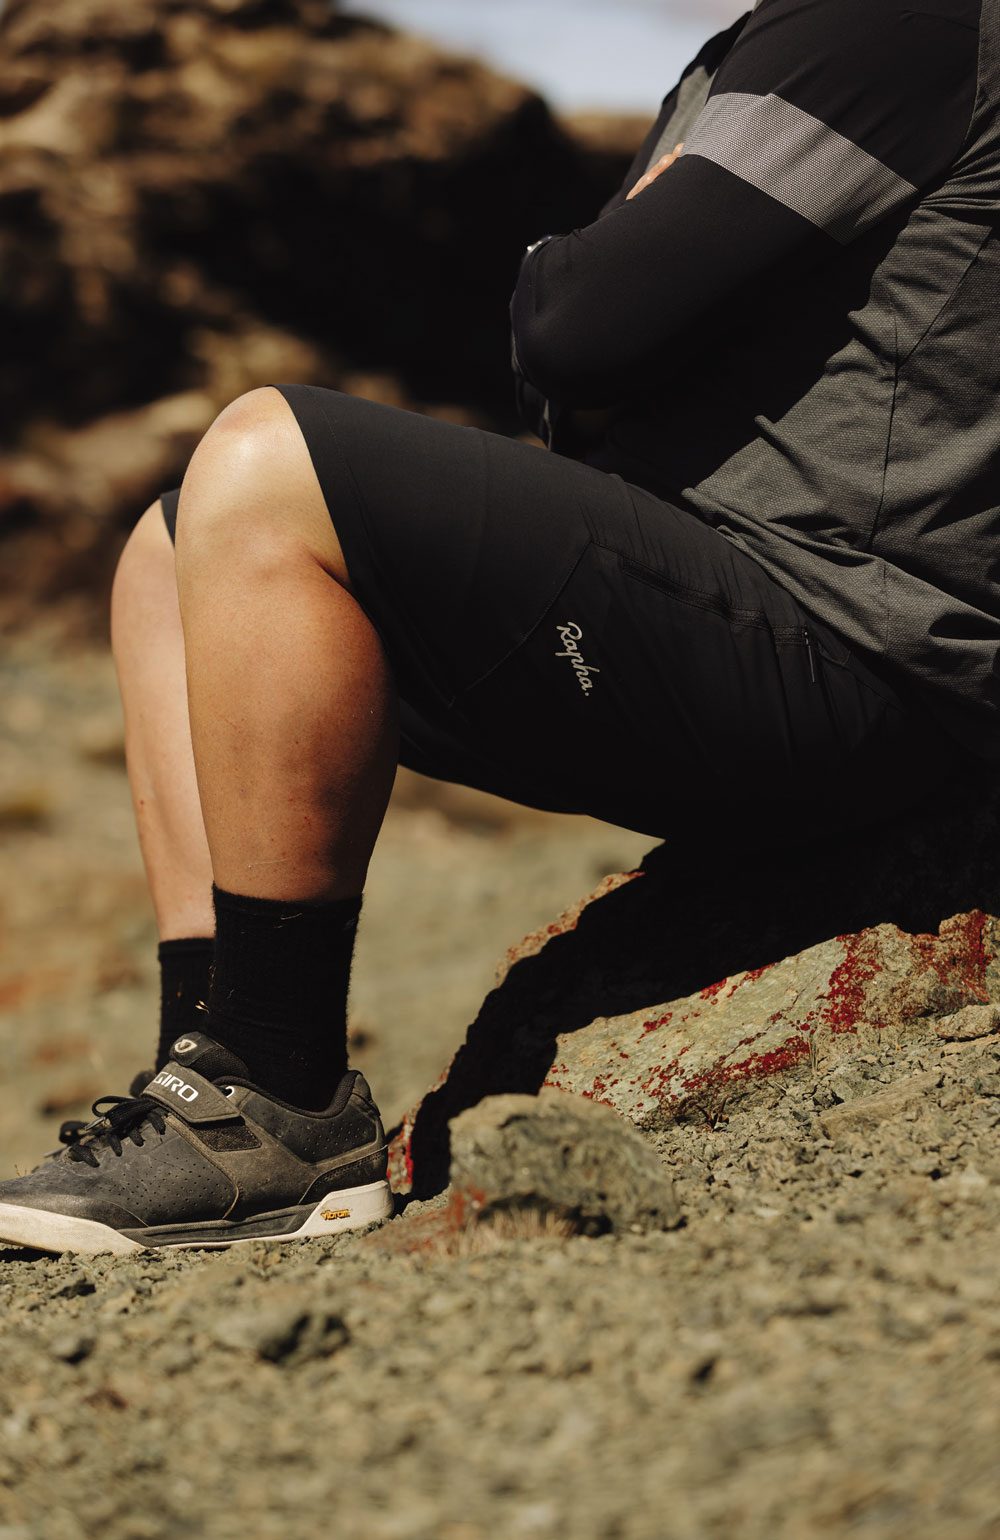
There are two main hip pockets up front and a zippered one on the back – ideal for car keys or small Allen keys, but nothing much more considerable. Up front, a domed closure is paired with a zipper to keep things tidy. I’m a pretty strict 32” waist so went for a Medium. I reckon they’re slightly on the larger side but, with a small adjustment of the Velcro adjusters on each side of the waist, they’re spot on. The fit is listed as ‘semi-fitted’, which seems pretty accurate as they’re reasonably roomy through the leg without being baggy.
The leg length is what will probably be the kicker as to whether you like these shorts or not. I’m slightly below average when it comes to leg length for my 176cm height, and the Evoke’s sit a little above my knees with their 11-inch inseam. In the grand scheme of MTB shorts, this is on the shorter side of things; most shorts sitting in excess of 12 inches. I reckon this length hits the nail on the head for their intended use as a trail short though, ideally sans-knee pads. The overall silhouette is equally at home on a trail ride as at the gym or local swimming spot – they’d even be sweet for a drop-bar gravel ride. With subtle branding – just a small woven label above the rear pocket – they don’t scream “I’m a mountain biker!” at all… which makes a nice change.
Wearing liner undershorts has become normal for many riders these days, and we’re seeing fewer and fewer people hiding bib shorts beneath their baggies. There are a heap of liners on the market these days but, from what I’ve experienced, most fall short and are merely ticking a box rather than offering the ideal solution. The fits are off, chamois are bad and the overall experience leaves me wishing I’d just purchased a good pair of bibs instead – then hidden them under baggies, of course!
Trek has knocked it out of the park with this pair of liners though – I’m impressed. Let’s start at the top and work our way down: the waistband is a wide, soft number – think, a comfy boxer-short style – and there’s no narrow elastic cutting into your stomach as you’re doubled over, chewing your stem whilst grunting up a steep climb. A couple of different recycled nylon and spandex blends on the main panels help the shorts form nicely to your body, with no discernible bunching or rubbing. The legs feature a similar band to the waist, but with rubber grippers on the rear – finally, a liner the legs won’t creep up on – and they’re awesome for holding up knee pads too. The liner can be used snapped into place, attached to the shorts, or worn completely independently – i.e. under another pair of shorts. Not by themselves… although we’re not ones to judge.
All the good features of a liner are easily let down by an inferior chamois but, after lots of saddle time, my undercarriage is happy to report that the chamois lives up to the rest of the short. No dramas here.
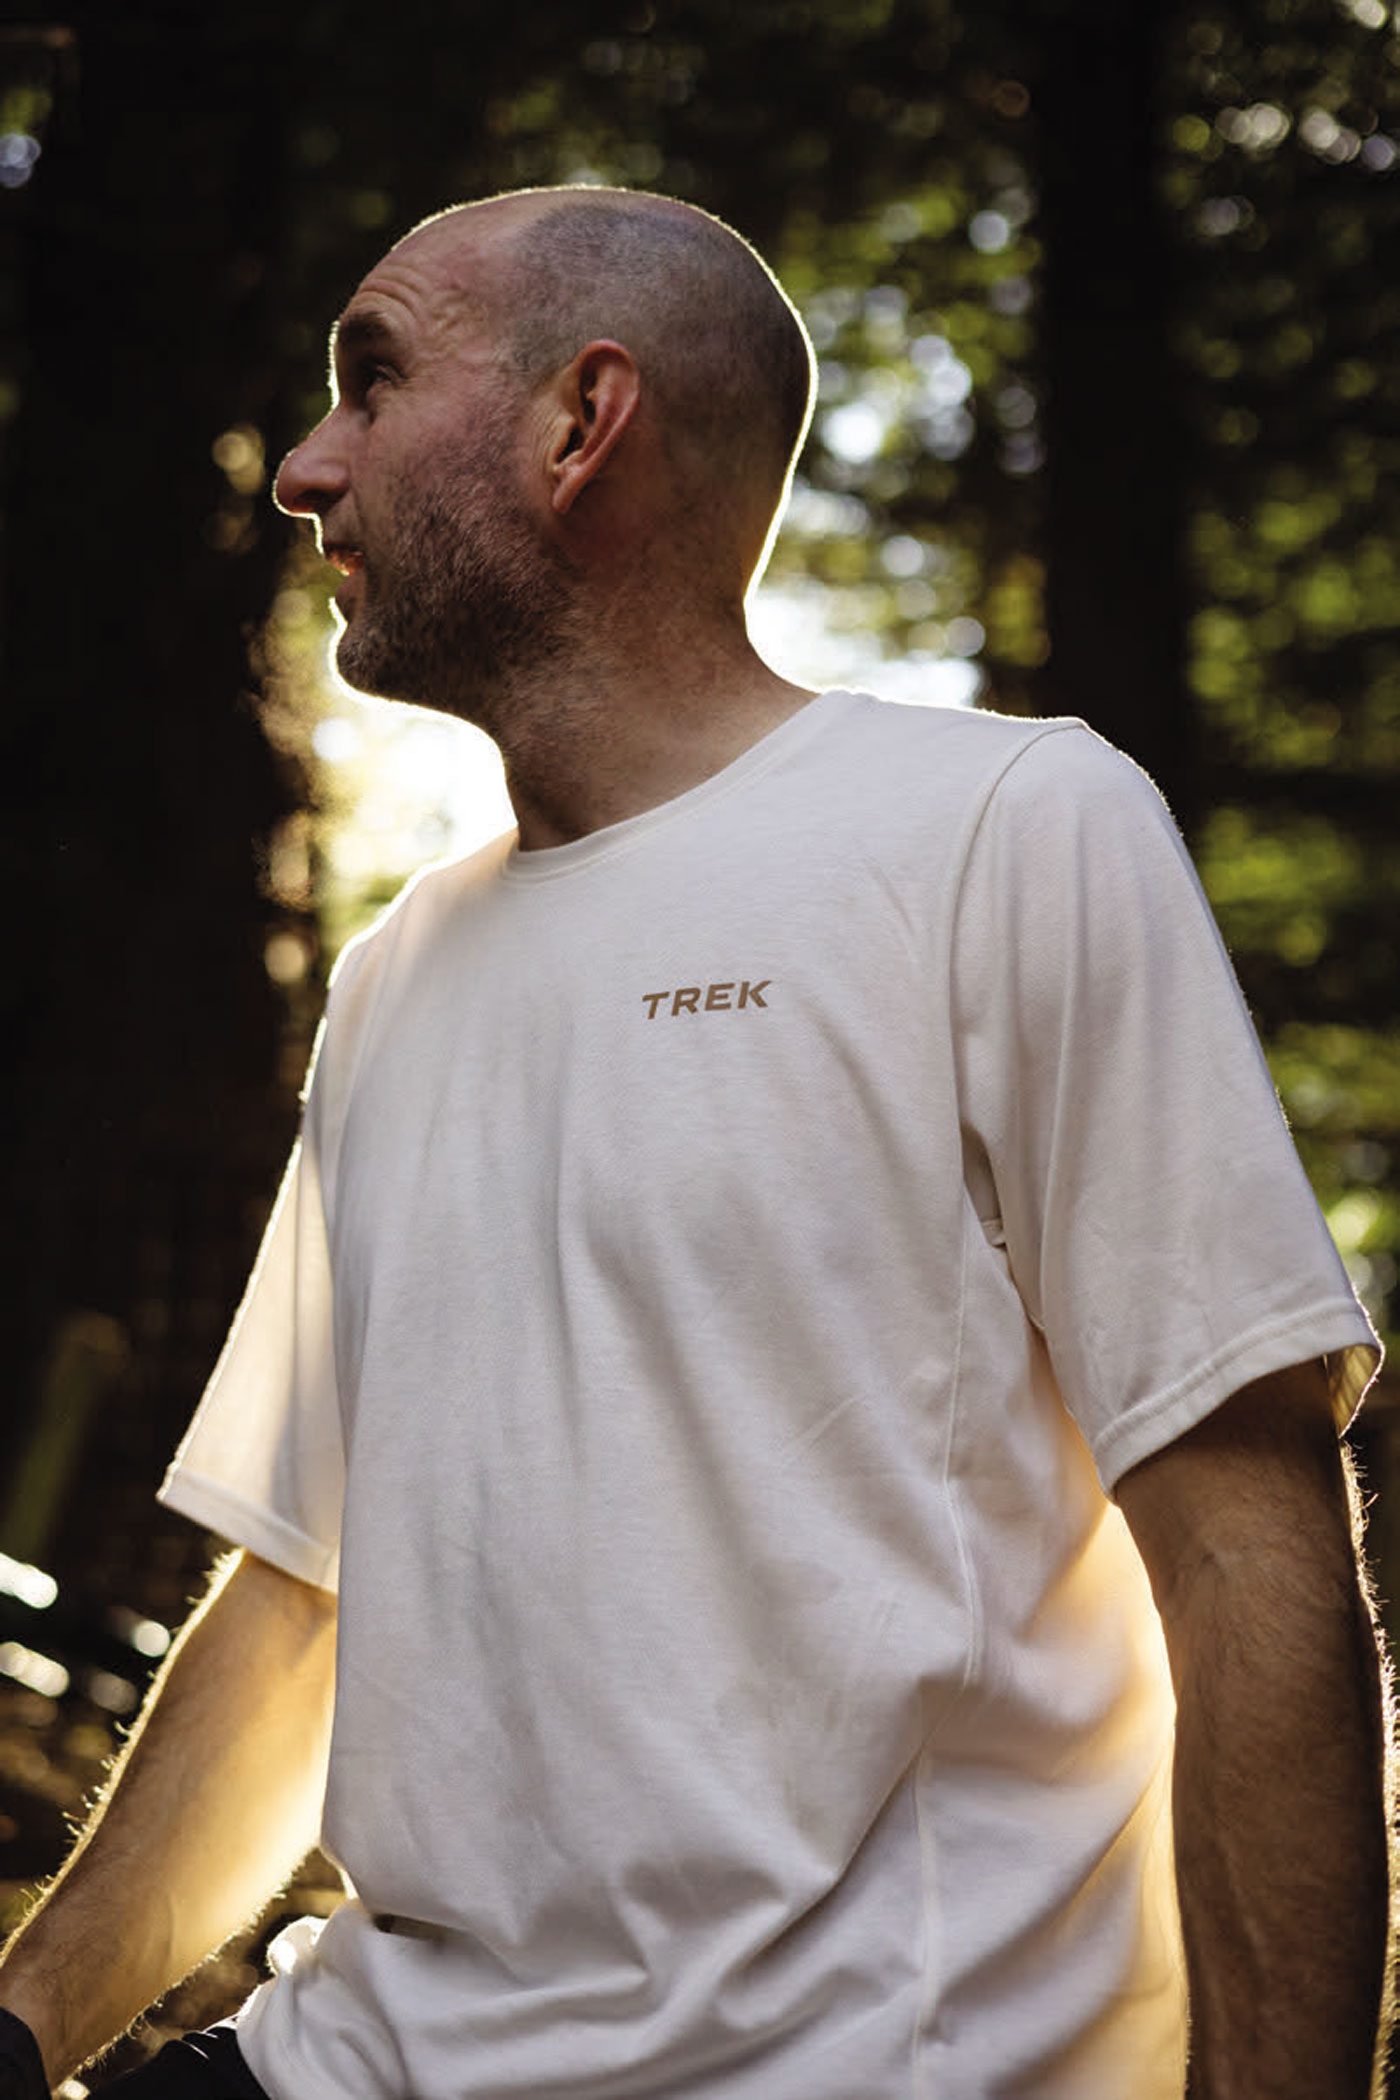
TREK EVOKE TECH TEE:
The Evoke Tech Tee’s main body fabric contains 85% recycled polyester blended with cotton, and passes the same OEKO-TEX® tests the shorts do, so no nasties are hiding in the fabrics.
Wearing a size large (normal for me) the semi-fitted cut is plenty comfy and leaves room for movement. I’m impressed that Trek used some panelling down the sides to help shape the form, not just a standard tee-styled cut. The rear has a slightly dropped tail to help avoid a public builders crack.
The fabric feels reasonably lightweight but not to the point I’d be concerned about tearing it any more than other riding shirts. It breathes well and doesn’t hold on to sweat but helps it evaporate off. Although I’ve been riding this off-white colour over the early winter, the mud seems to clean out of it much easier than some shirts I’ve used.
As with the shorts, this top doesn’t stand out from a casually-dressed crowd and, again, subtle branding helps you stay low-key; just a small chest logo hit proves that you are in fact a cyclist.
WRAP-UP
Like most of the Trek kit (or, previously, Bontrager) I’ve used over the years, the quality of both the shorts and the shirt appears to be top-notch. So far, it seems these garments will stand the test of both time and trails. If you’re searching for some versatile trail-riding garb with subtle style, and don’t want a baggier style ‘all-mountain’ look then the Evoke shorts and tech tee will likely be right up your alley.
First Impressions: SRAM GX Transmission
WORDS: LESTER PERRY
DISTRIBUTOR: WORRALLS
RRP: $2,170
“I was eager to pull out the UDH hanger from my battle-scarred frame and slide on a new Transmission…”
After hearing whispers that a more affordable GX groupset may be in the pipeline, I was eager to pull out the UDH hanger from my battle-scarred frame and slide on a new Transmission.
SRAM has launched the GX series – continuing their ‘All Day’ theme with a groupset designed for all-mountain, all-day missions, at a far more affordable price.
What you find on the GX system is largely the same as the higher-end Transmissions released earlier this year. There are some subtle differences which are visually noticeable from those higher-end units. In particular, the battery is hidden away in what I’ll refer to as the “Derailleur Garage” – keeping it out of harm’s way – essentially inside the derailleur. Replaceable, protective skid plates have been added, and a two-piece outer link. It also features a tool-free cage assembly – so it’s both removable and upgradeable, should you want to do so. A steel inner cage replaces the carbon of its higher-end brethren. Like the GX AXS of old, it’s been built for riders of the real world.
A couple of weeks before the launch date, a nice cardboard cube arrived on the courier. I quickly watched an install video, and it was game on. It’s been a long time since I’ve installed anything on my bike that required a proper read of the instructions or, in this case, a video. SRAM does a killer job of stepping through the installation process: whoa-to-go in around 30 minutes. I’d imagine after another couple of goes, a whole Transmission could be installed in about 15 – 20 minutes, maybe even quicker. It really is pretty simple provided you’ve watched the video. My only install hiccup was my inability to pair the system to my phone (no doubt user error, but I’ll figure that out soon) as well as the compatibility of the shifter clamp with my brakes, which aren’t SRAM. It took a bit of jimmying, but I managed to get the two to work together – it did mean that I couldn’t take full advantage of the adjustment that should have been available. Fortunately, the one spot I could get the shifter to sit was just right for me. I see in their documentation a different shifter pod mount is available and this would have completely solved my issue.
Te Miro MTB Park, just out the back of Cambridge, was my first testing ground. For the uninitiated, the trails are reasonably varied but the general theme is clay and native roots, dispersed amongst meandering climbs with the odd pinch or crux move requiring low cadence torque and fast, precise shifting to get the most out of your bike if speed is your aim. Coming off the back of a few days of intermittent rain, I wasn’t expecting much aside from mud and muck – perfect for bedding in a fresh groupset.
Leaving the car park, I snapped through the gears and made sure everything was still as it should be. I shifted through the cassette and took a couple of looks back just to be sure it had shifted, as it was so smooth and quiet, just a small ‘zit’ noise and a rolling increase of resistance at the pedals. I spun my way up the Easy As climb, taking the harder, steeper lines where possible, purposely shifting at the wrong time and under full power. Thoroughly impressed at how positive the shifting feel and accuracy was I pressed on, thinking to myself, ‘sure, it’s good now, but I bet once there’s some mud in the system it will be just like everything else’.
‘Easy As’ caps out and links into the Miro climb; its mellow gradients are broken up with some proper NZ native roots. Regular traffic polishes off the bark and pulls slimy dirt up onto them. You have to have your wits about you to keep the power down and maintain forward momentum, a situation where a mis-shift or slipped gear will likely see you stalled out or on the floor. Again, I was impressed by how accurate the shift was, with no slipping or mis-shifts, regardless of how many shifts under full power, and regardless of cadence.
Climbing to the top of the native bush, Miro finished, and I dropped into ‘Phil’s Gold’ – a test of a rider’s fitness, line choice and cornering ability; no steeps, but lots of corners, and a fair smattering of slimy roots. Eager to make this thing mis-shift, I again banged through gears, up and down the cassette, forcing shifts out of near-dead-stop corners. Nought. Nothing. Nada. I couldn’t get it to fault. I wondered whether I’d be so positive after a few months aboard the groupset – would the crispness remain after riding the second half of winter on it?
Another climb up Miro and a lap down ‘Native DH’ and my time was up for the day. I was only one proper ride in but so far, so good. I found myself shifting way more than I would aboard my previous group, and shifting from dead stops, under full power, and over chunky surfaces. I’d be concerned about heading over the bars and losing teeth on any of my other setups with that sort of carry-on.
SRAM made some pretty bold claims about their remapped Cassette, new X-sync technology (i.e. redesigned shifting ramps) and use of their flat-top chain to make it all work: ‘Creating seamless shifts even during your hardest power output.’ I’ve gotta say, there’s something in this combination of marketing speak and fancy nomenclature that really makes this thing shift impressively under power – something other brands claimed they’d done years ago – but SRAM has taken it up a level. I’ll be very interested if it continues to perform to this level, even after many km’s and battery charges.
So far, I have three main concerns. One, will the shifting with buttons mean I lose my right thumb muscle tone, rendering it useless when I go back to a cable system? Two, will I smash off the low-hanging shifter Pod? And three, will I want to give this groupset back after the next few months of testing is over?
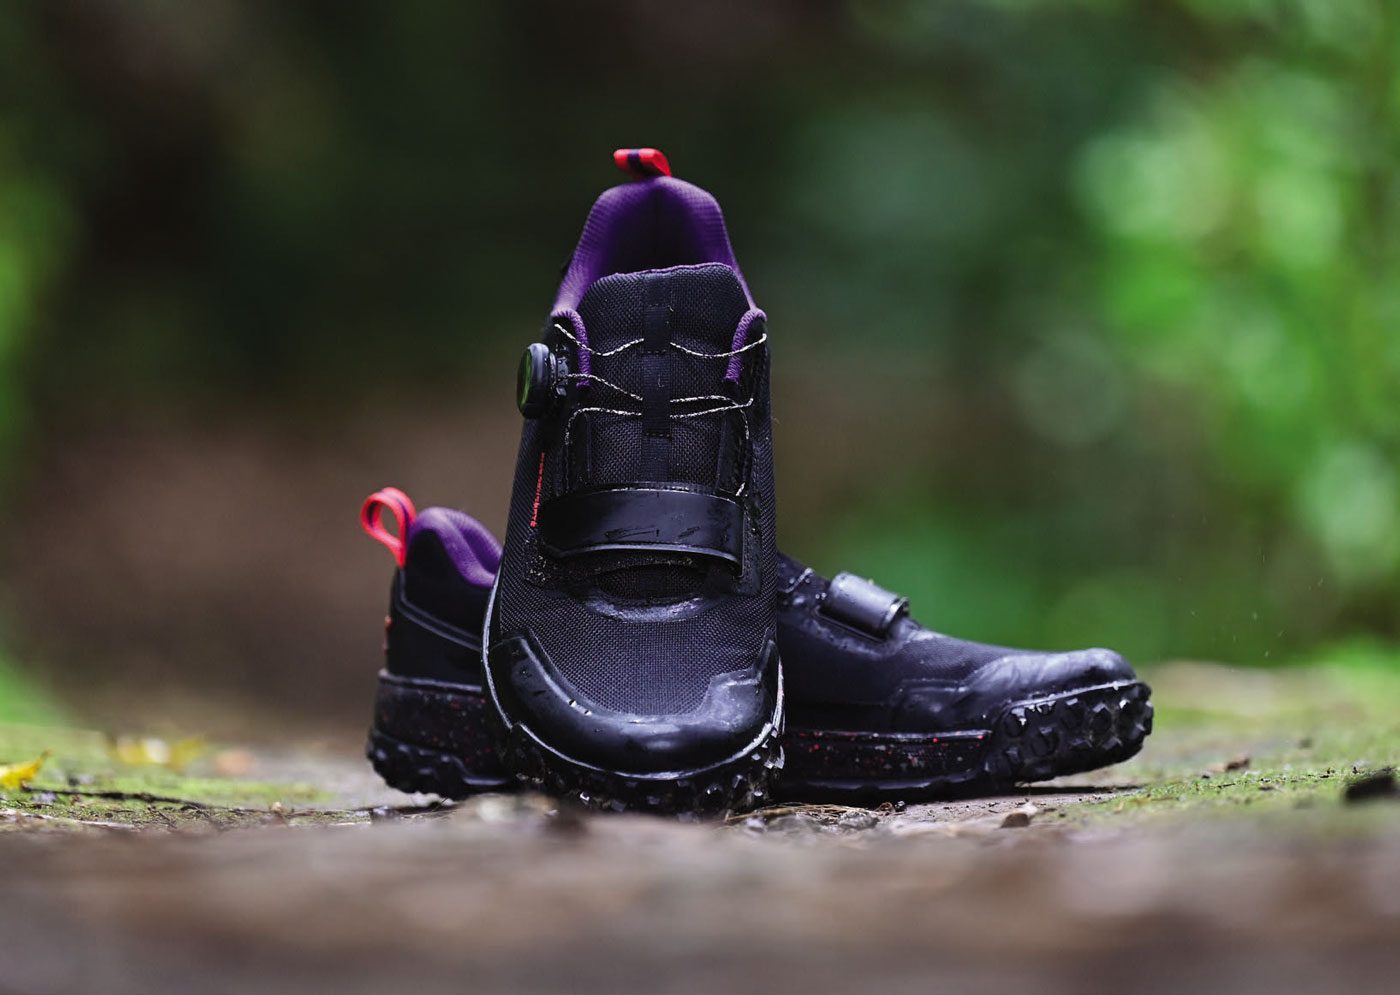
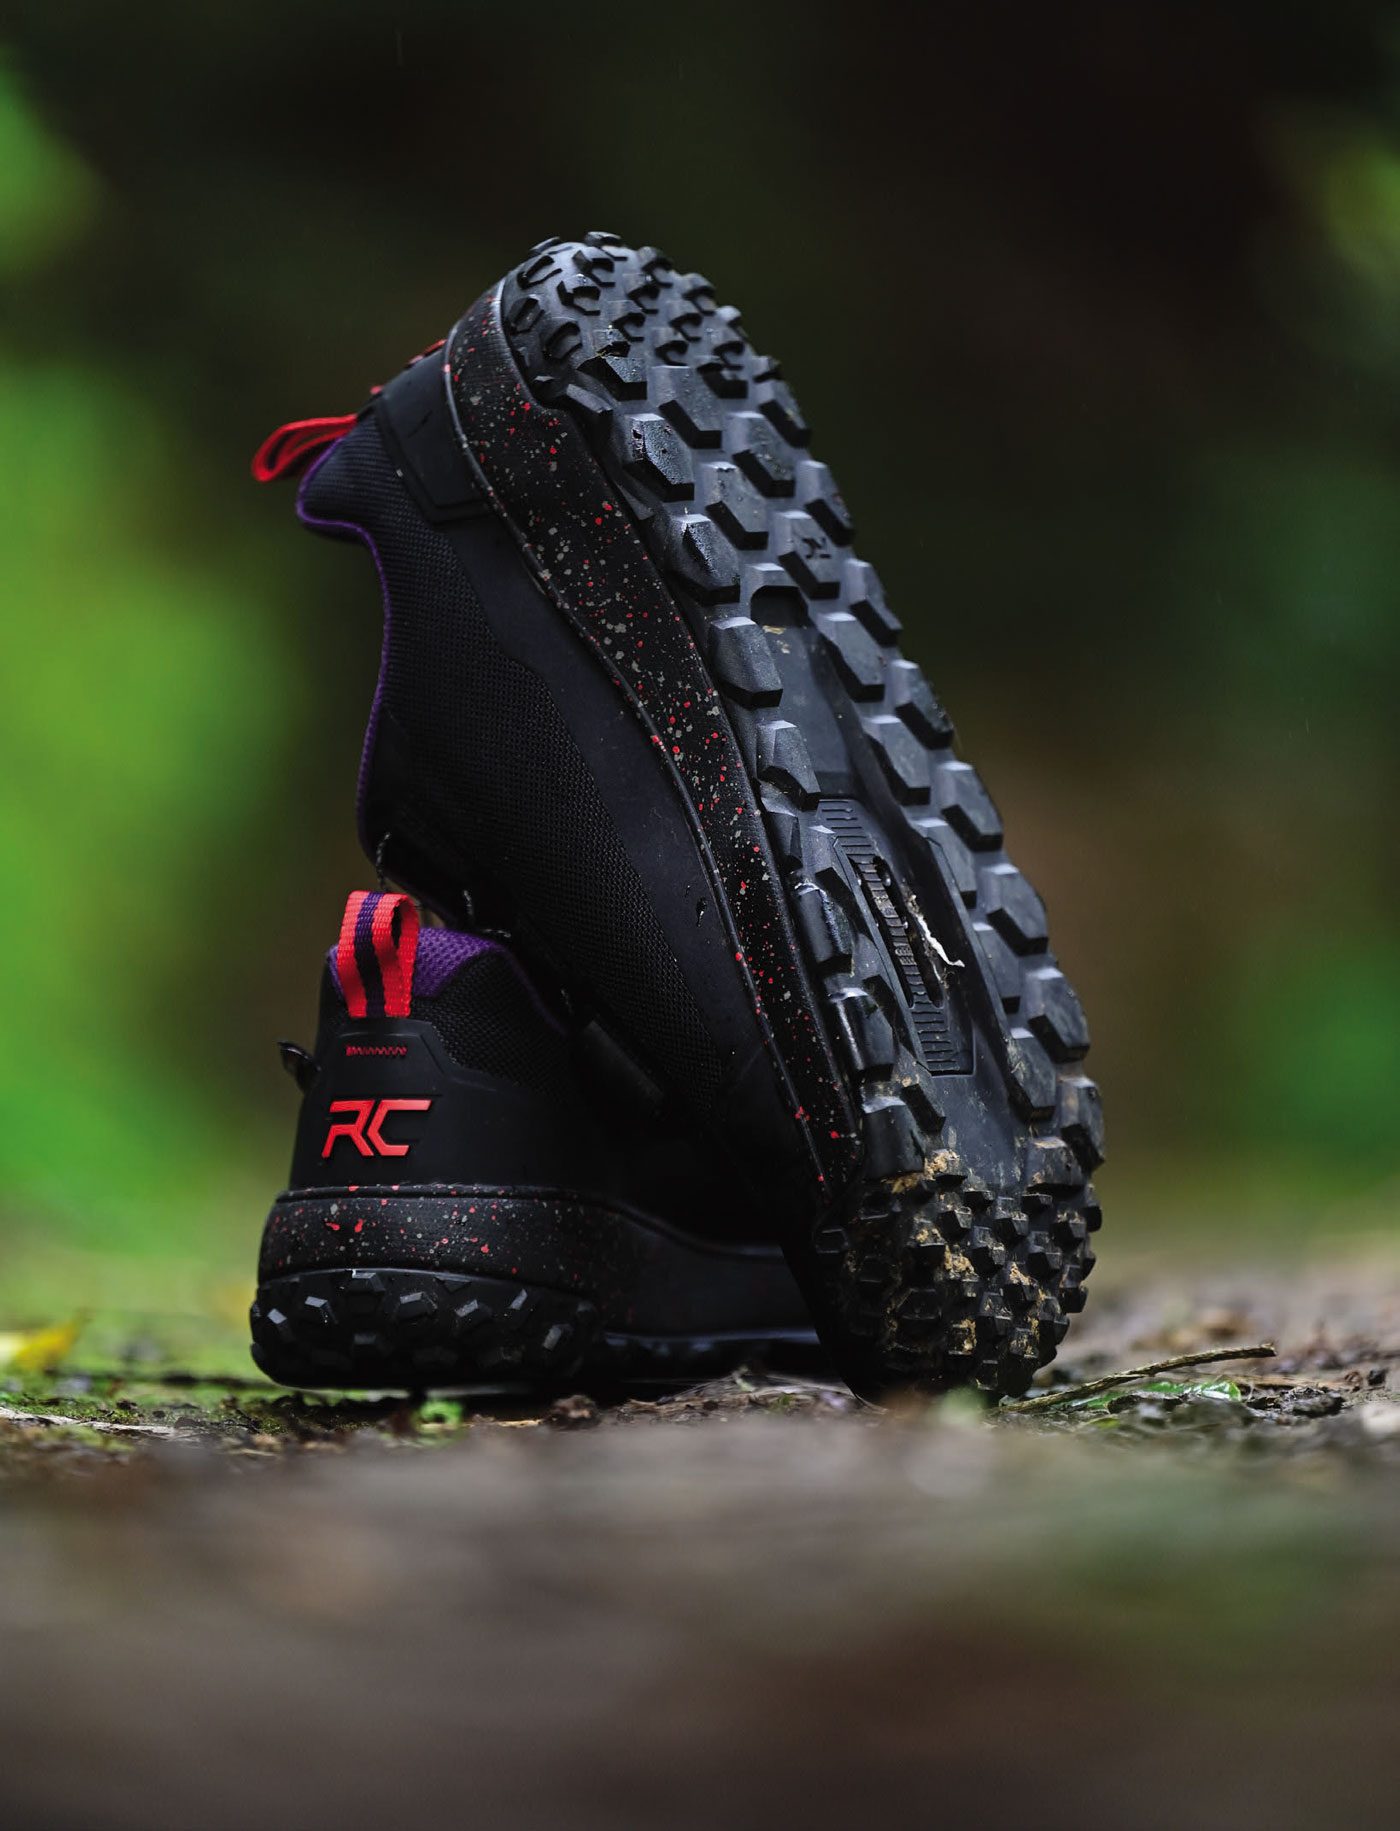
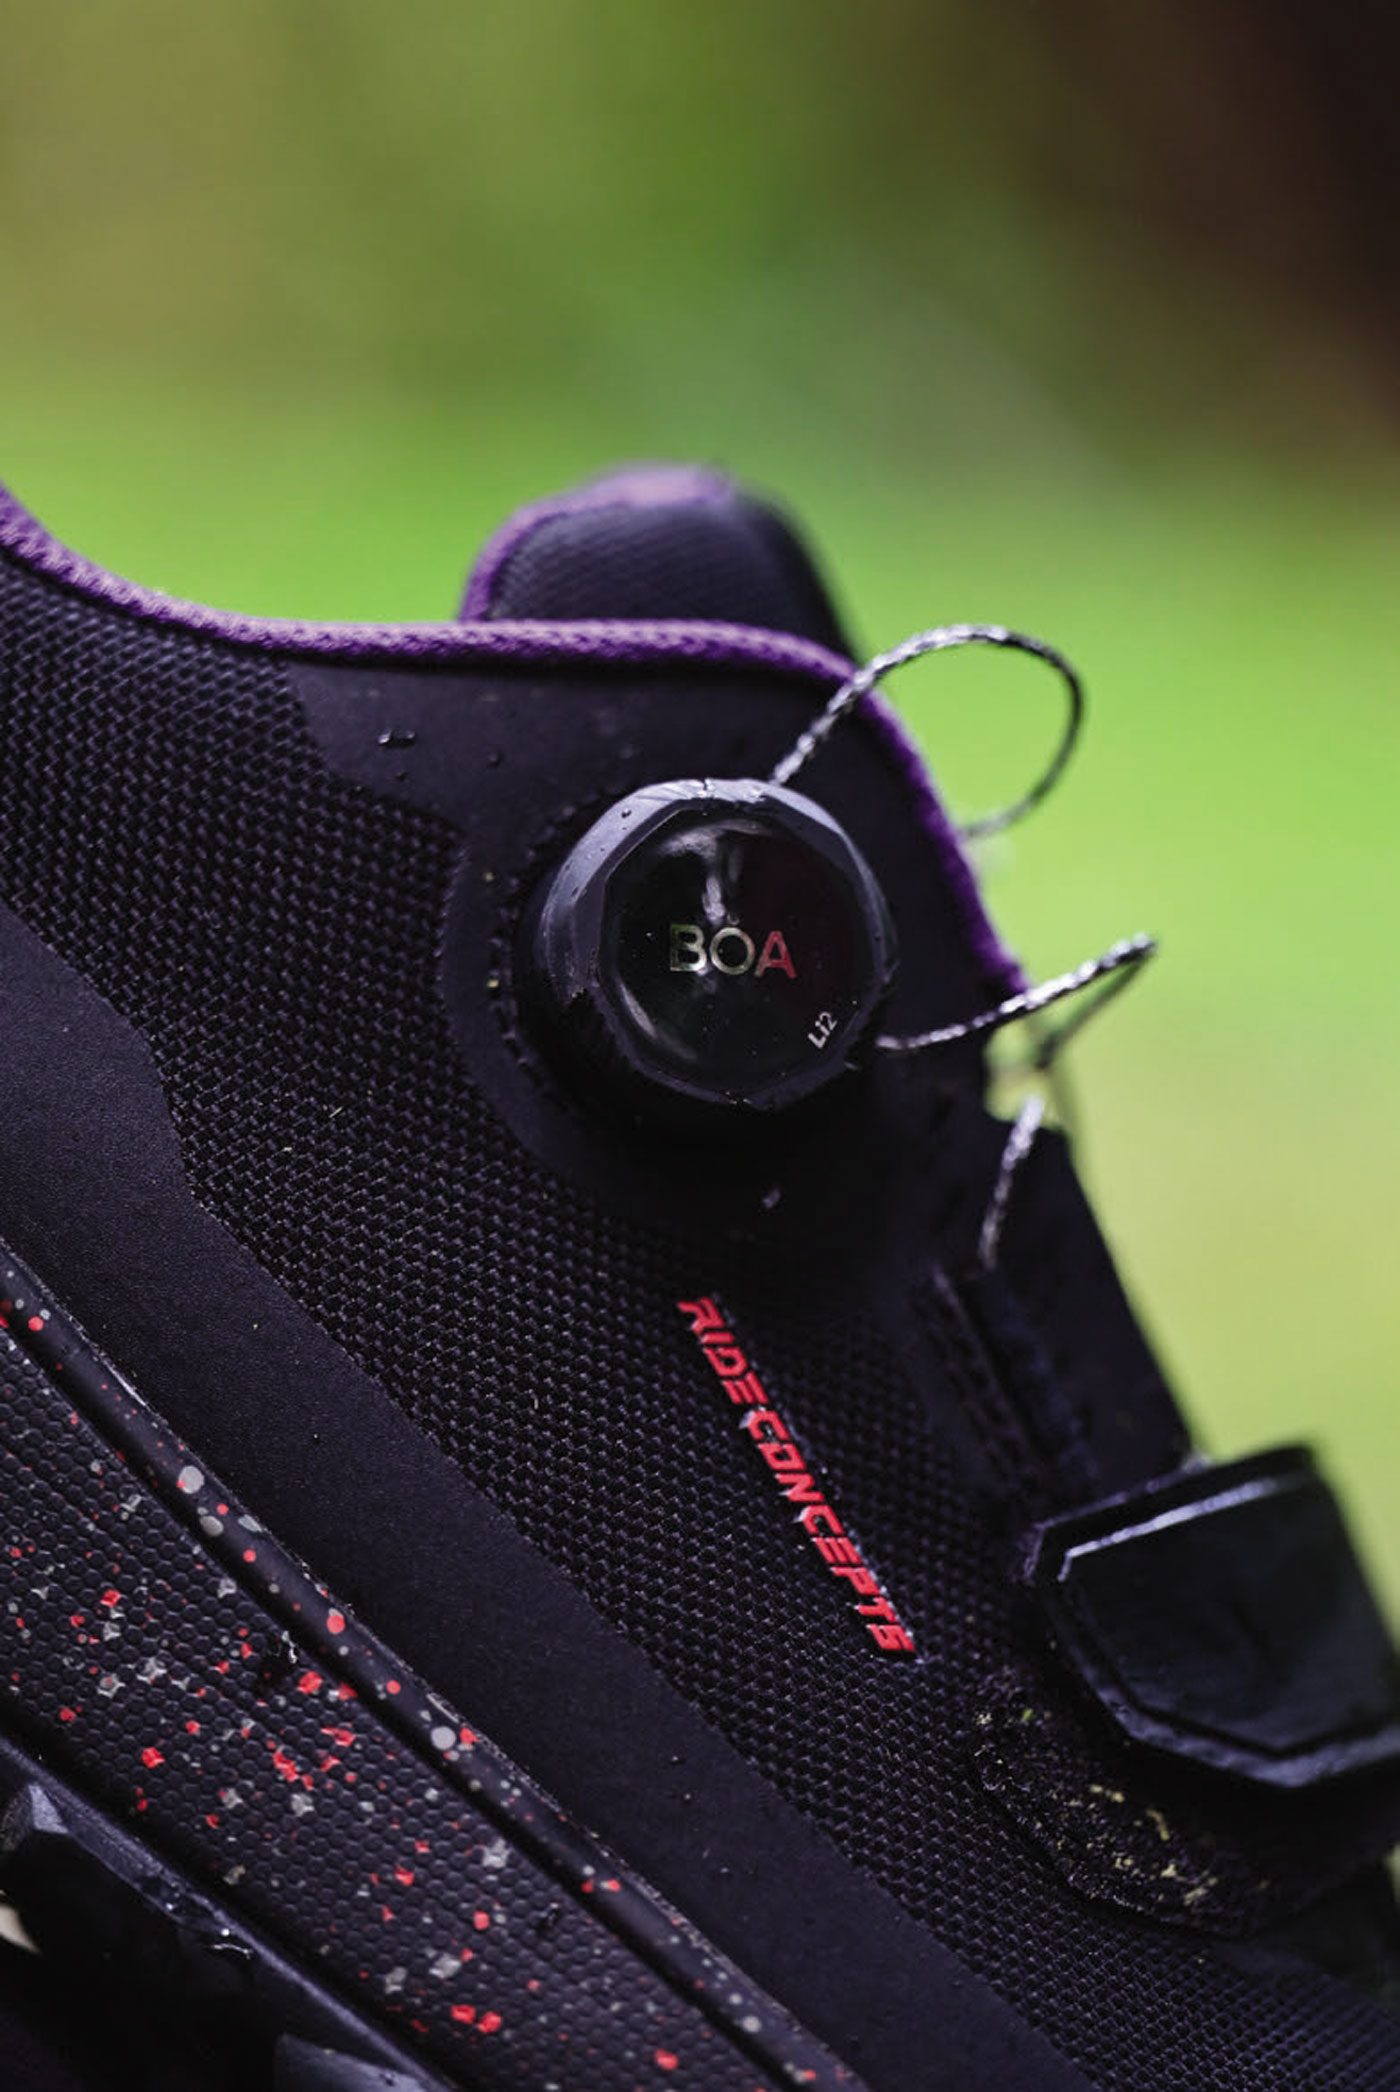
Ride Concepts Tallac Clip BOA Shoes
WORDS: LANCE PILBROW
DISTRIBUTOR: SOLIS NZ
RRP: $349
“If I was thinking about a ride that might have significant hike-a-bike, these would be worth considering for that alone.”
I’m the kind of guy who swings both ways when it comes to riding clips and flats. To be honest, I’m not really sure which one is my preference; I alternate between them both so much. Last year, I was able to review the RC Shoes Tallac Flat pedal shoe and it quickly became my favourite with its generous padding around the cuff, comfy D30 sole, and general good looks. It just ticked all the boxes and seemed to match my foot just right for all-day comfort.
So, when the new Tallac Clip shoe came along, this seemed like a home run. Same shoe, just in clip form. Right? Well, actually, no. But we’ll get to that later.
The Tallac Clip I received is the BOA version – yep, it’s got one of those twisty dials that magically does up the laces and, with a flick and a click, it pops up and everything releases. I’ve had a few of these and, aside from looking a little more space-age than lace-ups, I’ve had no problem with them. In fact, I’ve found them incredibly reliable. I really like how I can make micro-adjustments to the tension as I’m riding along. The low-friction textile TX4 BOA laces look perilously thin, but are in fact ultra tough. I’ve never had an issue with the system across a few different shoes. The Tallac has an additional Velcro strap across the lower part of the shoe as well. To be honest, I’m not really sure what the point of this is. I’d prefer the BOA laces just to go a bit further down. The shoes are quite stiff at this point, so I never really found that the Velcro strap was achieving much and, even with it undone, I didn’t feel like I lacked tension across that part of the shoe. Up top, the stealth black outer and purple inner looks great. The uppers are made from Cordura and have a nice woven look that is also durable, and has kept looking great after lots of riding. Internally, they are nicely padded – something I am particular about. I always like a shoe to feel like there is a bit more padding going on than not enough; I find that it really helps with comfort over long rides, and prevents rubbing and hot-points developing. That often comes at a small weight penalty, but it’s one I’m happy to pay. With all that said, I really liked the level of cushioning throughout the shoe and around the ankle collar area. Inside, they also have D30 technology in the insoles, which are designed to absorb impact and reduce fatigue. I really liked this feature on the flat version, so I was stoked to see it here too. On the scales they weighed in at 525gm per side.
Despite their casual looks, these shoes are stiff. On RC’s in-house stiffness scale they describe the Tallac Clip as “Level 5 Flex, found only on our Clipless offerings, is very stiff – designed for ultimate power transfer and support for hard-charging riders”. By comparison, the flat version I also tested is on their scale at Level 4. That all seemed a bit strange to me, as the flat version is a lot more flexible. On my own personal scale; if my running shoes are a 1, and carbon XC race shoes are a 5, I would rank the Tallac flats around a 2.5, and these Tallac Clips about a 4.5. All that is to say that the clip and flat version are totalling different beasts despite sharing the same name and aesthetics. More on that soon.
Underneath, these Tallac Clip’s also have a totally different tread pattern to the Tallac lace version. These are chunky – really chunky – massive hexagonal lugs cover the main portion of the sole with smaller notched hexagons on the toe and heel. It’s clear these shoes are designed to get plenty of grip if you ever have to walk in them. The midsole appears to be a similar thickness to the Tallac flat, and that is something I really liked about the flat version – it felt like a substantial and secure shoe that was a really good platform for walking around on. And yes, this proved true; walking up some greasy, wet clay uphills I was impressed with the great traction they provided. If I was thinking about a ride that might have significant hike-a-bike, these would be worth considering for that alone. I also liked the way the toe grip extended up around the front toe box, providing additional impact protection and durability to a part of the shoe that can get a bit of a battering. The toe box is super solid and offers a high level of protection.
But all that chunky grip did have a drawback. Most notable was that with my Shimano cleat in my preferred most rearward position, in the slotted cleat bed, I simply couldn’t clip into my XTR trail pedals. I can only assume the tread was simply too thick and was preventing the right amount of cleat sitting proud enough to engage the pedal mechanism. I experimented with sliding it incrementally forward, but it wasn’t until it was more or less in the middle position of the slot that I was able to get easy and consistent ‘clipping in’. This was pretty frustrating, and seems like a massive oversight as most people I know prefer to run their cleats in the rearward position – certainly the enduro-gravity oriented crowd that I think these shoes are aimed at. (NB: After googling this, I see Shimano do in fact sell cleat spacers to raise the profile of your cleat – something I’ve never needed before, and never even knew existed, but would perhaps solve the problem?)
Sadly though, as much as I wanted to love these shoes, as good as they felt on, and as much as I loved the BOA system, and as much as I loved the look, for some reason they just didn’t agree with my feet. About half an hour into a ride, the widest part of my left foot would consistently suffer pain and numbness. This was surprising as it didn’t happen with the flat version, so maybe there is something about the stiffness of these clip versions that is just ‘too much’ for my feet? Or maybe there is something about not being able to get the cleat to work in the most rearward position? I’m not sure. After the first ride I thought, ‘hmm, I’m sure this will solve itself once I’ve broken them in a bit more and they have moulded to my feet a bit more’, but even after 20-odd rides it was still the same. Possibly the Level 5 stiffness means they just won’t form to my feet that much. In the end – and to quote bad relationship break-up lines – it was a ‘it’s not you, it’s me’ kind of deal with the RC Tallac Clip. Maybe they are just fractionally narrow for me? Maybe I’ve got a weird issue with my left foot that I wasn’t aware of? Maybe I’ve discovered something and need to see a podiatrist? RC do describe these as a mid-volume shoe on their website and say you may want to consider sizing up half a size. I didn’t get the chance to do that, which would be interesting, but I’d also be nervous to feel too loose in the rest of the shoe as I really like the general fit at my normal EU44 size. I still really like the shoe in principle; I like it enough to persist with it for a bit longer – even after this review goes to print – in the hope that it does in fact mould to my foot just that little bit more. It’s clearly a high-end shoe made with premium materials, which means I would expect it to be extremely durable over the long term and I think it will be a winner for lots of people, so it’s still worth checking out. But, I would also say, if you’re just on the fence about which size to go for, going up might be the right call.
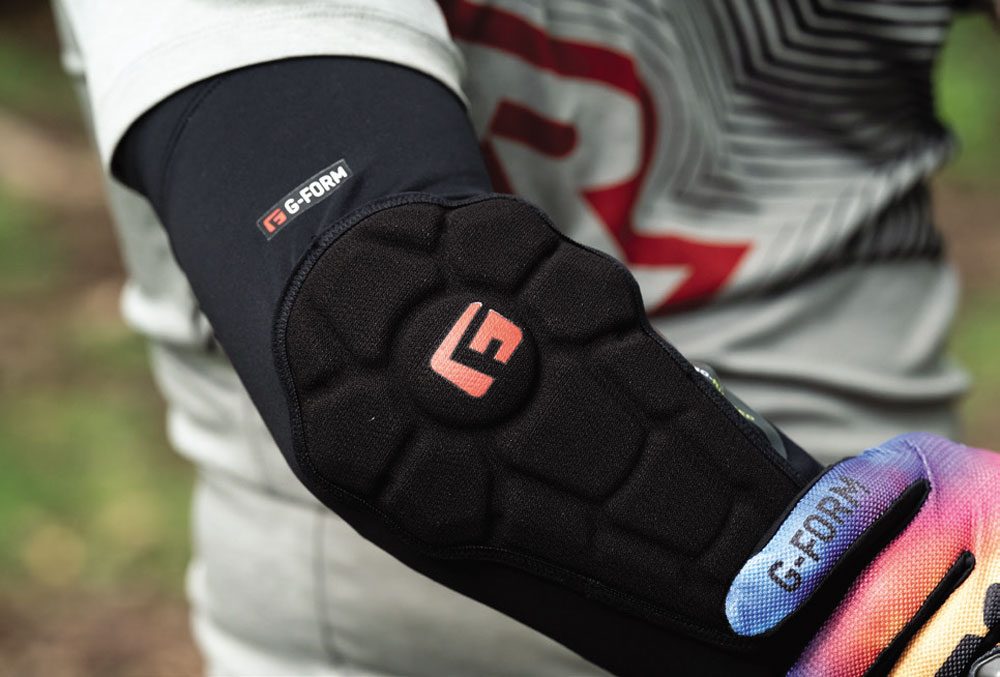
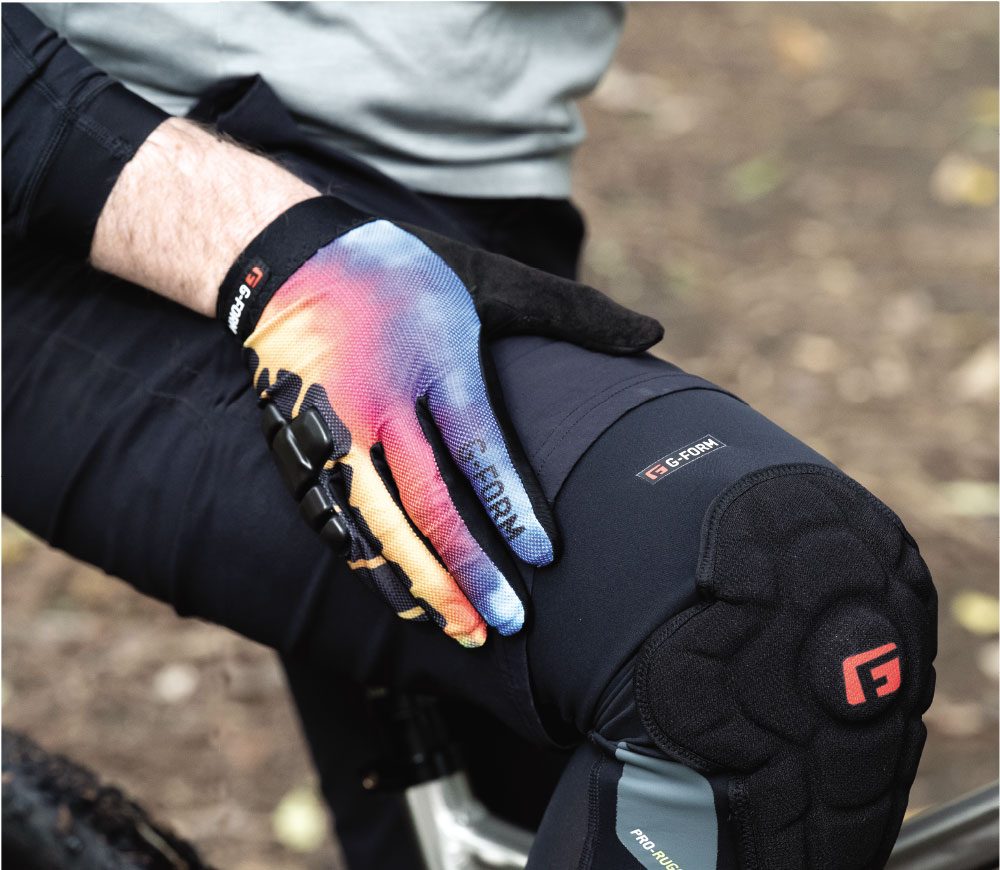
Product Review: G-Form Protection
“I’m really not sure if you could make a knee pad comfier than these. I actually forgot I had them on while writing this review…”
G-Form has built a solid reputation for comfortable protection over the years. I’ve owned previous versions of their elbow and knee pads, and I’ve used them for enduro racing when I’ve specifically been looking for something that is minimal enough to pedal in it all day, but enough to take the worst out of any impact. The last set of G-Form pads worked just perfectly at this, but they were on the minimal side of protection, so I was interested to see their latest ‘Pro Rugged’ series release as it seems to take things up just a notch. All of the new Pro Rugged range use their Smart Flex product on the impact zones; a soft, slightly putty-ish-feeling pad that gets significantly harder on impact. The technical term is ‘viscoelastic’; it’s a cool bit of tech that means when you are just pedalling along, the padding has a more natural ability to flex and move with your body’s natural movement, but still offers the impact protection that you bought the things for. It’s also designed to actually absorb impact and transfer less of this onto the rider.
On both the knee and elbow pads, the SmartFlex zones are covered in Armor-Tex, a tear-resistant fibreglass reinforced material. It’s got a rugged feel to it, and importantly, makes the pads look a little more matte, a little more subtle and, to be honest, a little less alien-like than previous versions which had a bit more sheen to them.
The G-Form Pro Rugged knee pad is similar to what I owned earlier, it’s a Lycra-style sleeve with SmartFlex around the knee. On this version, it is all a little thicker than previous G-Form pads I’ve owned but the idea is the same. The Lycra sleeve material is also different to my previous pair, this feels like it’s both thicker and softer too. They have also added a compression quality to the sleeve material which helps with the goal of keeping them in place. Putting them on, I was once again impressed with how comfortable these pads are to wear. They really do fit like a glove (their gloves fit great too, as you’ll read later) and they don’t have any noticeable itchy spots from Velcro or material bunching. I’m really not sure if you could make a knee pad comfier than these. I actually forgot I had them on while I was wearing them, writing the review! There is an upper Velcro thigh strap to tighten if you need it, but the silicone strip around the top and the bottom, combined with the natural stretch and compression of the sleeve, mean that they stayed in place perfectly, so I never really needed any tension on the Velcro.
The pads are left and right specific, with the SmartFlex zone angling outwards as it moves down your shin, which puts it in a better position to protect against scrapes that would probably come from the outside of your leg. In terms of protection, they really are all about the knee; they don’t offer anything in terms of impact protection outside this zone. These are going to really appeal to enduro riders and those looking for something they can ride all day in, comfortably.
The elbow pads are, well, like the knee pads but smaller! The Pro Rugged elbow pads pack all the same ideas into a slimmer, elbow-friendly package. Same SmartFlex padding covering your elbow but extending a little further down to cover your forearm as well.
We also had the Sorata gloves on review at the same time. These apply the same SmartFlex material found in the knee and elbow pads, but minimally, to the outer edge – just that spot where you are most likely to smash into a tree on that corner you misjudged. We had the Tie-dye colour way, but they are also available in black, blue and green/ grey. Apart from where the obvious armouring is, they are a lightweight, slim fitting glove that feels great. Though you can definitely feel the armouring on the outside of your hand when you are wearing them, they strike a nice balance between offering just a bit of protection in the most likely impact zone, without going so far as to feel like you are wearing a cricket glove. There is no Velcro closure which is a personal preference thing, but I found they had plenty of stretch around the cuff, they went on and off easily, and the cuff band felt great – a little wider than other gloves I’ve had in the past.
Out on the trail with the whole kit on I was really impressed with how comfortable everything felt. Other knee pads I’ve owned either seem to slip down or need to be tightened up so much it feels like I’m losing blood supply. These felt great. What is more, even after longer rides I didn’t feel like I had discovered the chafe and rub that some pads give. A big part of this, I think, is down to whatever they have done to improve the sleeve material and make it feel less Lycra-y, and a bit more like a nice pair of my wife’s yoga pants. Trust me, it’s comfy stuff, and it stops the areas underneath the armour zones rubbing against your skin. I’d happily wear these for an all-day enduro where I knew I would have to be putting in some serious pedalling throughout the day. The same went for the elbow pads and the gloves – no news is good news! When you don’t have much to complain about, there is sometimes not too much else to say. It does what it says on the tin! They weren’t too hot, the fit was spot on, and they stayed nice and comfortable all day long. Is there much more we’re looking for in our gear? Highly recommended.
REVIEW: LANCE PILBROW
DISTRIBUTOR: EVEROUTDOOR
RRP: SORATA GLOVES $59
RRP: PRO RUGGED KNEE PADS $149
RRP: PRO RUGGED ELBOW PADS: $139
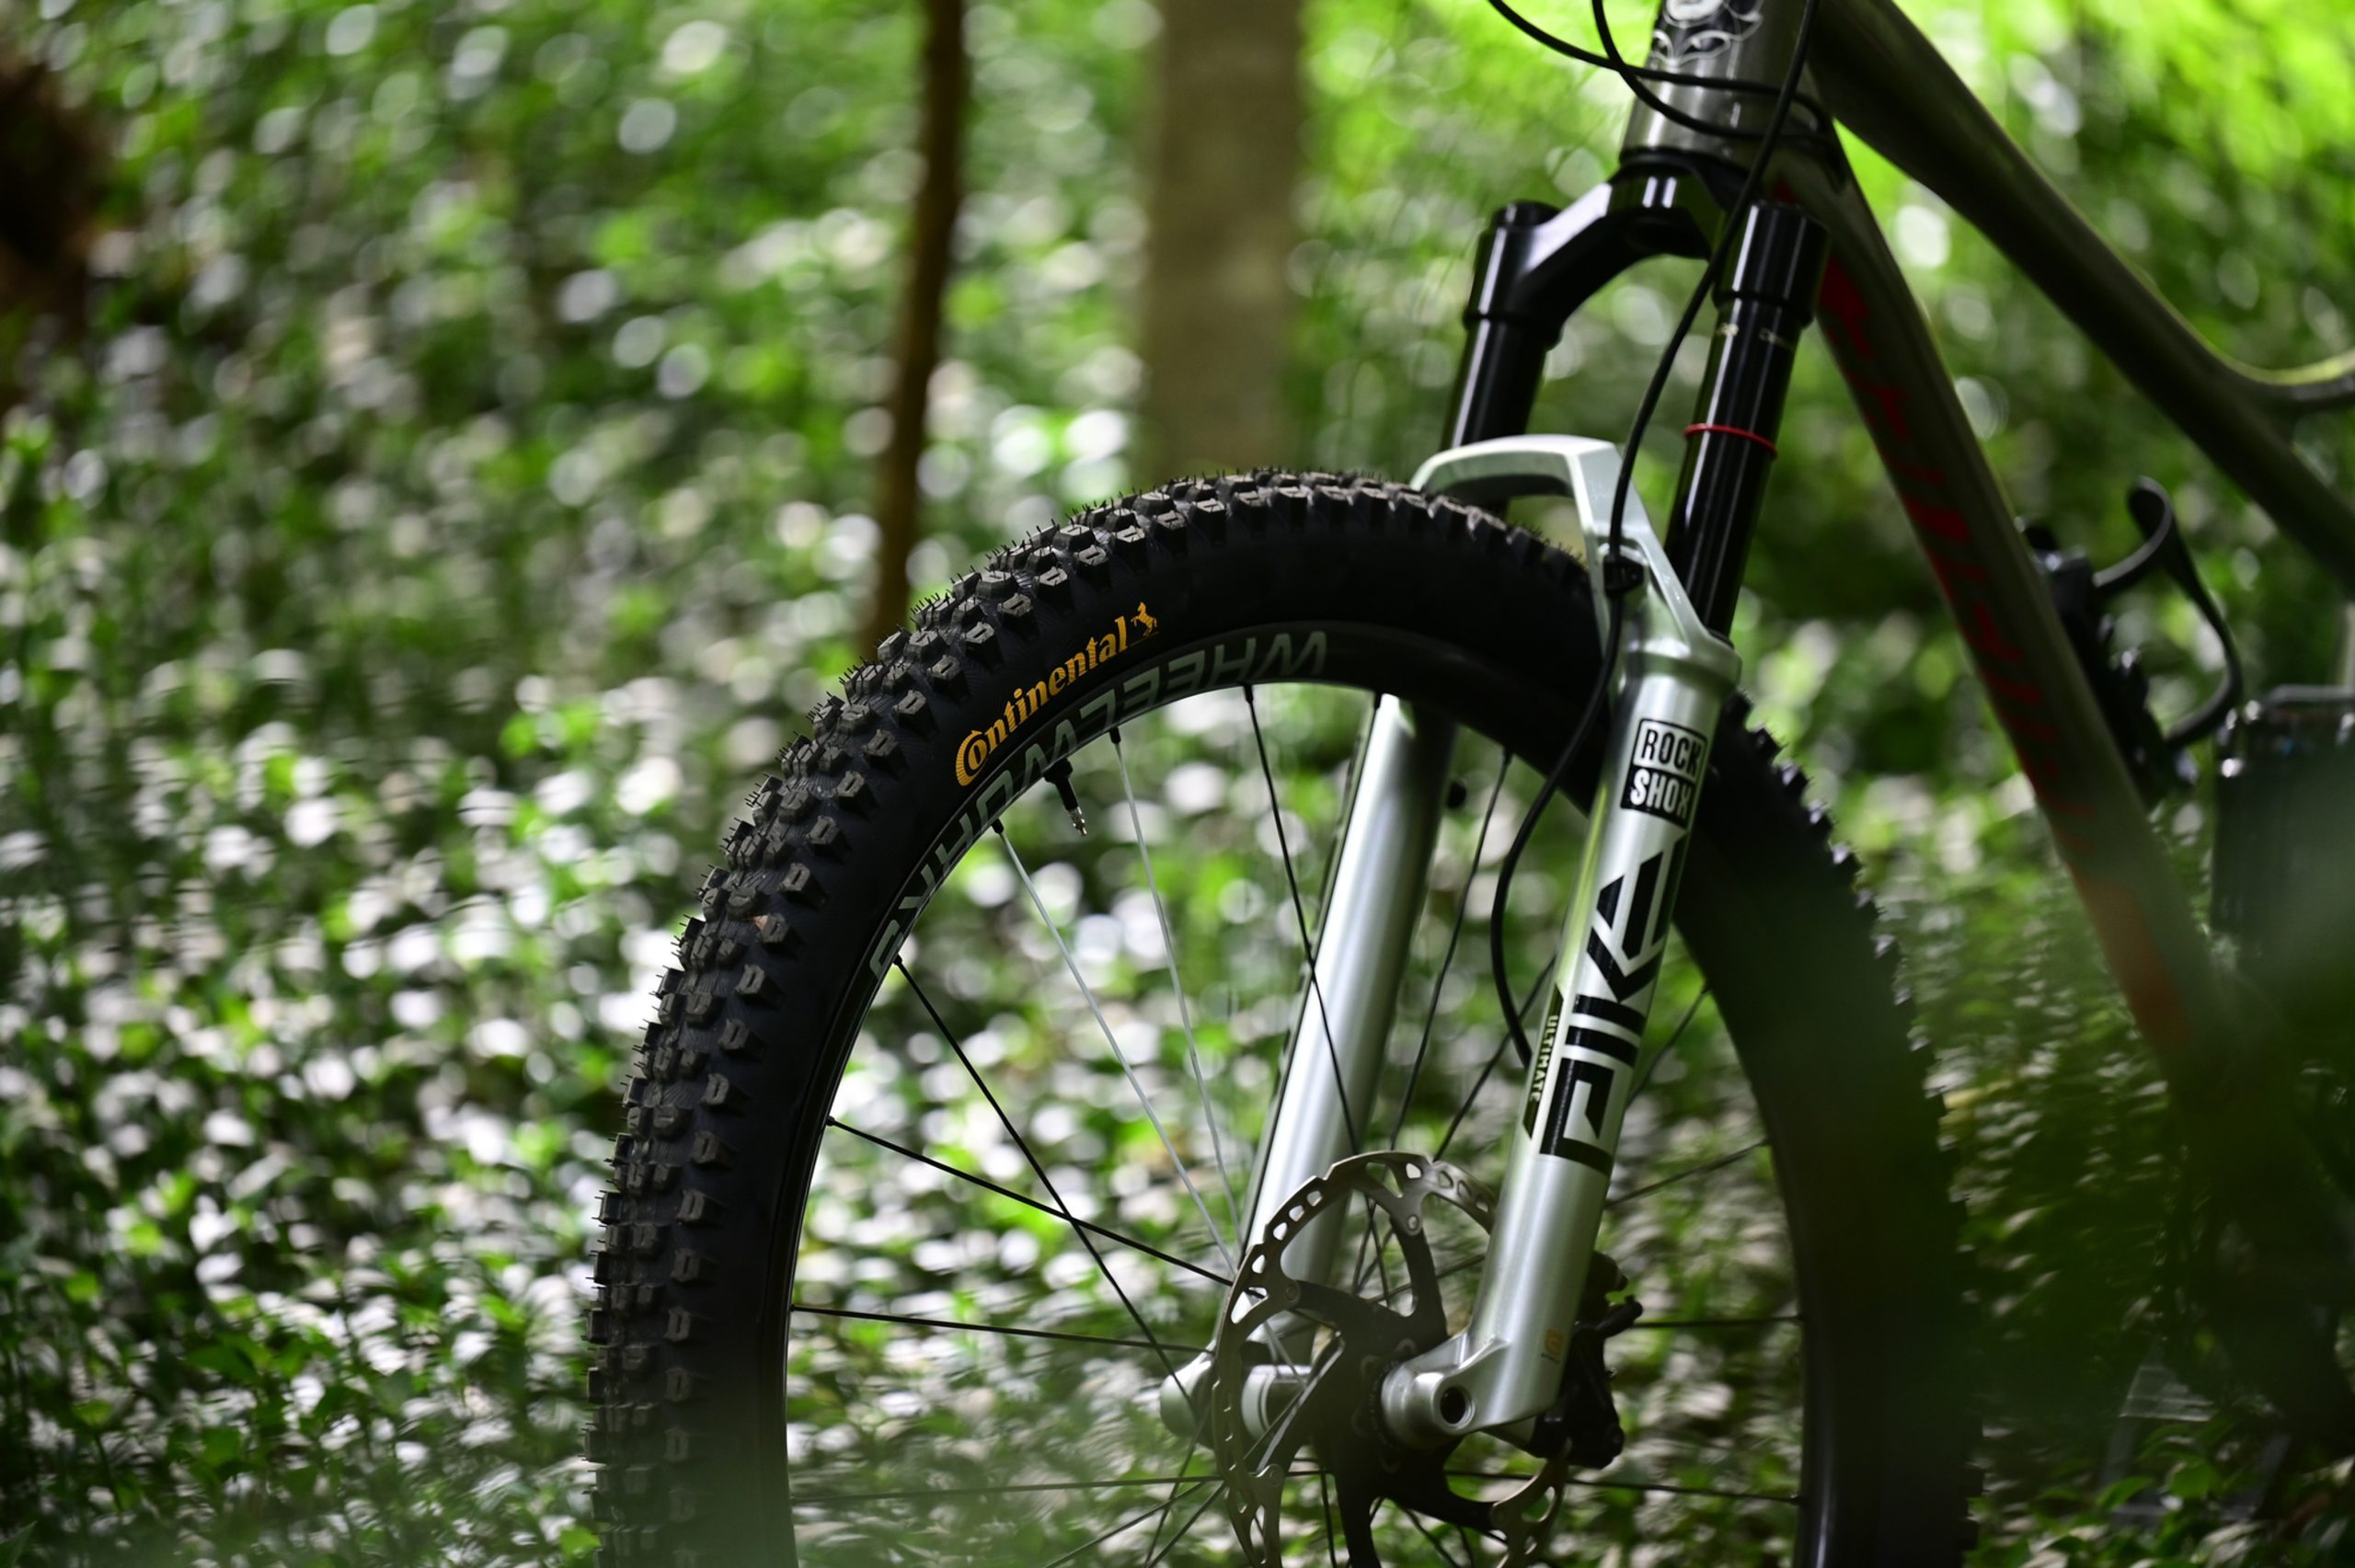
First Impressions: RockShox Pike
“We have been lucky enough to get our hands on the brand spanking 140mm Pike Ultimate and will be putting it through its paces throughout the year.”
Earlier this year, RockShox rolled out a major update of their range with an all-new Zeb, Lyrik and Pike, not to mention a bevy of new rear shocks. We have been lucky enough to get our hands on the brand spanking 140mm Pike Ultimate and will be putting it through its paces throughout the year. First though, the Pike was already a fantastic fork, so what have the SRAM engineers been tinkering with to make it even better?
For starters, one look at it and you can tell this is more than just tinkering, this is an all-new fork. The chassis and arch, in particular, look markedly different to earlier models, but the changes are worked throughout; starting from a blank canvas has meant that engineers have been able to make a unified approach to integrating all the best new ideas they had at one time. On the outside, you’ll see a new crown, upper tubes and lower legs and pressure relief valves on the rear, but the insides are all new too.

Previous Pikes spanned a wide travel range, but this has now been narrowed down to focus specifically on the 120-140mm travel range —smack bang in the middle of what SRAM see as the trail bike market. If you want more travel, you’ll have to go for the Lyrik; less travel, you’ll be on the Sid. This tighter range of travel means that SRAM engineers have been able to narrow the parameters of what they are working with and therefore optimise around that. The result, lower weight in some areas, and better torsional rigidity, meaning they are less likely to twist under braking load and navigating off camber terrain. Forks that don’t twist are free to move through their travel, so that rigidity creates a consistent, supple fork, even under the toughest conditions.
The new Charger 3 damper has been designed from the ground up and features a new spring backed, IFP cartridge damper. Fully sealed and self-contained, this new damper is designed to offer riders a much more consistent feel throughout the stroke, and an increased ability for riders to easily tune the ride to suit their riding style and preferences. The result? Totally independent High-Speed Compression (HSC) and Low Speed Compression (LSC) adjustments, and no “cross-talk” between the two.
On top, you’ll find new adjusters with a new twin dial layout, also with handy visual indicators so you can see at a glance where you are on the adjustment scale. They feature noticeably clearer indents between each setting too. Inside the forks, the bushing design is brand new too — these feature longer bushings now, which actually reduce the overall friction in the system.
On the other side is the new Debonair+ air spring, again, tailored to the specific needs of a fork in the 120-140mm range. The shaft is now an all-aluminum piston instead of plastic, there are improved glide rings, and a tweaking of the volume in the positive and negative air chambers. So, what’s the end result of all of this? RockShox believe the new Pike can initiate travel easier and that it will feel plusher off-the-top, while still having great mid-stroke support. It also means a higher ride height; it won’t dive through its travel under braking which means that you’ll be able to utilise every millimeter of travel when things start to get rowdy.
In terms of weight, ours weighed in at 1.90 kg with a 190mm steerer. That’s comparable with the previous generation, but the fact that they have managed to get 13.5% more torsional stiffness inside the same overall weight is pretty cool.
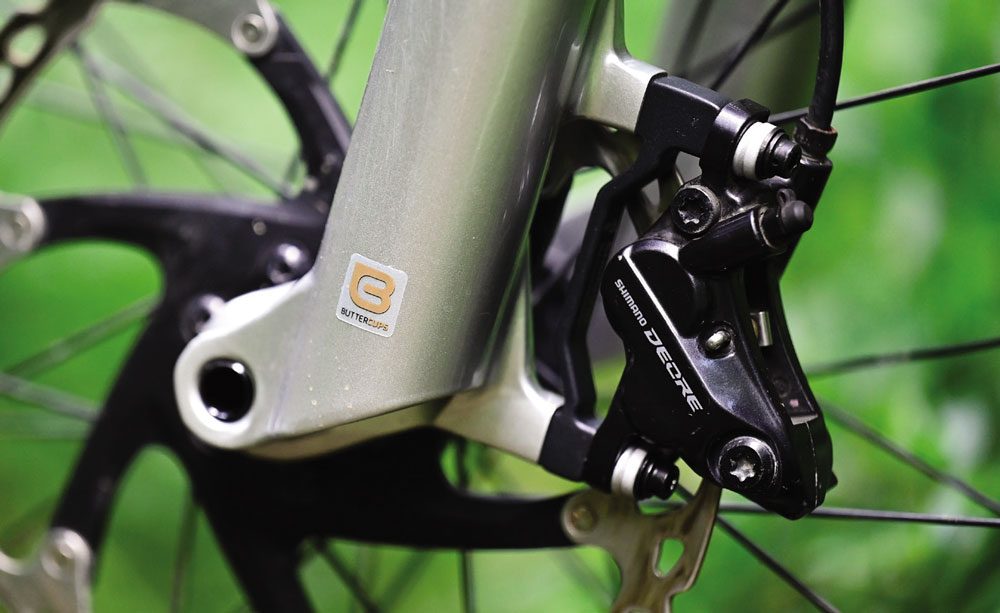
The final new idea that engineers worked in was the addition of what they call Buttercups. What are Buttercups, you say? Well, first, let’s talk about what they are trying to address. Ever felt like your hands have been battered after buzzing through a section of ripples on a fire road? Those are high-frequency, low amplitude vibrations. RockShox call it ‘trail chatter’ — those fast, small vibrations that ‘vibrate your eyeballs’ so to speak. As fancy as they are, fork dampers aren’t really designed with this specific example in mind; dampers are designed to absorb impacts, vibration-like trail chatter can often make its way past the damper without really activating it, up the fork, and into your hands.” Ok, so that’s what they are working to resolve — but what exactly are they? Buttercups live on both the damper and air spring shafts of Ultimate-level forks. Inside their gold packaging, Buttercups utilize rubber pucks and a metal plate to absorb frequencies that would otherwise travel up to the rider. These little Buttercups add about 4mm of vertical compliance to your suspension and RockShox believe they achieve an average of 20% reduction in vibrations from reaching your hands. Impressive!
Having owned the previous Pike, and a Fox Factory 34 (albeit the previous generation), I was eager to see just how the new Pike had improved over its previous version, and also over its nearest competition that had recently been upgraded.

Setting it up on my Banshee Phantom down-country bike, I was immediately impressed with the new look. The whole chassis has a modern, muscular look about it… and the silver was a great match too, which didn’t hurt. Straight away, I could tell that these were going to be a vast improvement over my previous Pikes in terms of small bump absorption — these things were smooth and would initiate into their travel with almost no force. The amount of stiction that is needed to be overcome to get the stanchions moving was almost non-existent. The first trail I rode, I could tell that these were indeed a whole new kettle of fish compared to the previous version.
The biggest realisation was how the first 30-40mm of travel seems to be noticeably more active. Whereas I was previously reasonably happy with my old Pikes (yes, regularly serviced) these new ones made the old ones feel, well… let’s just say, they’re not around anymore. Fast forward a few rides and the next thing I started to notice was how much more regularly I was using all the travel. I’d look down at the travel indicator O-ring and see that I had used all the travel, however, while riding I never noticed feeling like I’d bottomed out. They seem to have also improved the feel of the curve as you move towards the end of the travel to make it feel like you never really hit bottom.
This is just a ‘first impressions’ review but we are looking forward to putting some serious miles on these throughout summer and seeing how they hold up over the long haul, as we test them through a variety of conditions and have time to fully experiment with the various tuning options on offer.
REVIEW: LANCE PILBROW
DISTRIBUTOR: WORRALLS
Product Review: Rapha Trail Shorts
“Every piece of clothing comes with a field repair kit containing fabric matching iron-on patches to keep you looking good after a crash.”
It’s no secret that this brand comes from the ‘roadie’ scene. But this means they know a thing or two about use of good fabrics and have been making ‘roadies’ look good for years. Rapha has now employed their knowledge around textiles to mountain bike apparel. Their focuses are on sustainability and longevity — and I can vouch for their products lasting many seasons. Rapha’s colourways are normally subtle, so you needn’t worry about being out of vogue whilst on the trail.
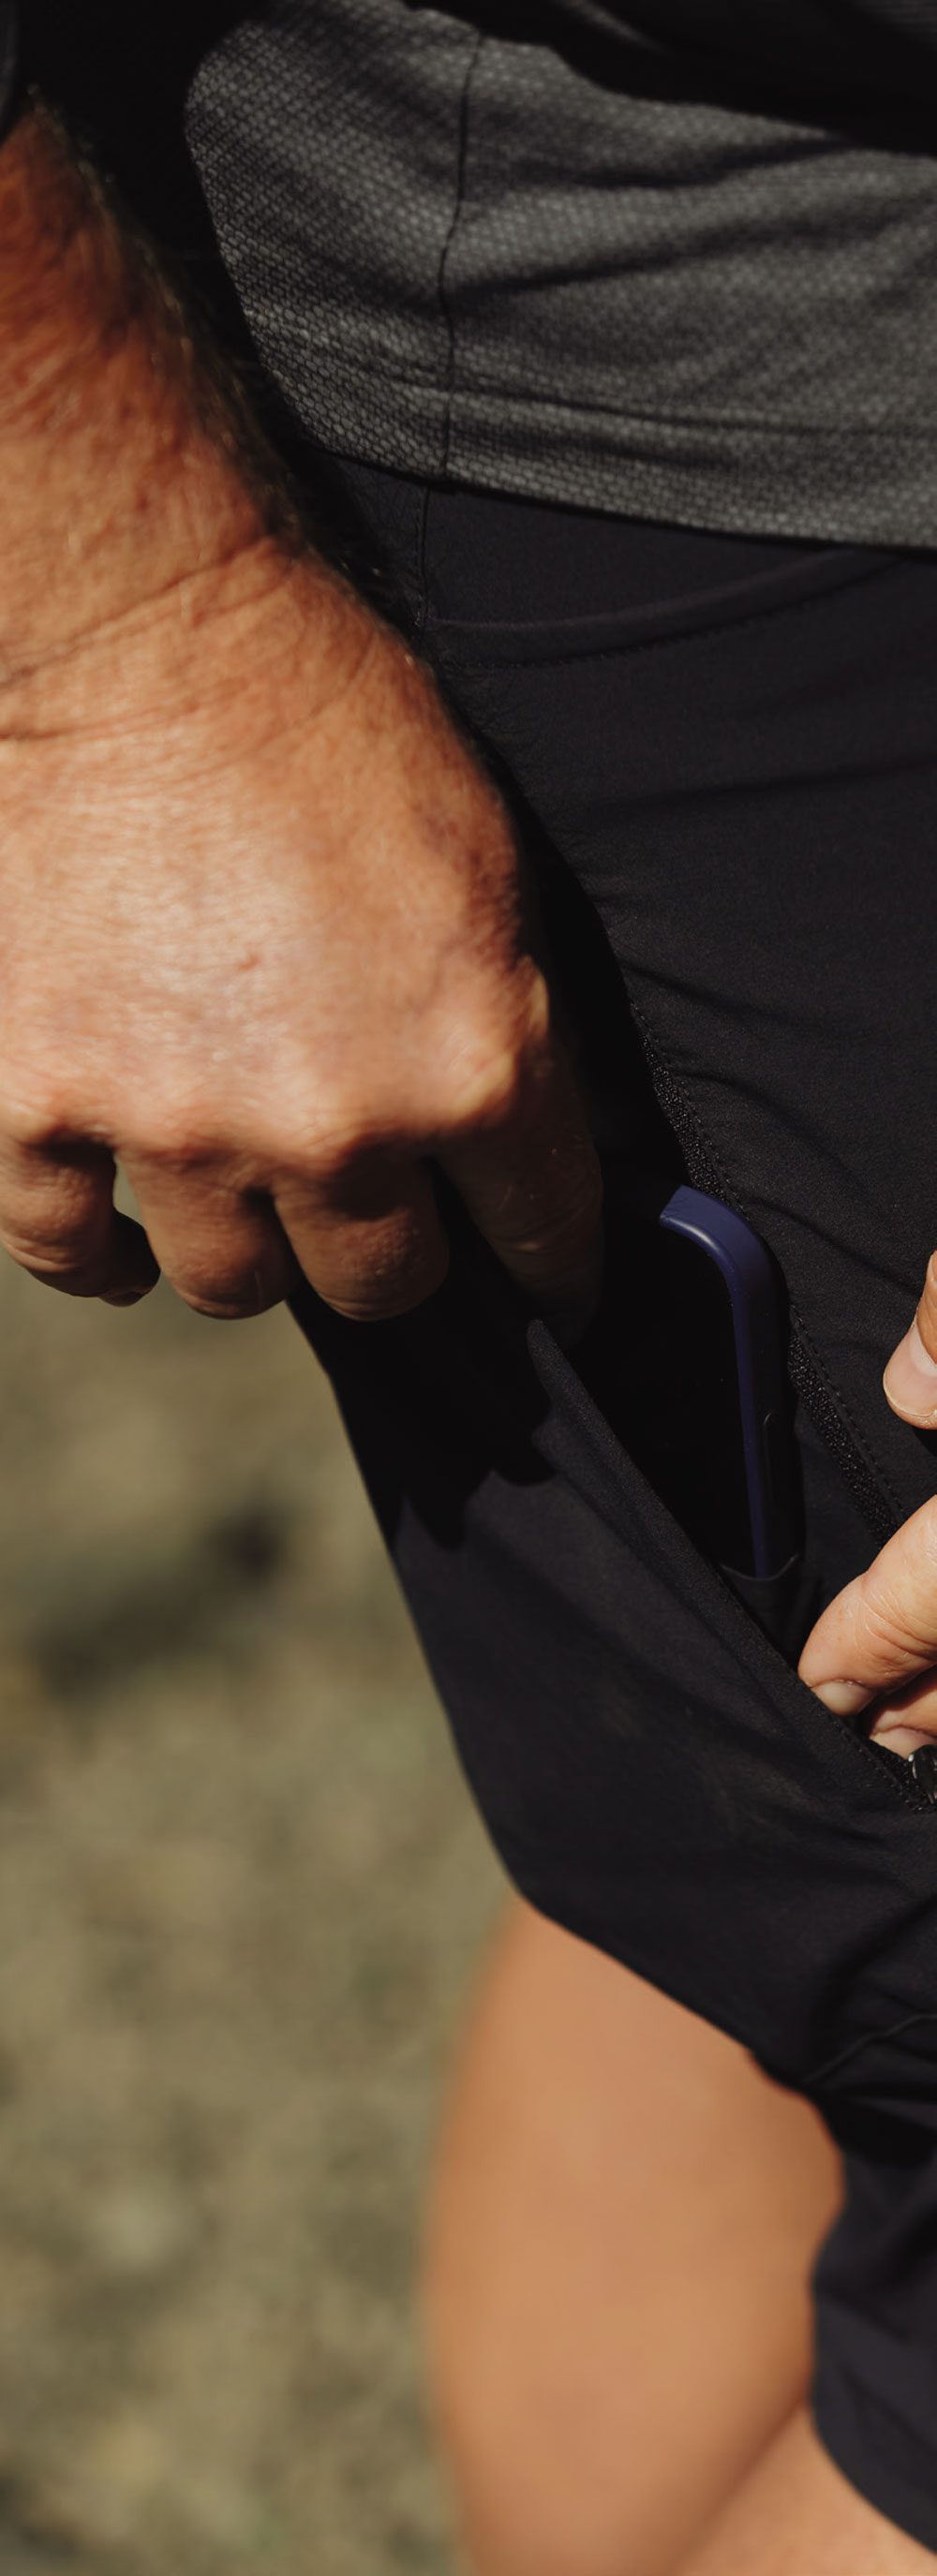
The Trail Short is a built from four-way stretch material that is Bluesign certified, meaning it is built from sustainable sources with minimised environmental impact. An integrated, contoured waistband allows for precise fit adjustment and there are four pockets, two of which have zippers with an integrated phone sleeve to keep items from sliding around. The cut is fairly form fitting but has been designed to work with or without knee pads.
The Trail Short have a relaxed and comfortable fit that slides over small to medium knee pads with no issues. Larger, downhill style knee pads may cause the shorts to bunch up and sit on top of the pad, though. I found they fitted my medium knee pads well and were also good without, too. The short is a little more form cut, which means there’s no bunching and they don’t get in the way when you’re pedalling. They certainly don’t have the bagginess of other shorts on the market.
The adjustable waist is neat and easy to use, locking in a personalised fit with no slipping of the belt. The size medium was a perfect fit in both the waist and length for me. Having had these shorts for a while, I found the breathability to be moderate even in the warmer months. They breathe well and don’t overheat, but a few vents would just allow a bit more airflow, especially if you’re wearing a bib-short underneath. The zippered pockets keep trail essentials secure, and the phone sleeve is a very well thought out solution to keep your phone from bouncing around. I really like this feature, and the position means the phone feels like it’s out of the way but always accessible for that quick pic or vid.
Rapha has priced these shorts consistently with the market and offers several services, such as free repairs and free returns if you’re not happy with them. Every piece of clothing comes with a field repair kit containing fabric matching iron-on patches to keep you looking good after a crash. Heck, if you shed some kilos they will offer 50% off your jersey in a smaller size. I’m a big fan of buying a quality piece once, rather than buying cheap stuff every year — and Rapha promises exactly that: quality and longevity, with repairs if you do happen to find a way to destroy it.
REVIEW: LIAM FRIARY
DISTRIBUTOR: IRIDE / RAPHA
RRP: $195 AUD
nar dapibus leo.
Bike Review: Trek Fuel EX
In the bike world, we often hear about ‘incremental improvement’. Teams take a lot of things into consideration that seem trivial but, taken on the whole, they add up to the small advantages that make the difference between winning and losing.
The same sort of thing applies to the bikes that get trotted out each season.
The reality is, within most categories, the bikes available have been very good for a long time now. The stuff that gets bolted on has been equally good for just as long. That high level of functionality means incremental improvement is what we get.
In the case of the latest Trek Fuel EX, it is a revision of a model that has been a mainstay for trail riders for 17 years. My personal bike has been one of these things for the last two iterations, and I can attest that although my first one was a very good bike, the next was slightly better and the latest one is better again – for my purposes anyway.
I switched from more boutique brands for a variety of reasons. Practicality, to start with. The bike shop I work with in my day job is a Trek dealer and, yes, I admit I got a good deal on my first Trek. But the main thing that made me give the bike a go was a conversation I had with a friend who runs a high-end bike and sports retail store in Germany.
In his country, Trek is seen as a market-leading brand with the best technology, and customers pay a premium for the products. The retail environment in New Zealand is a bit different, and Trek is one of the brands that is available in the two big chains of retail stores. Not necessarily a bad thing, but it puts a brand in a different sort of light.
I looked at my mate’s input as a reinforcement of my decision to go mainstream, and ordered my first Fuel EX.
I rode that bike for two years, and had the same amount of strife as I had on the boutique brand bike I had been riding. That is, not much. Everything worked, and there were no big problems. So, I was a lot more confident upgrading when the next major model change came along.
My current bike has also given me two years of trouble-free operation, and it was a lesson in the benefits of going with a gigantic company’s offer. A full carbon frame, carbon rims, and decent pile of components for a very keen price.
When I got the chance to spend some time aboard the latest version, I felt well-qualified to feel out what I expected to be very small differences.
The improvements turned out to be more than incremental.
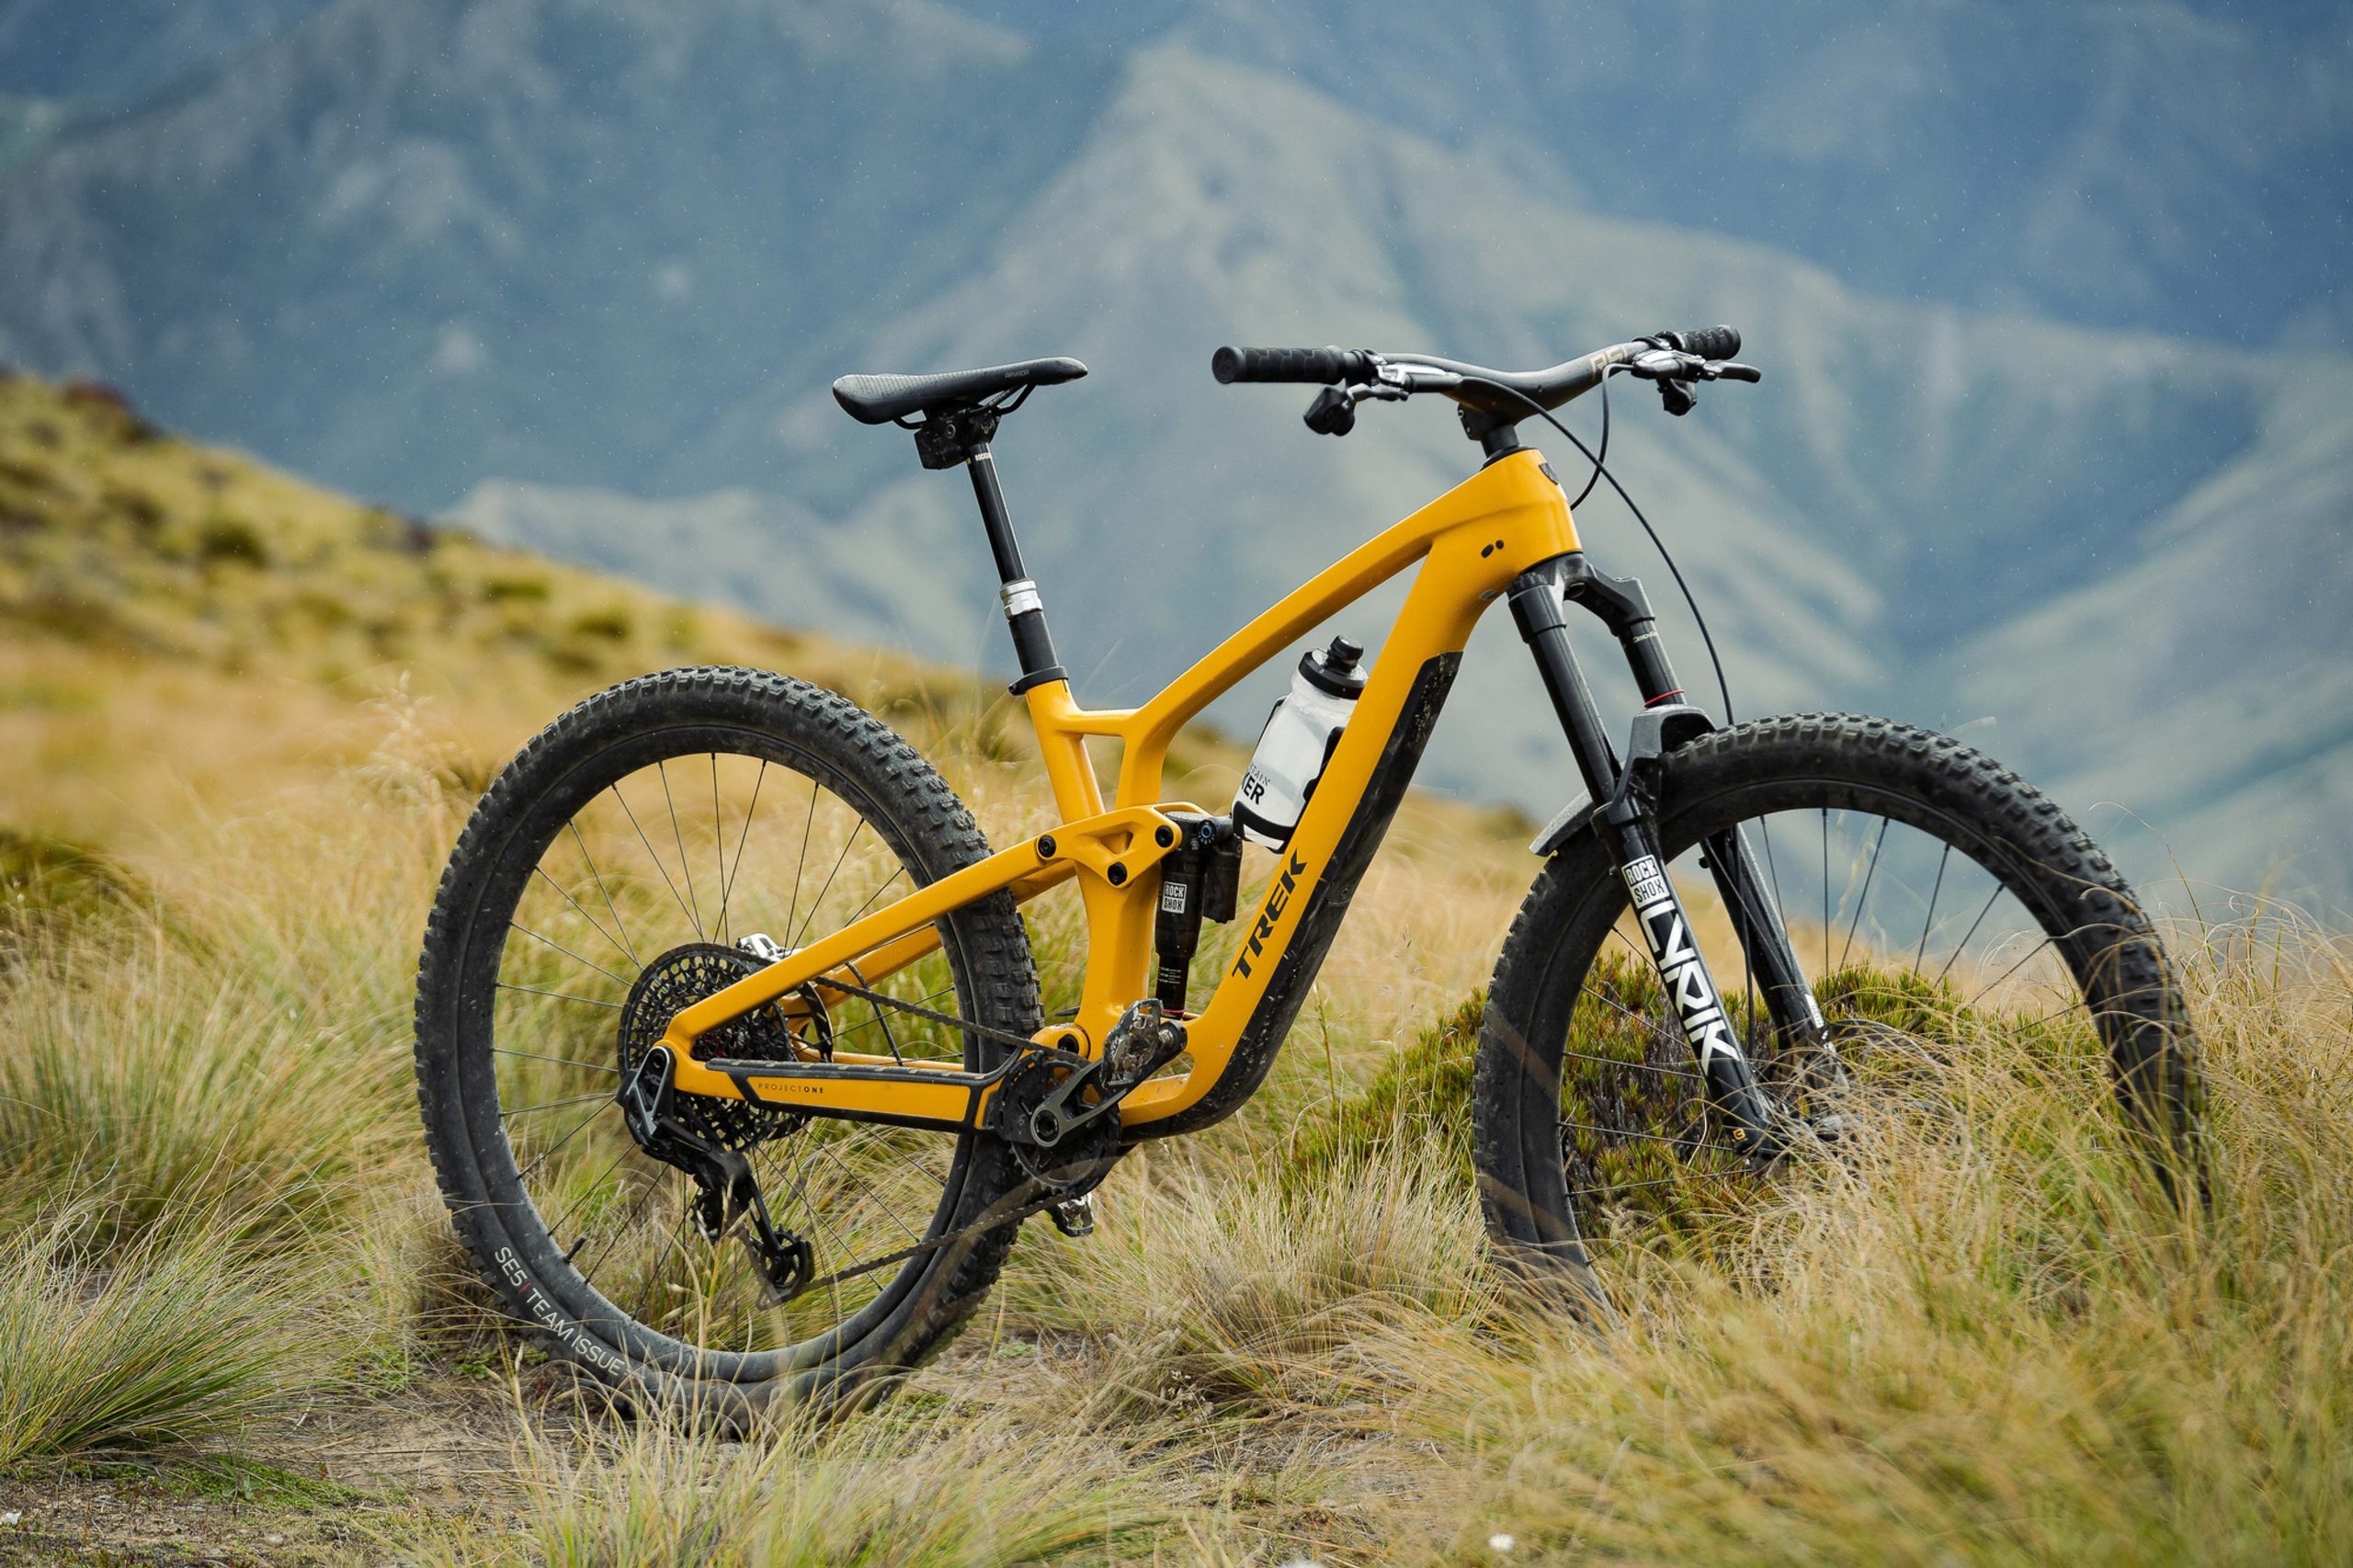
The frame is a thing of beauty – but that is in the eye of the beholder, of course. It has a very similar suspension system to the previous model, with ten millimetres more travel at both ends – they have upped the numbers to a very middle-of-the-pack level for a 29er trail bike: 140mm at the back and 150 in front.
The new model features more adjustability. Trek has offered their ‘Mino Link’ flip chip in the rear suspension for many years. That is an eccentric unit in the upper link of the rear suspension that lets a rider choose between a lower BB height – that makes the front end a fairly slack 64.5 degrees – or a higher BB and half a degree steeper head angle. In the 2023 model, they added a flip chip in the lower shock mount which gives you the option of a linear shock rate in the ‘Less’ setting or a noticeably more progressive rate in the ‘More’ setting. There is also provision for a headset providing a total of two degrees of adjustment.
The frame design makes a coil shock a possibility, and you can even mulletise the beast if you so desire.
The frame is definitely burly. There is a lot of material in the big tubes and tough-looking support struts in the well-reinforced design. The claimed weight of the Medium sized carbon example is 3.4kg. That translates to a complete bike weight of 14.15kg for this top-drawer model on review. That is not a super light bike these days, and the lower-specced versions can see an extra couple of kgs added on. Does that make much difference to the overall experience of the ride? Not in my opinion.
Heading out into the woods on the new bike, the first thing I noticed was the change of perspective from my cockpit point of view. My ‘old’ bike is a 2020 model, which has a 66 degree head angle and a 140mm fork. A degree and a half slacker, and 10mm more travel, doesn’t sound like much, but it puts that front wheel way out front. The effective seat tube angle has steepened by a whopping 2.5 degrees, to 77.5. The reach is stretched out by 5mm compared to the old machine, but that seat tube angle puts the rider over the centre of the bike.
The next thing I noticed was how spritely it felt. How a bike ‘feels’ is so subjective, I have always wondered why reviewers wax on about it, but now I am one. And how the bike feels is actually more interesting to me than all the numbers, especially the ones that refer to weight.
It feels light. It pedals incredibly well; the suspension platform is very stable with the air and compression settings set according to Trek’s online guide. It goes uphill better than anything in this reviewer’s experience – at least, that is the feeling I got from it. It isn’t a miracle machine, my Strava segments were still very average, but there were some PRs!
Same going down. The bike definitely transmits more chatter to the rider than my previous Fuels, but that could be down to the very stiff, unified bar/stem fitted to the model I had. Dropping a little tyre pressure settled it down a lot. I have not had great relationships with previous sets of Bontrager rubber, but the tyres fitted to this bike worked very well. They are big and heavy, and at a spongy 18psi in the front and 20 odd in the rear, they stuck to the dirt.
The extra ten millimetres of suspension travel doesn’t sound like much but, combined with the geometry tweaks, it really inspired confidence on downhill trails. I might not having been going any faster, but I felt great.
The down tube features the same storage facility that has been on the Fuel from 2020, with a cover that is secured by a lever tucked under the bottle cage, which bolts to the cover. There is enough room in the tube for a spare tube, a small pump, and a toolkit as long as everything is packed so it can’t rattle around. I have been paranoid about damaging the inside of the frame by having something loose floating around in there, so on my Fuel I have repurposed some neoprene things I had kicking around to contain my pump and a multitool. The bikes come with a long folding tube holder, which will hold a lightweight tube if you are patient and careful. It has a red tape on the end to haul it out with, and stowing the tube holder stops anything else form sliding down into the bottom of the tube and out of reach. The only downside to this baggage compartment is that the lid can rattle – it has the weight of a bottle attached to it, which probably doesn’t help. The test bike’s lid didn’t rattle at all. While we are on acoustics, the very generous chain stay protector on the new model quiets the back end of the bike down.
My take on the 2023 Fuel EX is very positive. I liked riding it. For everything I like to do, it was hard to imagine much improvement.
There is a range of build options that all share the same carbon frame.
The test sled was the 9.8 AXS model. It is listed at $12,699 – and that is a fairly eye-watering investment but, when you look at the tech you get, it is a way south of what you would need to spend on many more boutique brands with the same level of kit. Wireless shifting, carbon wheels and bars, Fox suspension.
There is an XTR version at $14,499, but the one that stands out for me is the XT model, at $9499.
Same carbon frame as the pricier bikes, unified carbon bar/stem, carbon Bontrager wheel set, Fox suspension, and the tried-and-true shifting and braking of Shimano XT. Very hard to beat that combo, and you get the back up of a large operation when it comes to the fairly unlikely prospect of a problem. Sometimes big is good.
WORDS: GAZ SULLIVAN
PHOTOGRAPHY: JAKE HOOD
DISTRIBUTOR: TREK NZ
RRP: XT: $9499 / 9.8 GX AXS: $12,699 / XTR: $14,499
Review: Continental Kryptotal & Xynotal Tyres
Reviewed by Lance Pilbrow
Distributed by Worralls
RRP: $148
Continental have recently done a major overhaul of their gravity tyre offering. The range they offer now is almost overwhelming. Four new names, five new tread patterns, three casings, and three rubber compounds. It’s a lot to get your head around. To try and simplify things, let’s run through the tread patterns, which will help you narrow your choice down to match how dry or wet your riding conditions are. For hardpack conditions you start with the Xynotal tread pattern; mixed terrain is the Kryptotal (front and rear specific tread pattern); the Argotal is for loose terrain; and the Hydrotal is for mud. Got it? We’re just getting started. The Xynotal, Kryptotal and Argotal are all offered in Trail, Enduro, Downhill, or Downhill Supersoft casings (the Hydrotal is only offered in DH super soft). Oh, and then you choose how hard or soft you like your rubber: Endurance (harder); Soft (softer than Endurance); or Supersoft (pretty self-explanatory). Still with me? If you like Subway and getting your Sub just the way you like it, then you’ll be in tyre heaven. For all that choice, width wise, the Kryptotal Re is 2.4” or 2.6”, everything else is 2.4”, and that’s it. Everything is available in 29” or 27.5”.
Ok, so you have lots of variants to choose from. No, I did not test every variant. As much as I love new tyres, I have other things to do with my summer. I’ve been riding the Kryptotal Fr (Front) and Kryptotal Re (Rear) in the Enduro Casing, with the Soft compound, in a 2.4” width, this summer. This probably represents a fairly middle of the road option across the board. The tread pattern on the Kryptotal Fr has a 2-3-2 pattern down the centre, whereas the Re has a consistent 2-2-2 pattern. The Enduro casing has three layers of 110 tpi thread count and weighed in at 1125 gm
Out of the box, the tyres actually just look great. I didn’t know I was so attuned to what a quality tyre felt like, but these are that. The finish on the tyres is top notch. The graphics are perfect and there is a unique kind of embossed pattern in the side walls and in between the lugs. It screams German precision and quality. Getting them mounted up on my WheelWorks wheels was pretty tough, I’m going to be honest. Were these the hardest tyres I’ve ever had to mount? No, but it would be getting close. The casing is incredibly stiff. Just getting them on the rim felt like I was going to break tyre levers or damage my rims. Thankfully, that was all in my head, but it took a LOT longer to get them on than any other tyre I’ve used in the past. Once they were on, they sealed up nicely.
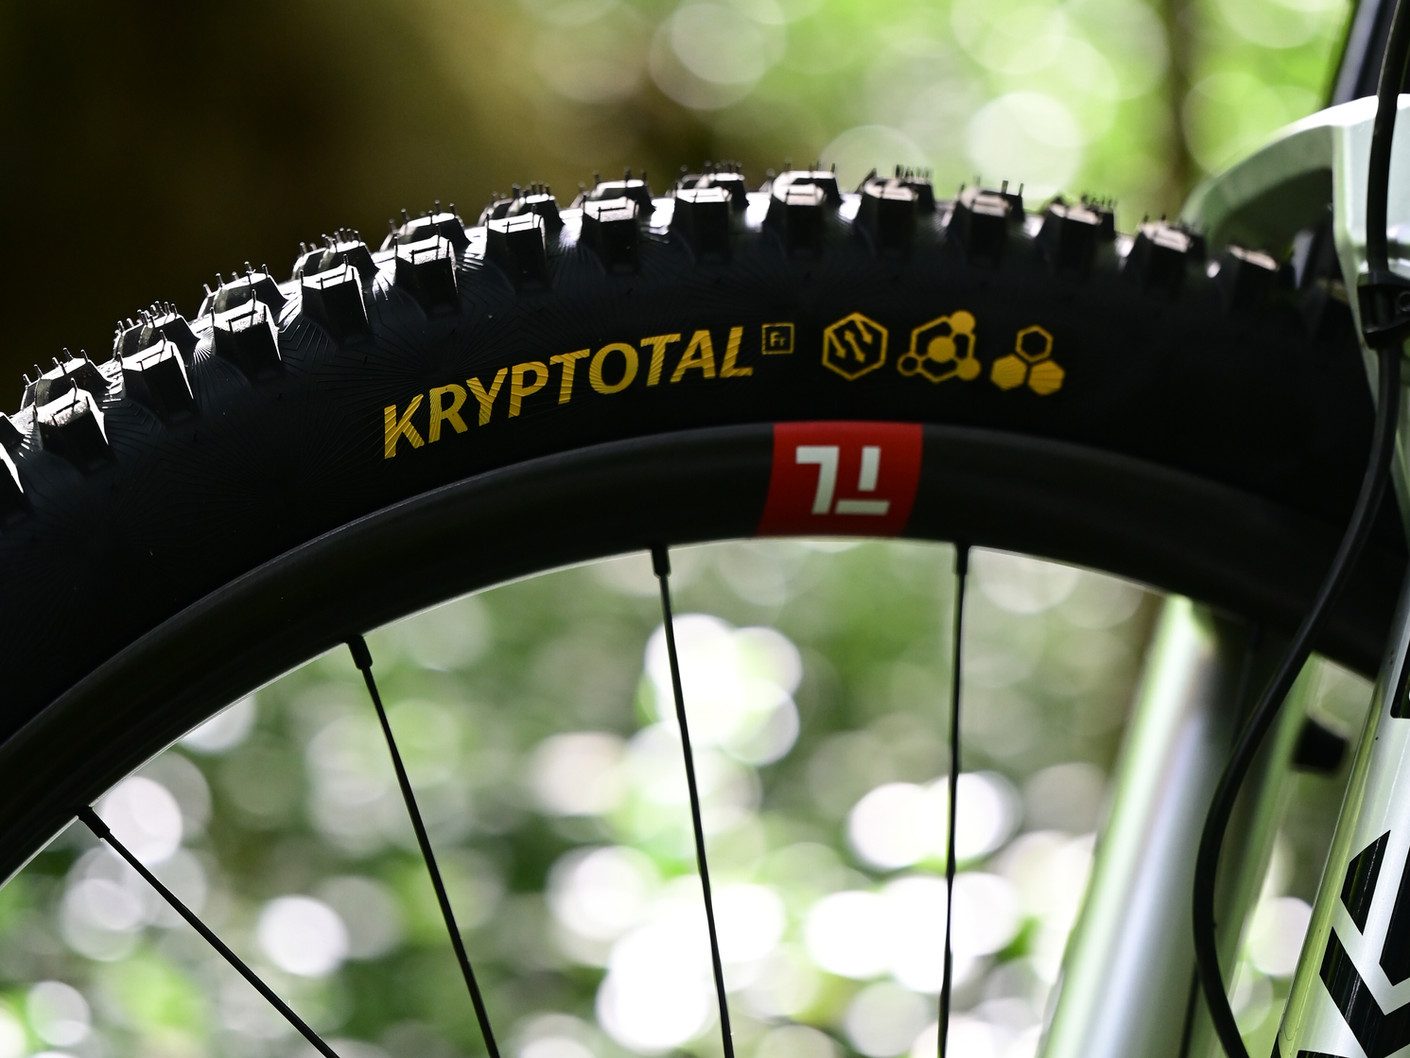
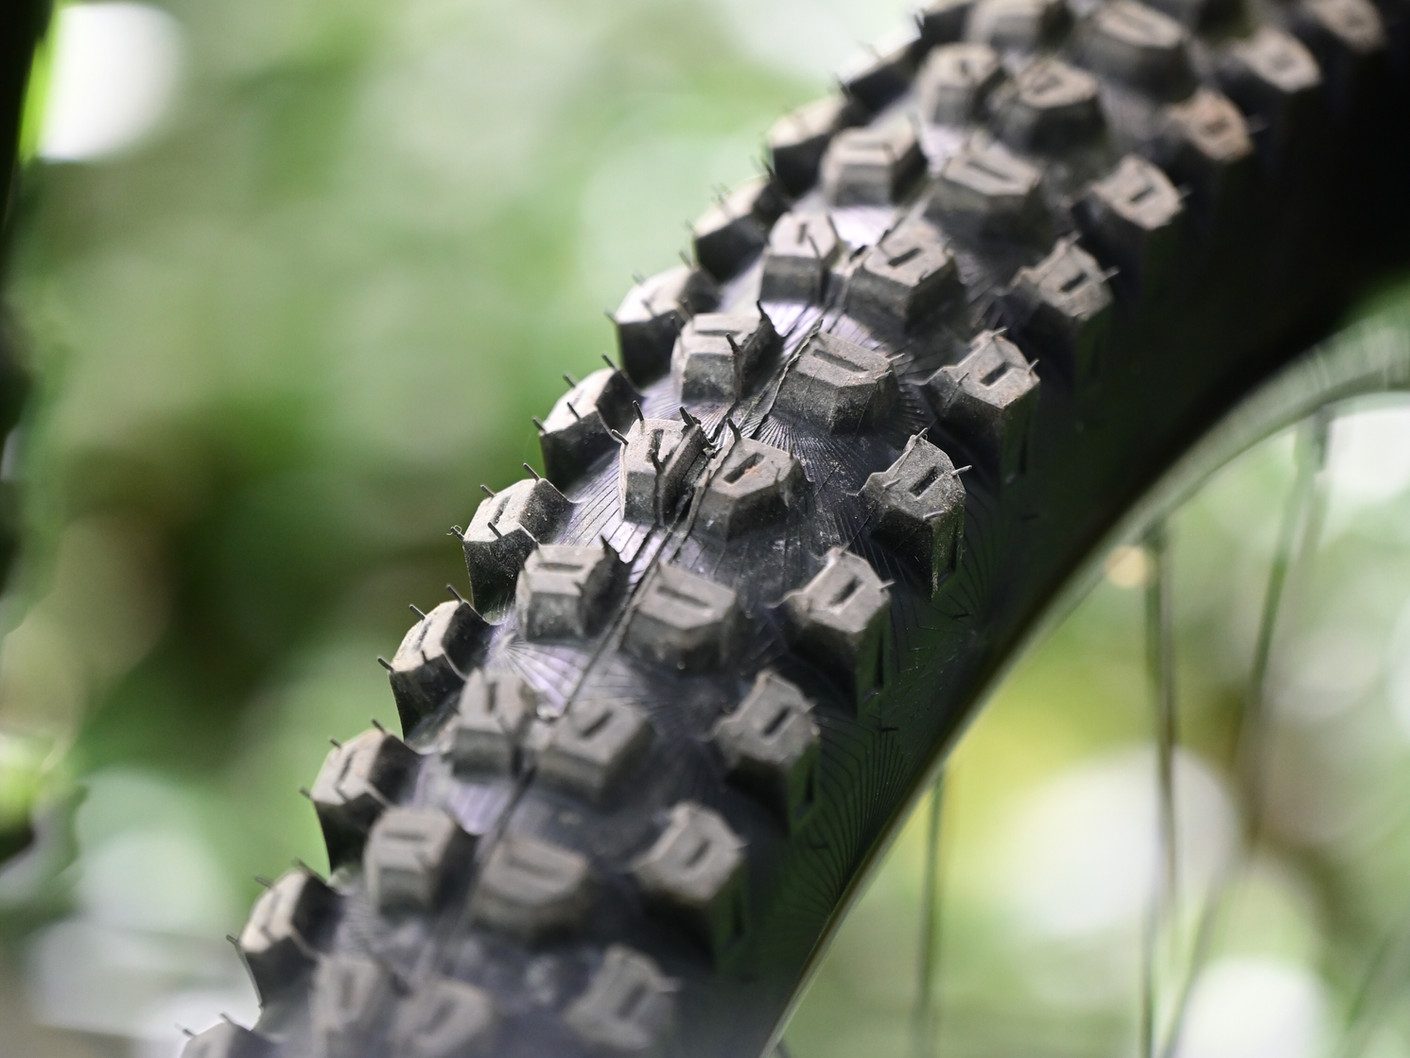
Visually, you can see that these tyres mean business – the lugs are tall and on the front there are generous gaps to help with mud clearance, enabling the tyre to really dig in. Out on the trail I have been really happy with the Kryptotals. The 2.4” width is spot on for trail riding and gives you plenty of rubber for when things get just a bit squirrelly. Having spent a fair bit of time recently on lighter, faster rolling tyres, coming on to the Kryptotals felt like I had traction in spades, and I always felt in control. I could push and push and it would always seem to hold. When heavy braking occurred, it would always hook up strong and this really made me feel confident riding them. I really noticed how, on a few favourite turns, I would try to push through and stay off the brakes, and the Kryptotal held the line incredibly well. Occasionally, I was actually surprised that I didn’t lose the front end, and was left thinking, ‘huh, I rode out of that?!’ with a great big smile across my face. This really helps with confidence and keeping your fingers off the brakes; holding your speed through the corners.
After a summer of riding, I’m happy to say the tyres still look great. The side walls are in great condition, and I haven’t had a single puncture, tear, or burps. If you’ve been a fan of Maxxis Assegai’s or DHR’s then I think you’ll find the Kryptotal to be right up your alley. I’ve been really impressed with these and will be leaving them on my bike for as long as I can. They gave me great confidence to push hard into corners and control when navigating heavy braking down steep descents.
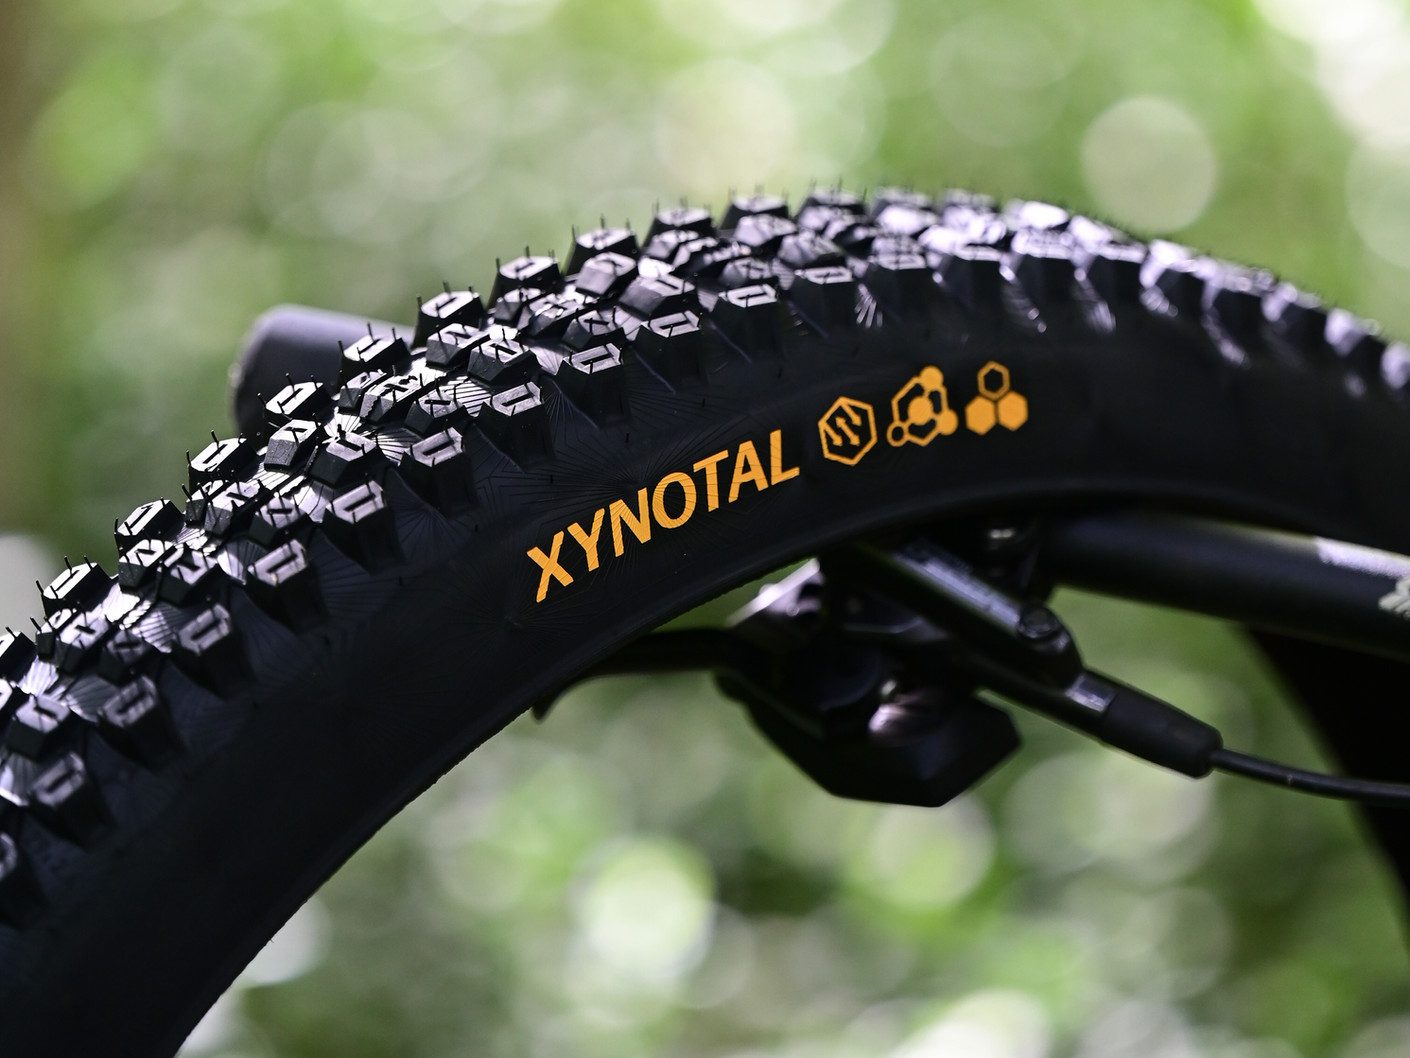
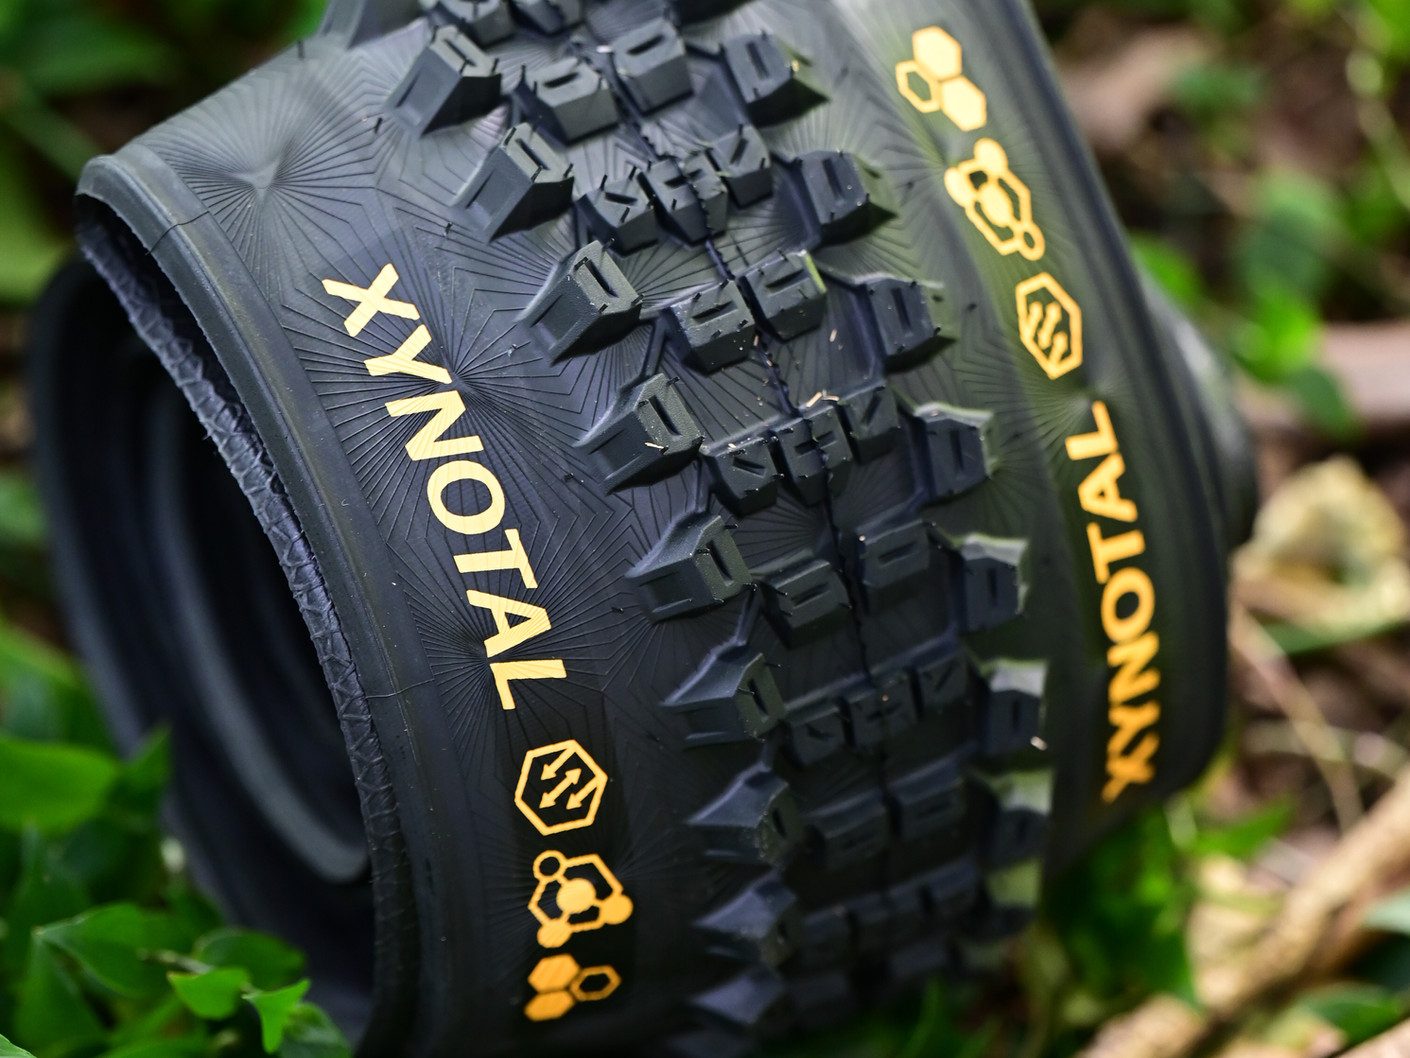
I also was able to spend a small amount of time on the Xynotal tyre too. This one is not offered as front or rear specific and, at a distance, it looks incredibly similar to the Kryptotal Fr. So similar it was a little like one of those ‘spot the difference’ cartoons but, after a bit more of a careful inspection, the Xynotal’s tread pattern is slightly closer together. On the part of the pattern where there are ‘2’ centre lugs, the Xynotal groups these closer together, whereas the Kryptotal keeps these further apart – presumably this helps the Kryptotal with mud clearance and hooking up in looser conditions (which is what it is targeted to do.) The Xynotal’s lugs are also considerably more bevelled down at the leading edge which should help reduce rolling resistance. All in all the Xynotal is theoretically designed for more hard pack conditions and may help the rider retain a bit more speed. On the trail, I found it really hard to tell the difference between the two – aside from generally feeling that the Kryptotal just had a bit more ‘bite’ to it. If I noticed it anywhere, it was on steep chutes under heavy braking. The Kryptotal just seemed to be able to hold traction for that fraction longer. This is all pretty arbitrary really, as it’s hardly a controlled test, but if hardpack conditions are where you ride, the Xynotal would do the job perfectly. As an all-rounder, I’d probably err towards the Kryptotal – and I like the front and rear specific options it gives.
The fact that the new Continental range is offered in so many variations of patterns, compounds and sidewalls is slightly overwhelming at first, but it means you can find a tyre that perfectly suits your riding style. Pricing varies across the range, depending on your variant. The Kryptotal’s and the Xynotal come in at $148 each.