

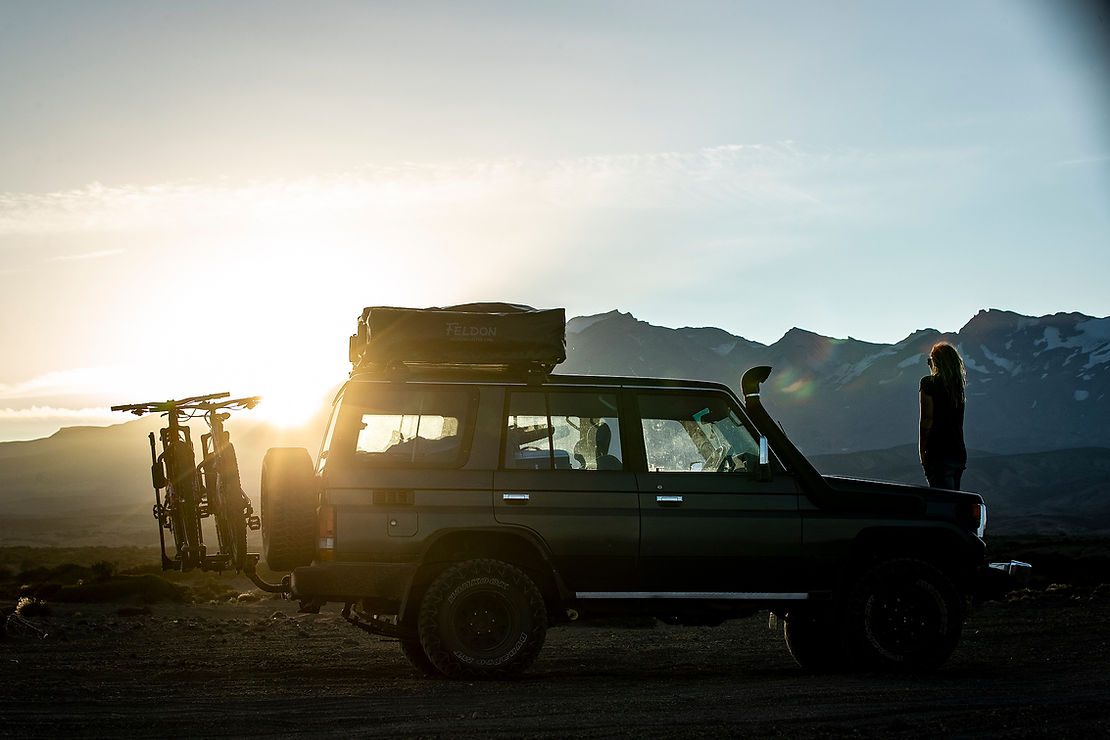
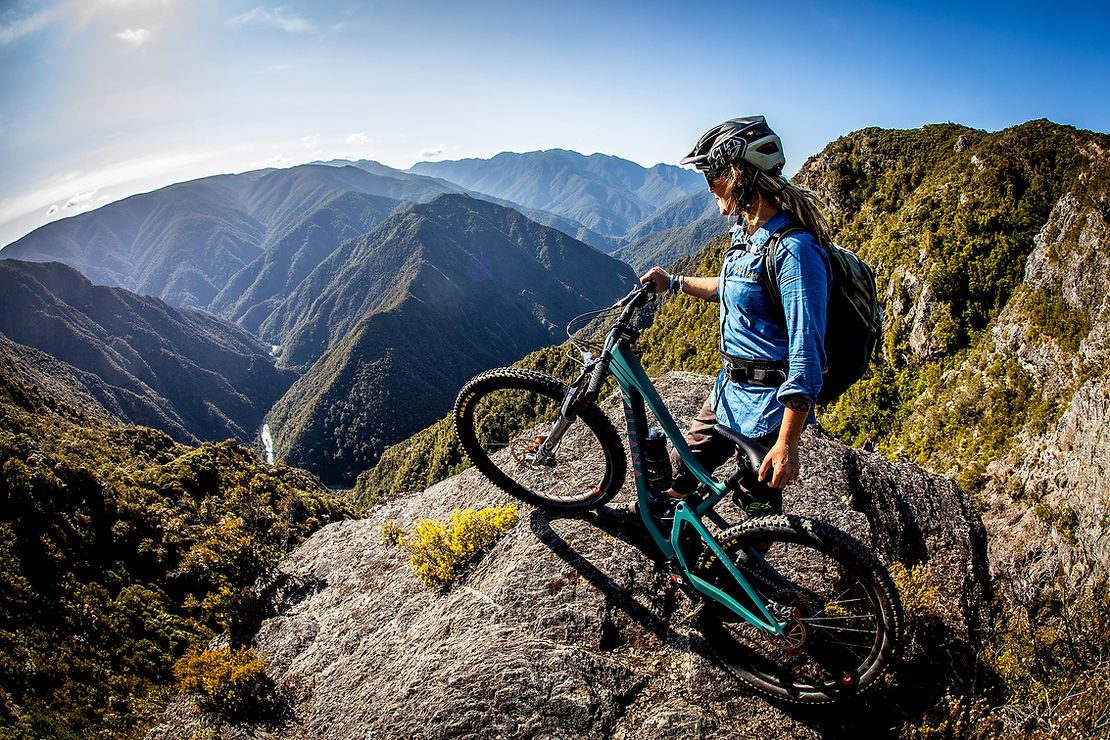
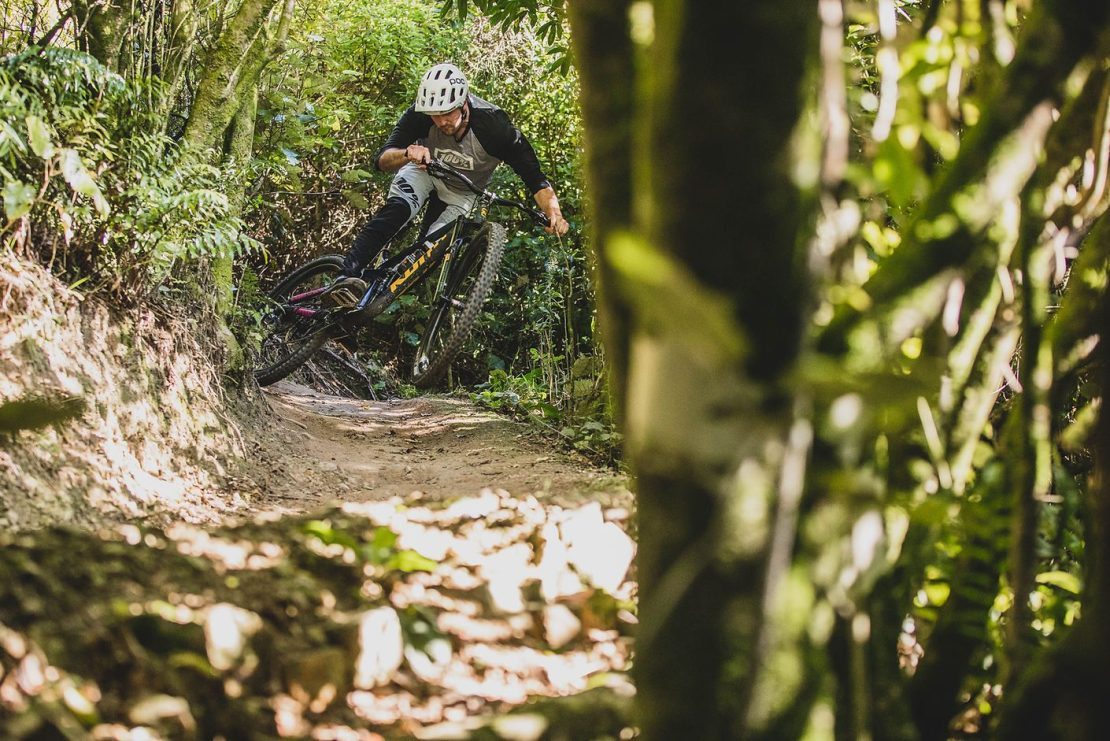
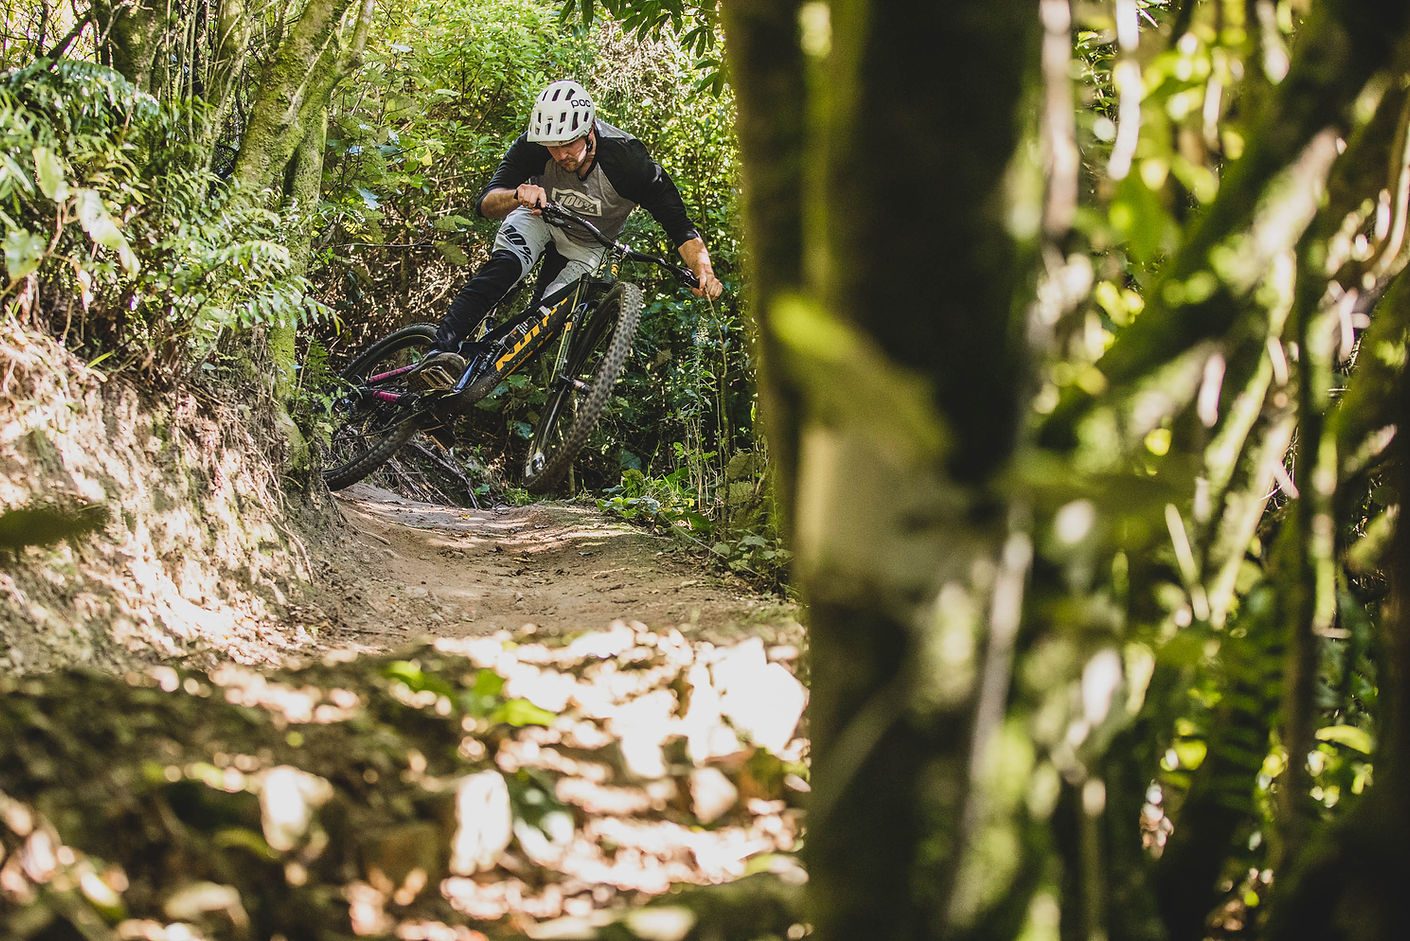
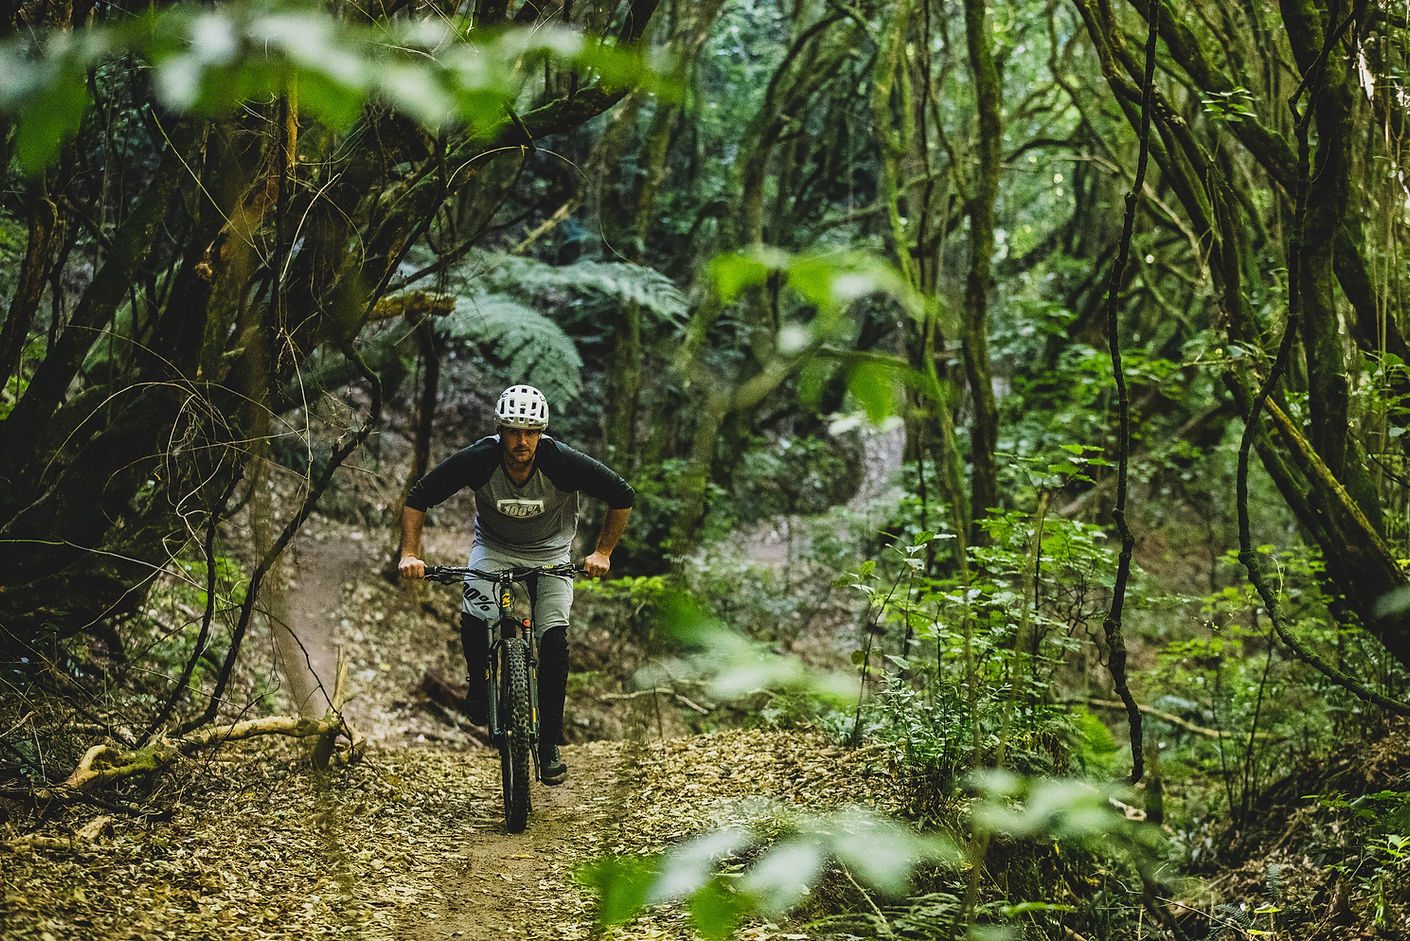
Story: Turbulent Travels
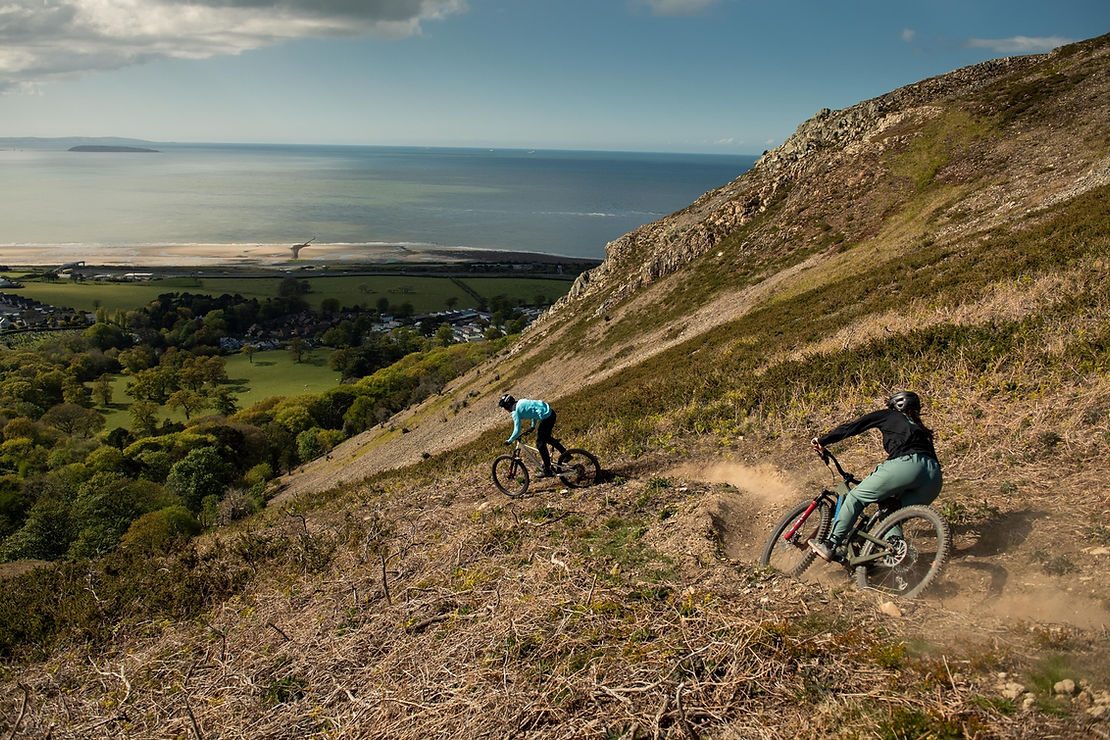
Last summer was going to be one of our shorter stints at home in Nelson, NZ. We arrived later than usual after a longer 2019 season, and the 2020 season’s work schedule was due to kick off earlier than ever before. It was still early in March - we were hosting EWS racers Ed Masters, Cole Lucas and Mark Scott for a bit of a training boot camp; some local racing then a few big rides and shuttles mixed with some beach time in and around Nelson and Marlborough - when things started to get pretty surreal.
COVID-19 was unfolding all around the world and we went from carefree summer fun on bikes to lots of uncertainty with the ever-changing situation. Strava and Trailforks apps were quickly replaced by a new set of maps, graphs, stats and figures that everyone checked hourly. After years of social media updates, TV news updates once again became more important. Nervous jokes turned into serious concerns. For our guests, daily ride plans were hastily replaced with ‘get me the hell home’ plans as lockdown loomed. A year’s worth of booked flights, accommodation and travel plans had to be cancelled and delayed; deposits and payments lost or deferred as the world came to grips with the impending crisis. My bike and bag was already packed for a visit to South Africa, as was Sven’s for the Portugal World Cup season opener. Needless to say we both had to unpack our bags again as we settled into the longest stint we’ve ever had at home, since moving to New Zealand. It would be our first winter in almost ten years.
Never in my wildest dreams could I have imagined something capable of causing worldwide paralysis in such a short time. We all did our bit, our team of five million. New Zealand, with its compassion and respect for fellow man and woman, fared better than most, if not all, other nations - and for this I’m both proud and thankful. Once the shock of being stranded sunk in, we genuinely enjoyed our extra time at home. I didn’t master the art of wheelies or become fluent in another language (despite best intentions) but we slowed down and enjoyed the quality time we had together. Autumn and winter in Nelson was a breeze, a mild one; I was happy to experience the settled weather, the shifting sunsets and sunrises - and the crisp, clear days were just fantastic. We re-established the veggie garden, adopted stray kittens and got to see our friends far longer than we ever do, which made us feel more part of the community than ever before. Everything was amazing – as if COVID didn’t exist. Even better – it didn’t exist in NZ, because we stopped the spread.
However, when the weeks turned to months, I began to feel isolated and even a little panicky. Immigrating to a new land is tough; leaving your whole family behind is a hard decision only made slightly easier by still being able to travel to see them whenever you choose. It’s been hard for everyone; we have all been affected by this in some way or another this year - work and livelihoods have been in jeopardy, or simply evaporated. An international travel ban is a bitter pill to swallow when a family member is diagnosed with a terminal illness. When Europe finally opened their borders to nations who had performed well in managing COVID, we jumped at the opportunity to salvage some work and get one step closer to seeing our families. People were baffled as to why on earth we would even consider leaving the COVID-safe NZ bubble for the crazy, scary, infected world out there! But, we really didn’t have a choice and to be honest, I am thankful for that - because the big, scary, infected world out there wasn’t so bad after all.
In Europe, the people were carrying on with their lives, building up their businesses again, boosting the economy and seeing loved ones. Yes, it was different: we had to wear masks, follow social distancing protocols, be super careful, wash our hands constantly, sanitize after everything and take numerous overly expensive and uncomfortable COVID tests, but at the end of the day - is that really so bad?! Shops and restaurants had their rules and at the busy beaches they cordoned off squares with ropes to safely distance people from on another. I felt totally naked without my mask, but if that’s all I had to do to carry on with work and my life, then I was more than happy to do that. The majority of people we saw, and the places we went, accepted and operated under this new norm so that at least some of this crazy year could be salvaged in a small way. It was wonderful to be back in Europe and the thought of not being allowed to travel again sends shivers down my spine.
Events were very different of course - no spectators, no access to pits or even the riders really - but the event organisers and regions managed to make it happen along with the race teams, and it was good to see how an entire industry - that had pretty much come to a complete standstill for over six months - could still continue (with precautionary measures) during a pandemic. Sven’s season went from the usual grueling 30 weeks of back-to-back events to a truncated five week season - better than nothing, but still quite frightening to see how a virus can change up your life just like that. Adapt or die, as they say.
Our usual six months in Europe was cut down to three. We had just settled into this new way of COVID living when it was time to leave again. Besides the work, our true intentions for being in Europe was for quick access to South Africa once their borders reopened. That announcement came on October 1st and, after some very complicated arrangements and a few more COVID tests, we were on a nearly empty plane heading back to Cape Town. Usually, that would be a very exciting flight for us - looking forward to reuniting with our families and friends - but this was a sad flight, as Sven’s mom had passed away just before we could get there to say goodbye, despite our best efforts. Sadly, we are not alone in having to go through this; thousands of others around the world, and in New Zealand too, have been separated by COVID in times of grief and need. So, it was onto another completely different world of worries in South Africa. Adapt, adjust and just keep your chin up.
From the very beginning of this outbreak, I was petrified for Africa and what this would do to the continent - a complete humanitarian disaster was what I had feared. There are (very) little to no subsidies for the poor, and social distancing is a luxury for some - simply not an option when you live in a shack or small house with ten other people. Telling people to wash their hands when some don’t even have running water in their homes is impossible, and with no work who has money for hand sanitizer? Often there is not even sufficient money for food. To my relief, they have done pretty well over here. Generally speaking, the people have stronger immune systems in Africa, and it is thought that widespread TB (Tuberculosis) vaccinations have somehow curbed a wildfire spread and kept the death rates surprisingly low. For the most part, people are abiding by the rules, wearing their masks and following protocols. So, once again, I’ve witnessed a country where people are now able to carry on with their lives. It is not without utter hardship, poverty and struggles, but they are carrying on trying to rebuild their lives and keep the economy from completely collapsing. The sheer scale of poverty here is mind blowing and it always takes us a little while longer to “get used to” the complete chaos over here. But, once we do, and we settle into the rhythm of the country, we appreciate it for all the amazing things it has to offer. You really do just adapt, adjust and soak up what this colourful, vibrant country contributes to life's tool belt.
Earlier this year, the media constantly portrayed a crazy, mad world outside of safe little old New Zealand, and yes, it was and still is - and to some extent this made me afraid of leaving New Zealand. I guess what I’m trying to say is that you shouldn’t believe all the media hype. Don’t let them scare you. We learn so much by traveling - from other cultures, languages, people and places. I felt alive again and cannot ever imagine a life lived in only one place.
As our time here in Cape Town comes to a close, I feel sad to leave. I’ve slipped back into this way of life again, but I’m excited to once again be going back home to New Zealand after five months away, with a whole new arsenal of experiences and adventures and insights into how the rest of the world is faring and coping in their different ways. I’m content - and ready to face another battery of eye-watering Covid tests and a hotel room (with windows which cannot open) for two weeks of confinement… but I’ll do it again and again if it means I can keep traveling, learning and growing from these experiences. Adapt, adjust and keep your chin up.
Just for the record though, I will be giving the USA a wide berth for the foreseeable future…
Words: Anka Martin
Images: Sven Martin

Review: 100% Teratec Knee Guards
So, as they say, it’s best to use protection?! Nah, you really should, especially when it comes to riding mountain bikes. If you’re like me and fall every so often then you want to protect yourself. So, yea, use protection. 100% have made a real impact on the scene but in years gone by they made simple accessories for MX, nowadays they’re a global player. You can see their googles on the heads of racers but recently they’ve become known and well-established for apparel and helmets. The brand continues to grow, and over the past few months, I’ve had the opportunity of testing some of their protection; Teratec Knee Guards.
The Teratec uses a lightweight design, they’re comfortable in use, and the overall stability of this protector is excellent. It’s got a fairly generous cut with enough sleeve up the top of the pad to ensure it stays in place. The protective pad works as its meant to – soft and flexible allowing for movement but robust enough when you crash on it. I found the guards needed a bit of ‘breaking’ in order to make the material a little more pliable. After the first few rides, they started to fit better. Fit wise, I lean towards a medium and sometimes large but with these, I’d recommend trying before you buy. These do a run a little tighter and for me, the medium was a touch small – this was mainly around the cuff at the top. But that maybe because I’ve got thick thighs?! You be the judge, but some riders may want to size up. That said the elastic/rubber cuffs at the top and bottom do fit very tight, but the pads stay in place well. And throughout all my rides with them, they stayed in place. However, I would like a little more rubber above the knee pad with a touch more roominess if I’m being picky.
In regard to the actual protection, the removable insert is super solid. And I’ve had a couple of offs to thoroughly validate this. There’s good coverage across the entire knee including some of the upper shin. For me, the pads didn’t get overly hot and they’re fine when it’s cold out. After a few rides, they do stench so best to whip the pads out and chuck em’ in the wash with your other riding gear. Having this easy option is a huge bonus and means you keep your riding buddies.
Above all the Teratec Knee Guards do their job well. They’re comfortable to wear all day on the bike and offer good protection and comfort. Wearing them I felt faster. Perhaps I just looked faster or because I had such good protection, I had more confidence to push myself harder.
Words: Liam Friary
Images: Cameron Mackenzie
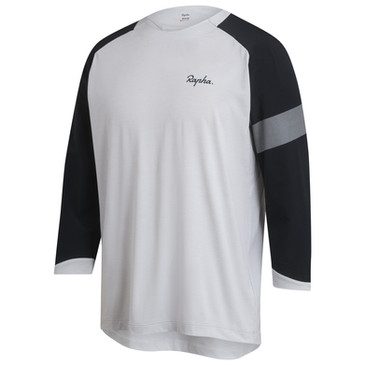
Release: Rapha's new MTB Line
"What is Rapha Performance Trailwear? It’s far more than the fabrics and features you see on the shelf behind every garment is a story. From backcountry bikepacking trips and World Cup competitions, to afternoon laps around our US headquarters in Bentonville, Arkansas, every garment we make is tested by our elite athletes and weartesters. And with a roster that includes Olympic medallist Jill Kintner, EWS racer Ella Conolly and XC legend Adam Craig as well as Bryn Atkinson, Eliot Jackson and Joey Schusler, we’re able to push our products to the limit. Riding and racing in locations around the globe, our wear testers have put this kit through its paces on the world’s best trails to guarantee that it won’t crack under pressure or fade over time.
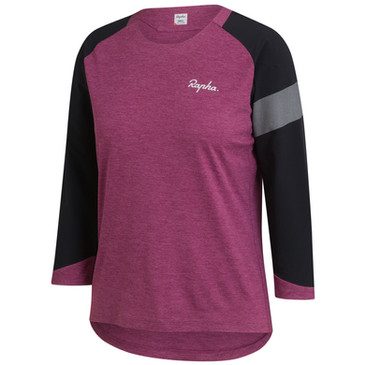
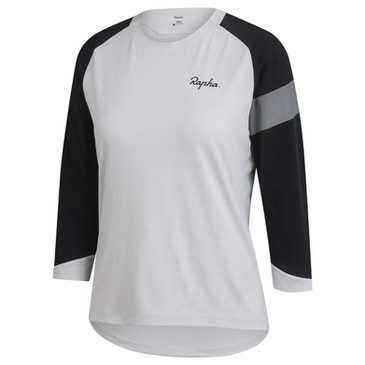
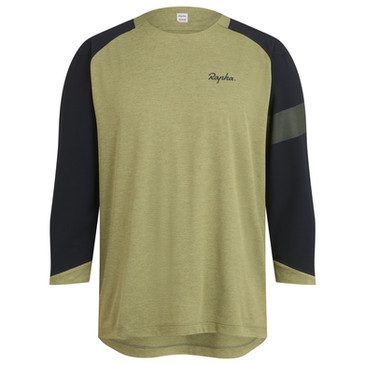
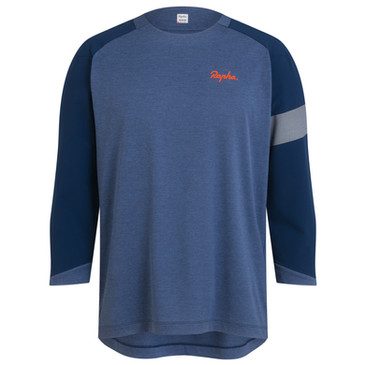
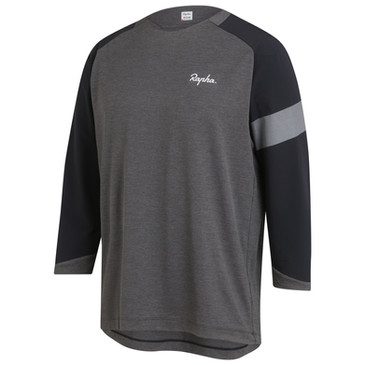
The Trail ¾ Sleeve Jersey is a modern take on the classic ¾ sleeve mountain bike jersey. Constructed from a 100% recycled, light and breathable fabric to keep you cool in the heat, it’s also durable and snag resistant thanks to an incredibly high strength knit. A textured fabric back not only wicks sweat away from the skin but also disperses the moisture over a greater area, creating an incredibly fast-drying shirt that remains comfortable. On the sleeves, a strong, double weave fabric keeps your arms shielded from stray branches or a light tumble, while an antibacterial treatment maintains freshness for longer days on the bike. And for the inevitable crash that causes more damage than you can ignore, included are a set of repair patches in the same colours and fabrics of the jersey that offer a handy at home repair option so you and your jersey can get back to the trails.
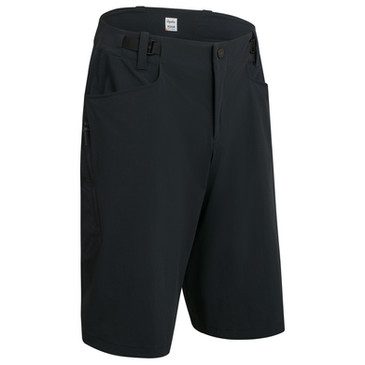
The cornerstone of the Rapha Performance Trailwear range, the Menʼs Trail Shorts are a durable, fully featured mountain bike short with a contoured, variable width belt for locked-in comfort on the bike. Constructed from a durable yet forgiving plain weave stretch nylon, these shorts are tough enough to handle the abuse of all-mountain riding, while still prioritizing flexibility and breathability. An ergonomic pattern means the shorts move with you, with seams and panels placed strategically to allow for freedom of movement whether you’re grinding up a climb or going for it on the descent. The fit of the shorts has been sized to comfortably accommodate a liner and tailored to be used with or without modern trail knee pads. To keep the shorts secure, an anatomically contoured variable width belt system locks you in behind a button closure at the waist. To the front, two large hand pockets provide rapid access, while two zipped side pockets offer storage for keys or other essentials. And for the inevitable crash that causes more damage than you can ignore, included are a set of repair patches in the same colour and fabric as the shorts that offer a handy at-home repair option so you and your shorts can get back to the trails.
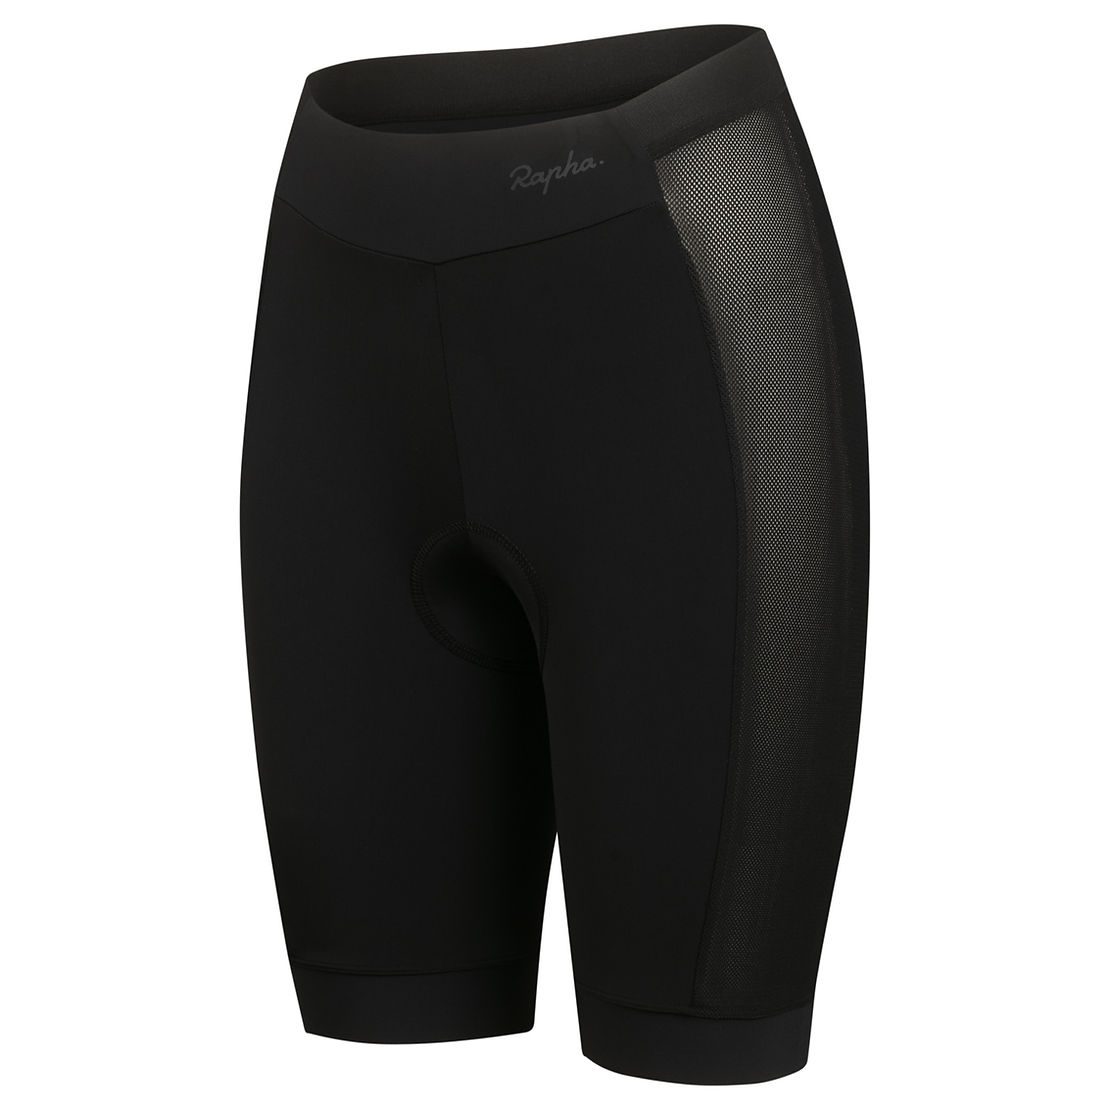
The Men's Trail Cargo Bib Liner Shorts are a lightweight underlayer constructed from recycled materials designed to work seamlessly with the Men's Trail Shorts. Drawing on 15 years of innovation, we’ve carried over technology and fabrics from our award winning bib short range to create a pair of fast-wicking and durable cargo bib liners that will boost comfort on any mountain bike ride. Mesh uppers promote airflow to keep you cool on the hottest days, while the fast-wicking and lightweight main fabric promotes next to skin comfort. To the back, two rear cargo pockets offer extra storage space for essentials.
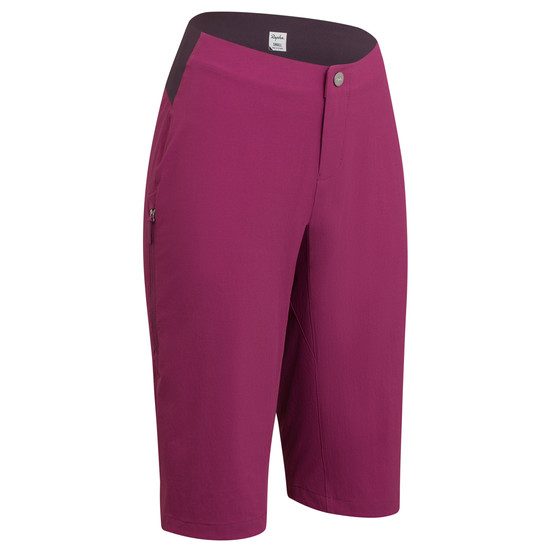
The cornerstone of the Women’s Rapha Performance Trailwear range, the Women’s Trail Shorts are constructed from a durable yet forgiving plain weave stretch nylon which are tough enough to handle
the abuse of daily mountain biking, while still prioritizing flexibility and breathability. An ergonomic pattern means the shorts move with you, with seams and panels placed strategically to allow for freedom of movement – whether you’re grinding up a climb or going for it on the descent. A low profile stretch waist creates locked-in comfort on and off the bike, while the fit of the shorts has been sized to accommodate a liner, and tailored to fit with or without modern trail knee pads. On the front, two zippered side pockets offer storage for essentials and a phone. And for the inevitable crash that causes more damage than you can ignore, included are a set of repair patches in the same colour and fabric as the shorts that offer a handy at-home repair option so you and your shorts can get back to the trails.
The Women’s Trail Liner Shorts are a lightweight underlayer designed to work seamlessly with a pair of Women's Trail Shorts. Constructed from recycled materials, the Liner Shorts carry over technology and fabrics from our award winning bib short range to create a pair of fast-wicking and durable liners that boosts comfort on any trail. Featuring lightweight mesh panels on the sides to promote airflow, these shorts will help to keep you cool on the hottest days.
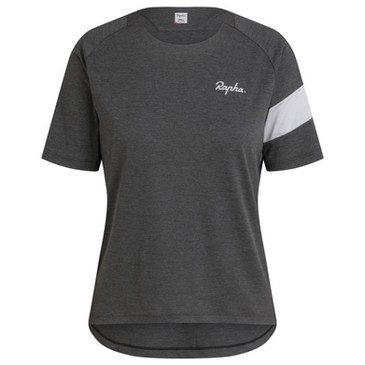
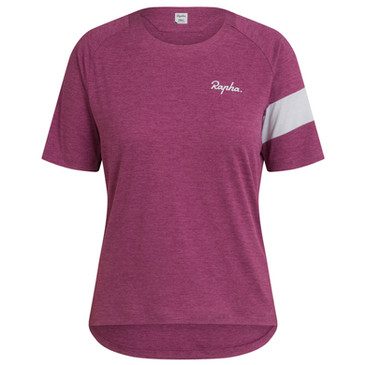
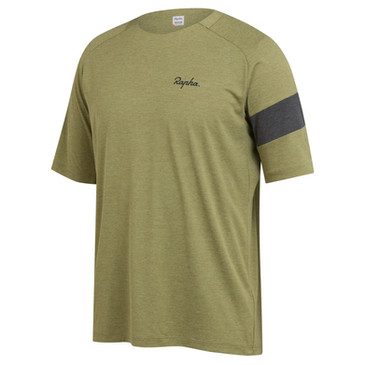
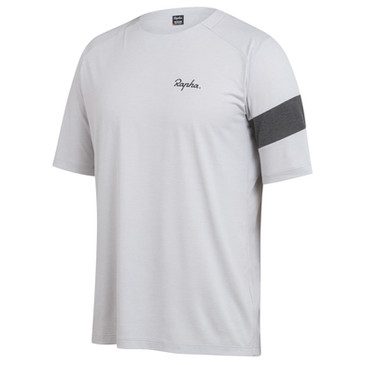
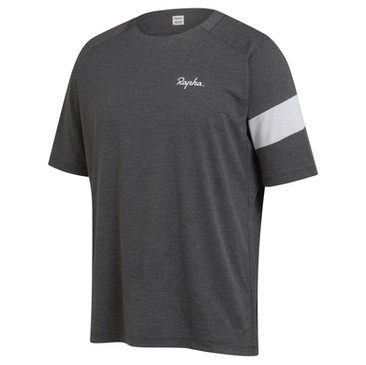
The Trail Technical T-Shirt is a light and breathable top designed specifically for mountain biking. Constructed from recycled materials, the Trail Technical T-Shirt is durable and snag resistant
thanks to an incredibly high strength knit while remaining incredibly airy and lightweight. A honeycomb fabric structure not only wicks sweat away from the skin but also disperses the moisture over a greater area, creating an incredibly fast drying shirt. The textured fabric combined with a loose fit helps the t-shirt stand off a rider’s skin for improved comfort, while an antibacterial treatment maintains freshness for longer days in the saddle. And for the inevitable crash that causes more damage than you can ignore,
included are a set of repair patches in the same colour and fabric as the t-shirt that offer a handy at-home repair option so you and your shirt can get back to the trails.
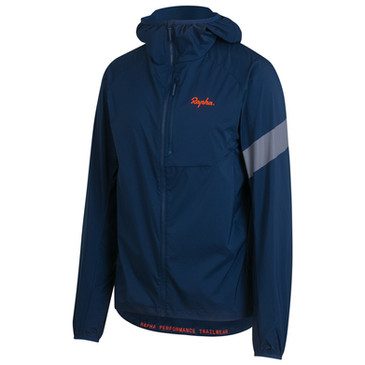
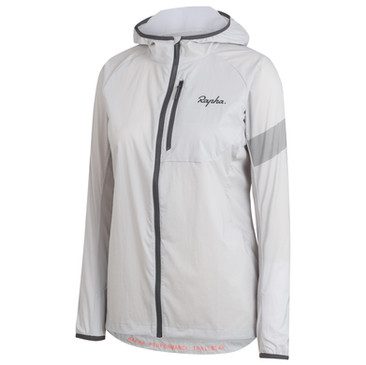
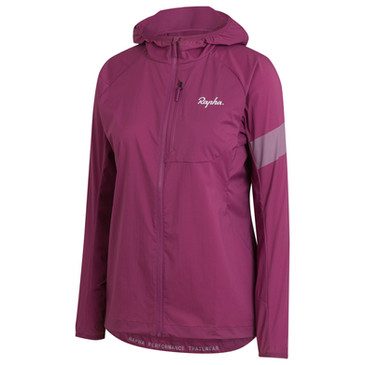
The Lightweight Trail Jacket is a packable windproof shell made for mountain biking in changing conditions. Made with a lightweight yet breathable ripstop nylon fabric that’s treated for durable water repellency (DWR), this jacket offers unrivaled weather protection in a seriously small package. A helmet compatible
hood features an adjustable cinch cord to offer a locked-in fit when the conditions turn nasty, while an oversized TPU zip puller allows for easy ventilation while riding. When you’re not wearing the jacket, it stows into its chest pocket for maximum packability. Further still, the Lightweight Trail Jacket comes with an added strap that allows you to cinch your jacket down to your frame for a clean, off body storage solution.
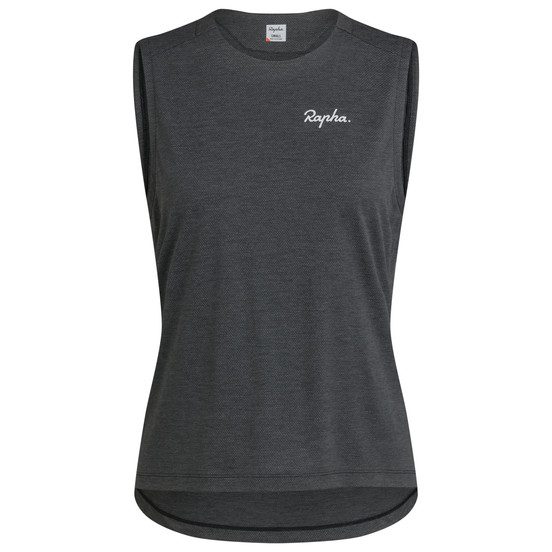
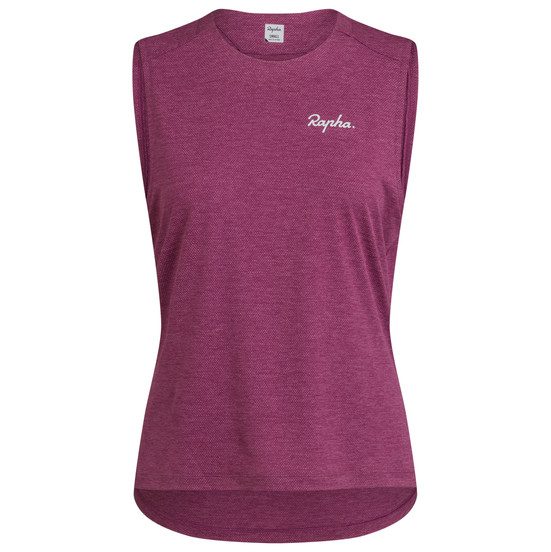
The Women’s Trail Tank is made for mountain biking in the heat. Constructed from a light and breathable fabric to keep you cool when the temperature soars, it’s also durable and snag resistant thanks to an incredibly high strength knit. The honeycomb weave fabric structure, made of recycled materials, not only wicks sweat away from the skin but also disperses the moisture over a greater area, creating an incredibly fast-drying top. The textured fabric combined with a loose fit helps the tank stand off a rider’s skin for improved comfort, while an antibacterial treatment maintains freshness for longer days in the saddle. And for the inevitable crash that causes more damage than you can ignore, included are a set of repair patches
in the same colour and fabric as the tank that offer a handy at-home repair option so you and your shirt can get back to the trails.
The Trail Hip Pack is a dependable companion for longer days on the trail, capable of safely stowing your things while you ride. Constructed from a fully recycled, durable ripstop fabric that’s easy to clean, this comfortable hip pack features multiple storage and fixing solutions for your essentials – including two water bottle pouches, a 3 litre internal capacity, and an external drawcord that can be used to strap
down a jacket or extra layer. A further front valuables pocket inside the pack includes a key clip for safe carriage of your valuables. Adjustable waist straps provide a locked-in fit, while a form-fitting and breathable back panel boosts comfort at the same time as preventing the pack from jostling while you
ride. Finally, an aquaguard zip seals things up, adding an extra layer of protection against the elements.
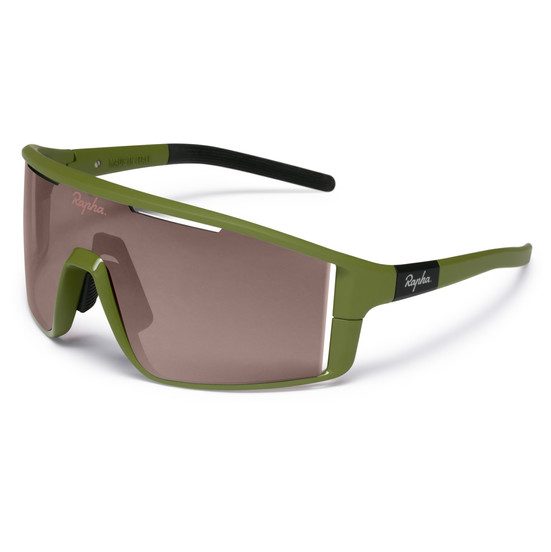
The Pro Team Full Frame Glasses are designed to ensure a clear line of sight and complete stability on even the roughest terrain. The frame is made with lightweight, injection-moulded Grilamid that holds that lens securely in place and protects from the elements. Megol arm grippers provide high levels of grip in all conditions and the nose piece, made with the same material, comes in two sizes for an adjustable fit. Snap lock hinges make the glasses easier to put on and remove while adding further stability. And for improved ventilation, subtle vents are positioned along the edges of the hydrophobic, anti-fog lens, which is interchangeable with a wide range of spare lenses for clear vision in any light conditions.
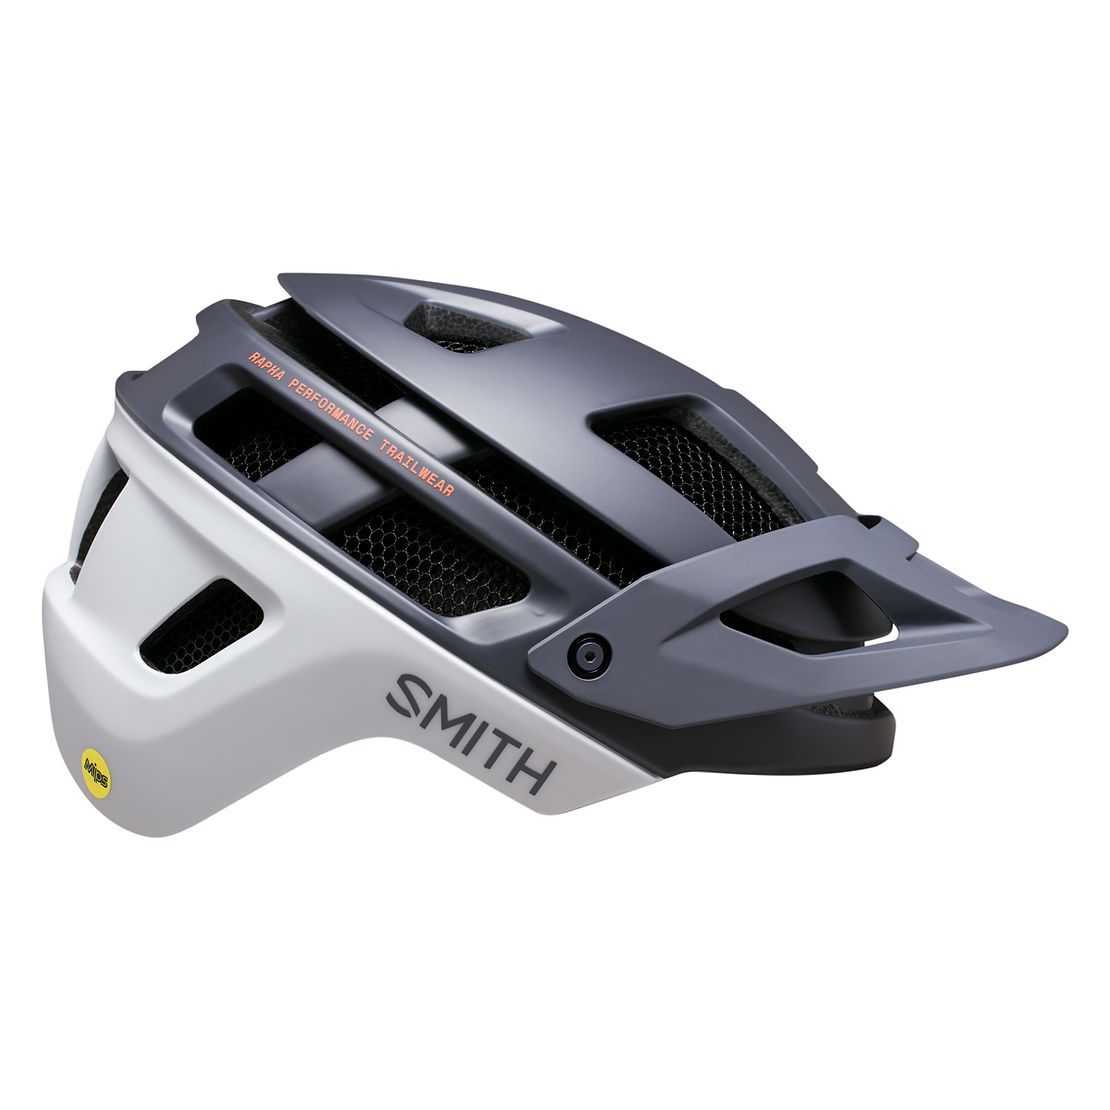
Created in collaboration with Smith, the Rapha + Smith Forefront 2 combines two cutting edge technologies to provide state of the art impact protection out on the trail. A Multi-Directional Impact Protection System helps reduce rotational forces caused by angled impacts to the head whilst complete Koroyd coverage provides further impact protection without compromising ventilation. Designed to work with goggles or sunglasses, the helmet features an adjustable visor for storage between laps as well as twenty air vents which keep the air flowing and help you to keep a cool head. Smith’s VaporFit dial adjustment system makes locking in the perfect fit quick and easy so you can get to the trail head sooner.
No matter where your local trails are, every ride leaves its mark on your apparel as surely as your tyres leave tracks in the dirt. But Rapha Performance Trailwear is designed to last, for lap after lap and season after season. Even if you do come off and rip an item of your kit, it’s not the end of the line. Most of our products include a repair patch kit, made with excess fabric from the same garment that would otherwise have been headed for the landfill. You can use the repair kit to easily fix your garment and get back on the trail as quickly as possible. For more serious stitch-ups, most pieces of Rapha Performance Trailwear can also be sent back to us for a free repair. We’ve repaired more than 34,000 garments since 2004 and every repair we make not only extends the life of your kit but helps us to reduce excess and minimise our environmental impact. Lastly, we’ve tried to use environmentally preferred materials across the range where possible. In 2021, 43% of Rapha Performance Trailwear, by volume, is made using environmentally preferred materials, with a commitment of reaching 90% by 2025."
Release: Mechanix Wear x 100% Glove
"100% has teamed up with Mechanix Wear, to release an exclusive collection, consisting of two popular work gloves, the Original and FastFit. Mechanix Wear, the leader in hand protection, and 100%, a premium sports protection brand, joined forces to collaborate on the most advanced gloves for working hands.
The collaboration combines the best garage gloves with the featured 100% extended logo and signature colors. A special print on the palm of the gloves is taken from the original 100% tagline, “How Much Effort Do You Give?” 100% continues to inspire a whole new generation of athletes asking this same question.
“We created 100% to make the most advanced performance eyewear, technical apparel and sports protection for the most demanding athletes on the earth,” said 100% co-founder and CEO Ludo Boinnard “We’re excited to partner with a like-minded brand that takes this same approach to building the most advanced gloves for working hands.”
“Mechanix Wear and 100% have a deep connection and storied past in the world of motocross,” said Michael Hale, CEO of Mechanix Wear. “Both brands are driven by passion and an unwavering commitment to protect riders and mechanics on and off the racetrack. Mechanix Wear is proud to collaborate with 100% by offering our proven glove technology and industry leading protection to one of motocross’s premier brands.”
The 100% and Mechanix Wear Collection consists of two styles; the Original and FastFit and each is available in five sizes.
FastFit
The next generation of FastFit work gloves are here. Take control with high-dexterity 0.6mm synthetic leather and stay connected with touchscreen technology in the palm of your hands. The FastFit delivers an unmatched fit with TrekDry evaporative cooling to keep your hands cool and comfortable.
The Original
Stop throwing away perfectly good gloves due to worn out fingertips. We covered the fingers of our Original glove with ultra-grip, High Abrasion Resistant (HAR) material. HAR provides 60% more coverage to high wear areas, greatly reducing fingertip and seam failure for longevity. Form-fitting stretch Spandex and a durable microfiber palm provide a second-skin fit with exceptional dexterity for jobs big and small."
News: Commencal's new Supreme WC Prototype
Commencal have an entirely new prototype Supreme for the 2021 world cup season with a new suspension platform. Keep reading to find out more...
"It's a prototype, a lab bike that means we can try many new concepts under the most testing and extreme conditions.
In order to work with a minimum of unknowns, we use a lot of tubes from our current bikes and this allows us to ensure perfect management of stiffness as well as limiting the risks in terms of resistance. This SUPREME features a brand new kinematic with a Virtual High Pivot. Through this system, we're always looking for more performance and liveliness, without compromising the capacity of our now renowned High Pivot Point.

There is no commercialisation on the cards yet, however it’s sure that this is the dawn of a new era for the future of COMMENCAL DH.
You will be able to enjoy Amaury, Myriam, Thibault and Angel behind the handlebars for the whole season!"
Release: Updated Santa Cruz Bronson
Santa Cruz have updated the Bronson for the 2022 new bike season, with the biggest change being a move to mullet-spec. Read on for more...
"When we dropped the Bronson on the world in 2013 we caught many people with their pants around their ankles. 27.5-inch wheels were the new kid on the block and people weren’t ready for a disruptive little middle child to muscle it’s way into the household. The Bronson was among the first of its kind to adopt the in-betweener wheel size and the timing was just right to make it infamous.
Eight years later, the fourth generation Bronson comes in swinging with mixed wheels. It’s something that our other naughty kids, the Syndicate, have been playing with for a while on the V10s and Bullit eBikes. The big wheel up front gives the Bronson more traction (bigger contact patch and more rollover) which results in more confidence for the rider, while the BB to axle drop of the smaller, 27.5 rear wheel makes it easier to drop a shoulder into a late turn or lift the front wheel up and over obstacles.
Our demo crew have a saying, ‘If in doubt, take a Bronson out.’ It’s not that it’s the most versatile or anything cliché like that, it just has always had the biggest personality of any bike we build. Now the mid-travel and MX wheels mean it’s up for anything and urges a wider array of riders to get into more trouble. The good kind of trouble. With 150mm of travel and a leverage curve similar to the Hightower, it has enough to go deep on any landing and the VPP™ suspension design makes sure that there’s no wasted energy when heading back up for another go. Proportional chainstays set the Bronson up for a wide range of rider sizes (we offer five sizes from XS to XL), while protective armour (downtube and shuttle pad), internal cables, and a bottle cage inside the front triangle mean that this wild child does have table manners.

A bike like the Bronson is meant to play rough-and-tumble, and as a result should also be ready to rumble. We build our bikes to last while most brands aim to just pass basic testing. But if a rider was really going to put their bike to the test in the real world over and over again it means building something beyond the standards. While the Bronson might not win any awards for ‘lightest on test’ it will be the bike that’s stiff enough for real mountain biking on today’s trails and is a bike that will outlast the rest. That’s why we proudly wave the flag of our lifetime warranty and have done so long before it became a box for a marketer to check. For the life of the bike we provide legendary rider support, which means all the human help and tech details are right at a rider’s fingertips. Fun fact: we also offer lifetime bearing replacement (if you’re too forgetful to take 15 minutes to service them)."
Release: Updated Juliana Roubion
Juliana have released the latest iteration of the Roubion, with the biggest change being the move to a mullet-configuration. Read more below...
"A 1:25000 scale map, a weather forecast and the Roubion. Three things you shouldn’t hit the high mountains without. And while we can’t guarantee you won’t get lost or soaked, we’re pretty sure there’s no better bike to tackle ancient alpine terrain.
The 150mm of VPP® lower link rear wheel travel and full carbon frame are built for a lifetime of tough climbs and tougher descents. Matched with a 160mm fork and Reserve carbon wheels, the whole package is ready to tackle an Enduro World Series at the drop of a beret. And whether blind racing or just blindly enjoying the trails as they come, the Roubion’s MX wheel combo feels like the best mix since Aperol met spritz. A 29-inch front wheel serves up high-speed stability and high-rolling confidence. Meanwhile the 27.5-inch rear makes for an intuitive and highly maneuverable rear end that loves to get sideways around the most ragged of switchbacks.
This bike is rapid, so when it comes to stopping power and control we’ve mixed things up here also. A 200mm front and 180mm rear brake rotor pairing ensures you shouldn’t overcook the corners no matter how hot you’re coming in. The Roubion’s chainstay lengths are all specifically sized for the XS, S and M frames too, meaning handling remains consistent across the range. And like all Juliana’s, each shock is tuned to work better for slightly lighter riders than equivalent Santa Cruz models. With free replacement bearings and lifetime frame guarantee as standard, the Roubion remains our #1 choice for rallying the world."
Review: 100% R-Core X Pant
Riding pants have come a long way since I was a kid. I remember the first set was a grey set of Fox 180 Moto pants I got for Christmas. I thought they were the coolest things ever. I would ride everywhere in them. They were thick, heavy and probably would still be around with the cockroach if the world went up in flames in a nuclear war.
Fast forward to 2021., I may not still own them Fox pants but I still think riding pants are the coolest thing out. Lucky riding pants have come a long way since I was young. We now have a vast range of them out there designed around mountain biking specifically.
I was lucky enough to be given a set of 100 percent R-Core X pants to test. 100 percent has a rich motocross history dating back to the 1980s but more recently has moved into the mountain bike scene. This history and knowledge show in their products: well-designed features, fit, ventilation and materials.
The R-Core X pants are aimed at the trail enduroish market., They are packed with clever features. The first thing you notice when you put the pants on is just how much airflow they have. There were many times I put them on and thought there I must have put a rip in the crotch purely from the breeze passing through them. Fit wise, they sit in the middle of the range - not too tight and not too baggy, enough room to move and also fit kneepads on underneath. A mixture of four-way stretch spandex and DWR coated polyester provide stretch and strength where you need them most. Silicon gripper pads on the back of the waist help keep the pants up while you do up the fantastic boa on the front. Why don’t more people do this? It makes a lot more sense than buttons or straps. The boa allows for micro-adjustment on the tightness and I personally love the way it looks. Rounding out these pants are two well-placed zip pockets on the front - big enough to get a phone and a small tool in one pocket.
I've spent about a month and a half putting these pants through their paces, from punishing wet rides in the rain to six-hour rides into the bush for overnight missions and quick laps around my local spots. They tend to be the go-to set I grab when I'm heading out riding due to their lightweight feel and overall comfort. All the ventilation helps you not overheat, the fabric stays pretty dry on the wet rides.
What I have noticed on days where it is a bit warmer is that the material used isn't the most breathable. I’d often pull my phone out of my pocket mid-ride and it would be covered in sweat. Not an ideal thing for an electronic device but pop your phone in a sandwich bag before you go riding and you’ll be sweet. Would this put me off buying these pants? Absolutely not. As much as the material might not be the most breathable, the vents keep you cool on warm days. The fit and comfort are fantastic. You almost forget you are wearing them. Fantastic features such as the boa, silicon grippers and vents add up to a great versatile set of durable riding pants that work all year round and won’t let you down.
Distributor: FE Sports
Words: Jake Hood
Images: Caleb Smith
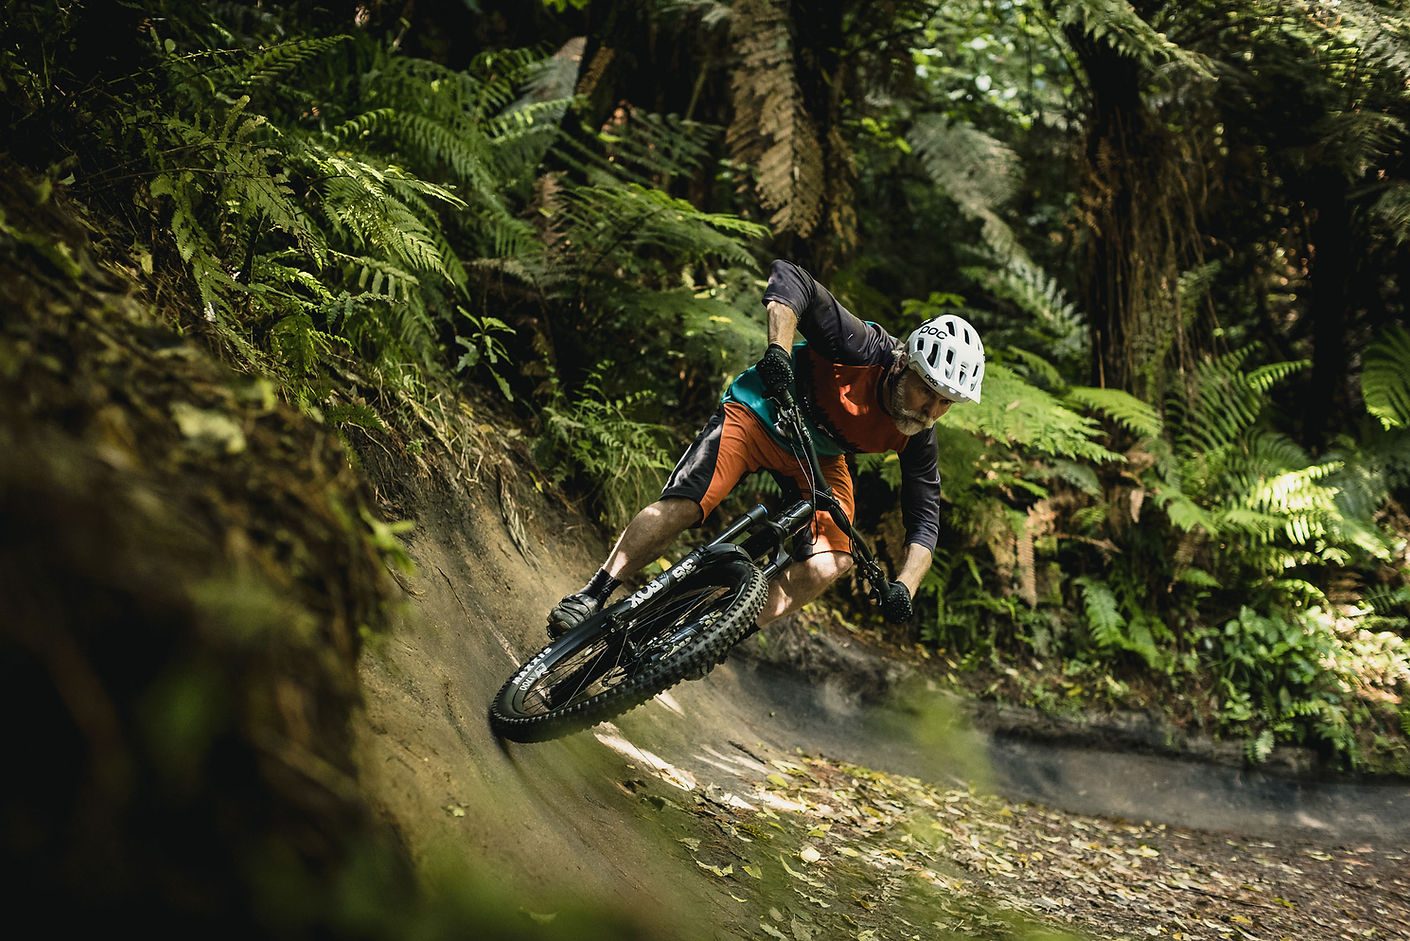
Story: Lens of a Local
Spend 48hrs in Rotorua riding with a local and you’ll return home yearning for more. It’s not just the place but the people who make this iconic mountain bike town shine. To round the year out (and what a bloody weird year) Gary (Gaz) Sullivan invited us to come and ride his local trails aboard the new Canyon Spectral 29.
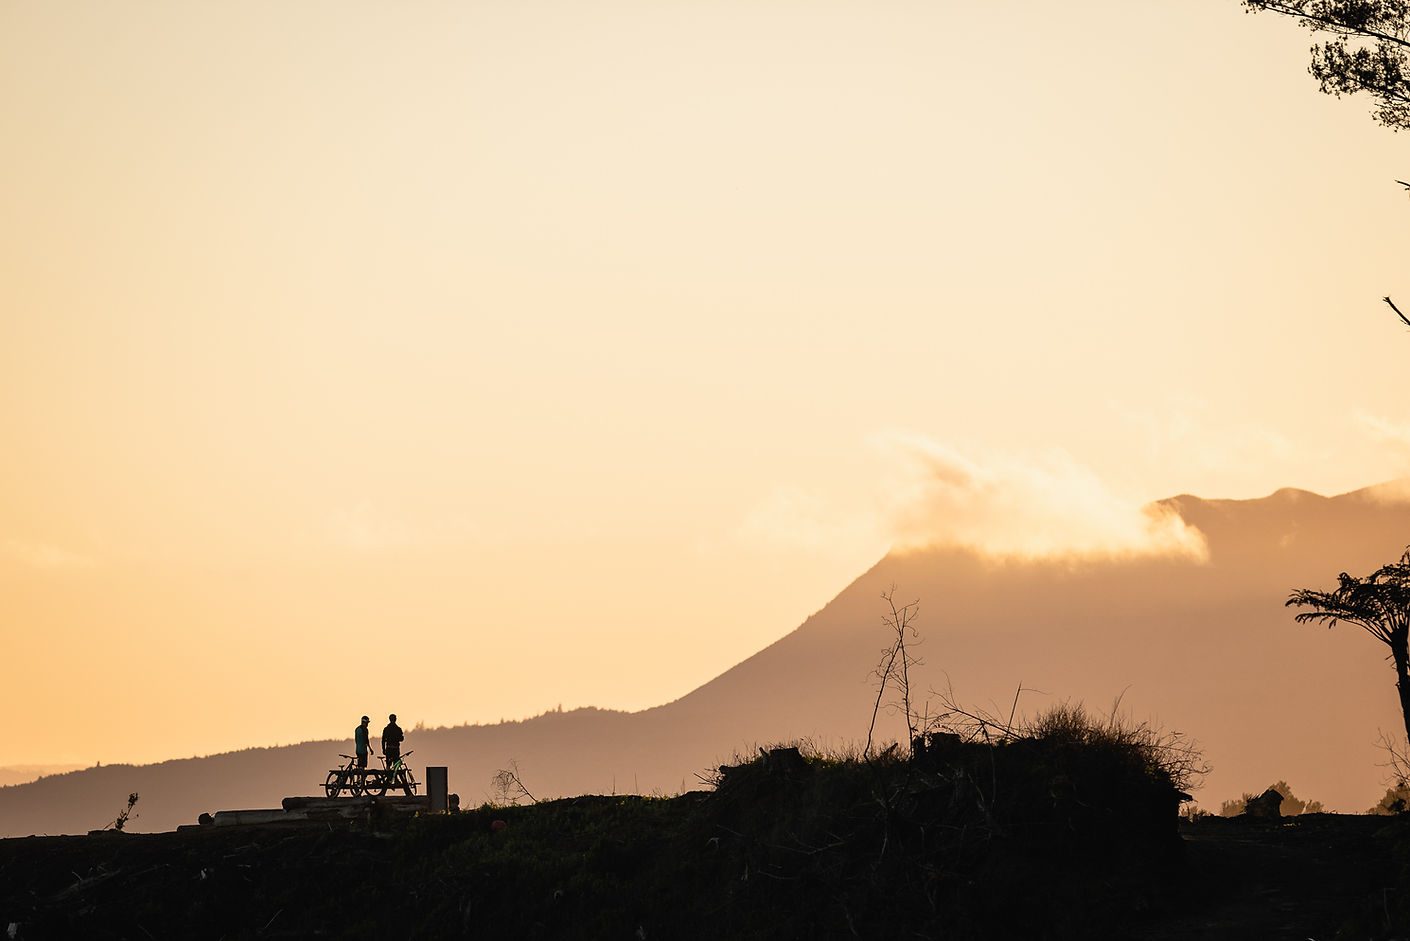
The early summer weather was in full swing and long days meant for long rides. To start the 48hrs we’d heard about the amazing sunsrise at the bench overlooking Mount Tarawera. It’s best to start with a bang so we rose early to be up there before the sun. Before the sun – the pre-dawn when you feel most connected to Papatūānuku. The faint light before dawn was soon overshadowed by the sun’s rays peeking over Mount Tarawera. Once the sun was up, part two of our adventure began.
Canyon Spectral 29 Tech
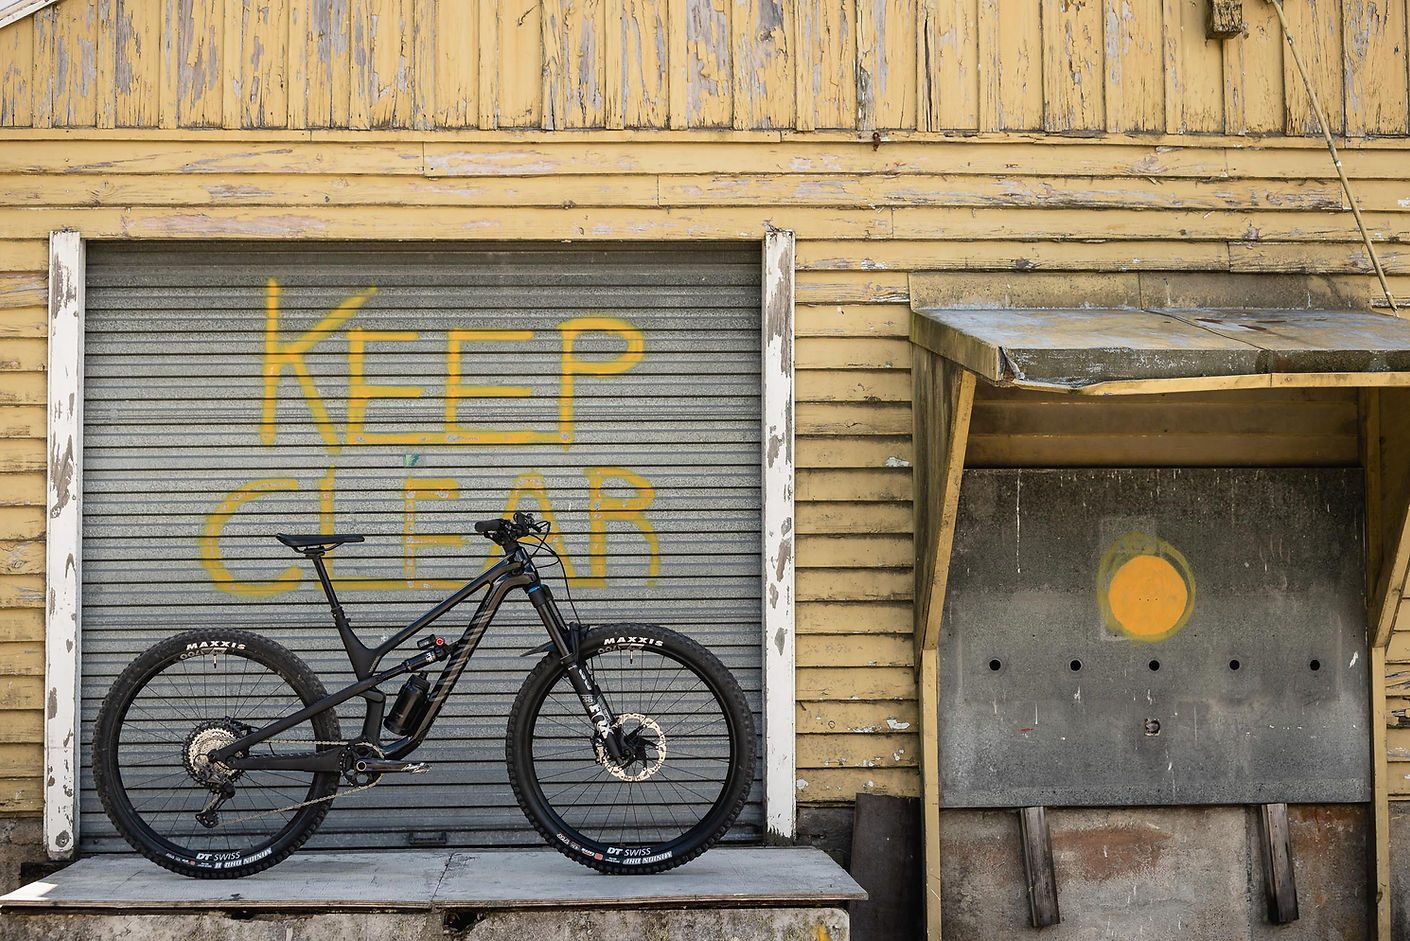
Firstly, as Canyon is a consumer-direct brand it’s worth noting that the box arriving is the first thing you actually touch and feel from the brand. They ensure it’s a good experience the box that the bike comes in is super organised and uses minimal excess bubble wrap and plastic.
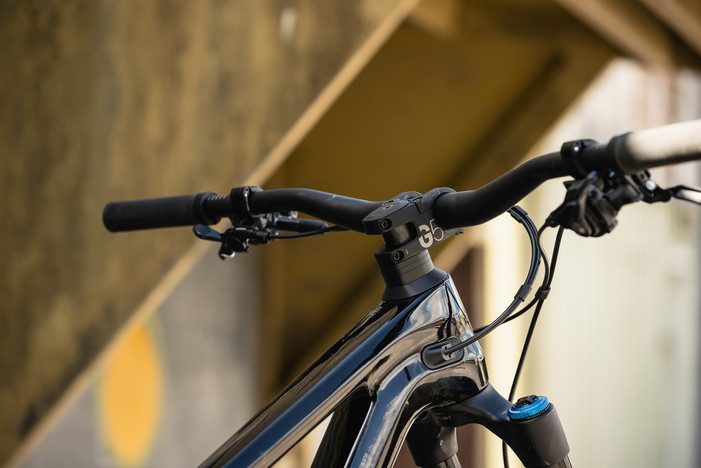
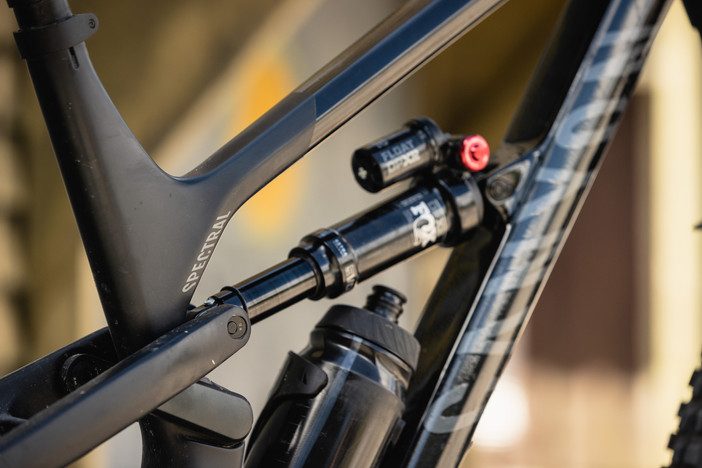
The Canyon Spectral CF 29 is a new trail bike from the direct-to-consumer company. The rig comes with 150 mm travel at the rear and, depending on the model, 150mm or 160mm upfront. So, you might have guessed by the name, but yea, it rolls 29 wheels. Initially only available as a carbon version (CF). Canyon’s masterplan with the Spectral 29 was to mix the agility of the 27.5” existing model with additional stability. The Spectral 29 bears little resemblance to its 27.5” counterpart. This is ground up and the geometry and suspension have had fundamental revisions. And even though there’s longer geometry the company claim it’s lighter than the Spectral 27.5”. But it’s stiffer too thanks to the huge chainstays (with tough protector) and reduced kink in the downtube. However, with the thick chainstays, it does limit the Spectral 29 to 30-34 chainrings. Canyon’s own G5 cockpit is top notch and up for abuse too. What’s more, is that Canyon has made improvements with the durability of the pivot bearings.
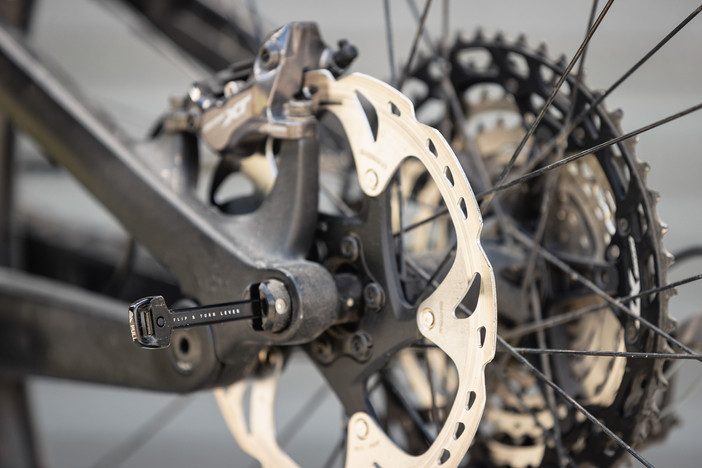
Canyon’s paid real attention to making the Spectral 29 durable and easy to service. Cables and hoses are routed through tube-in-tube guides and feed out where they’re meant to. There’s a threaded BSA bottom bracket. I particularly liked that you can get replaceable inserts to ensure the frames not destroyed by pesky cross-threaded bolts. Lastly, all the suspension pivots are removed from the non-drive side. Bloody brilliant idea!
Let’s turn to the suspension. Canyon has refined their “Triple Phase Suspension” concept. Anti-squat at sag has been increased, but it also drops off more quickly as the suspension compresses to reduce pedal kickback. The support and progression of the suspension have also been increased. Not only should it help the bike climb more efficiently but also offer more traction, pop and control for the descents.
Onto the geometry, the Spectral CF 29 is longer, and significantly so! The reach-in size L is a generous 485 mm and at the same time, the 64° head angle is noticeably slacker while the 76° seat tube angle (160 mm model in low setting) is 2° steeper. On the 150 mm fork Spectral 29 in the high setting, that goes up to 77°. Chainstays are 437 mm long across all sizes. A flip-chip on the shock mount allows the geometry to be adjusted by 0.5° to suit your preference. Canyon states that this is offered primarily for those riders looking for a higher bottom bracket on the climbs. I did notice a few bottom outs with pedal strokes so would have raised if we’d had a little more time with the bikes.
The bottom bracket drop is 36 mm in the low setting. Uber modern! But there’s a long seat tube. In size L, which is what I rode, this is 460 mm long. Which means you’ll need to choose the bike around the seat tube length rather than reach. It makes it easier to choose frame sizes for most riders according to Canyon.
Lastly, Canyon offers the Spectral CF 29 in two versions with two spec options for each. You can choose to go with either Spectral CF 7 or 9 which comes with 150 mm travel up front, SRAM groupset, RockShox suspension and DT Swiss wheels. Or you can opt for a Spectral CF 8 with a 160 mm fork, Shimano XT, FOX suspension and a Minion DHF and DHRII pairing laced on DT Swiss XM1700 - which is what we had for testing. It’s a lot of bang for buck coming in at $6,949. The 7 and 9 ranging from $5,699 to $8,649. There’s also the Spectral LTD which runs FOX and XTR for $10,399.

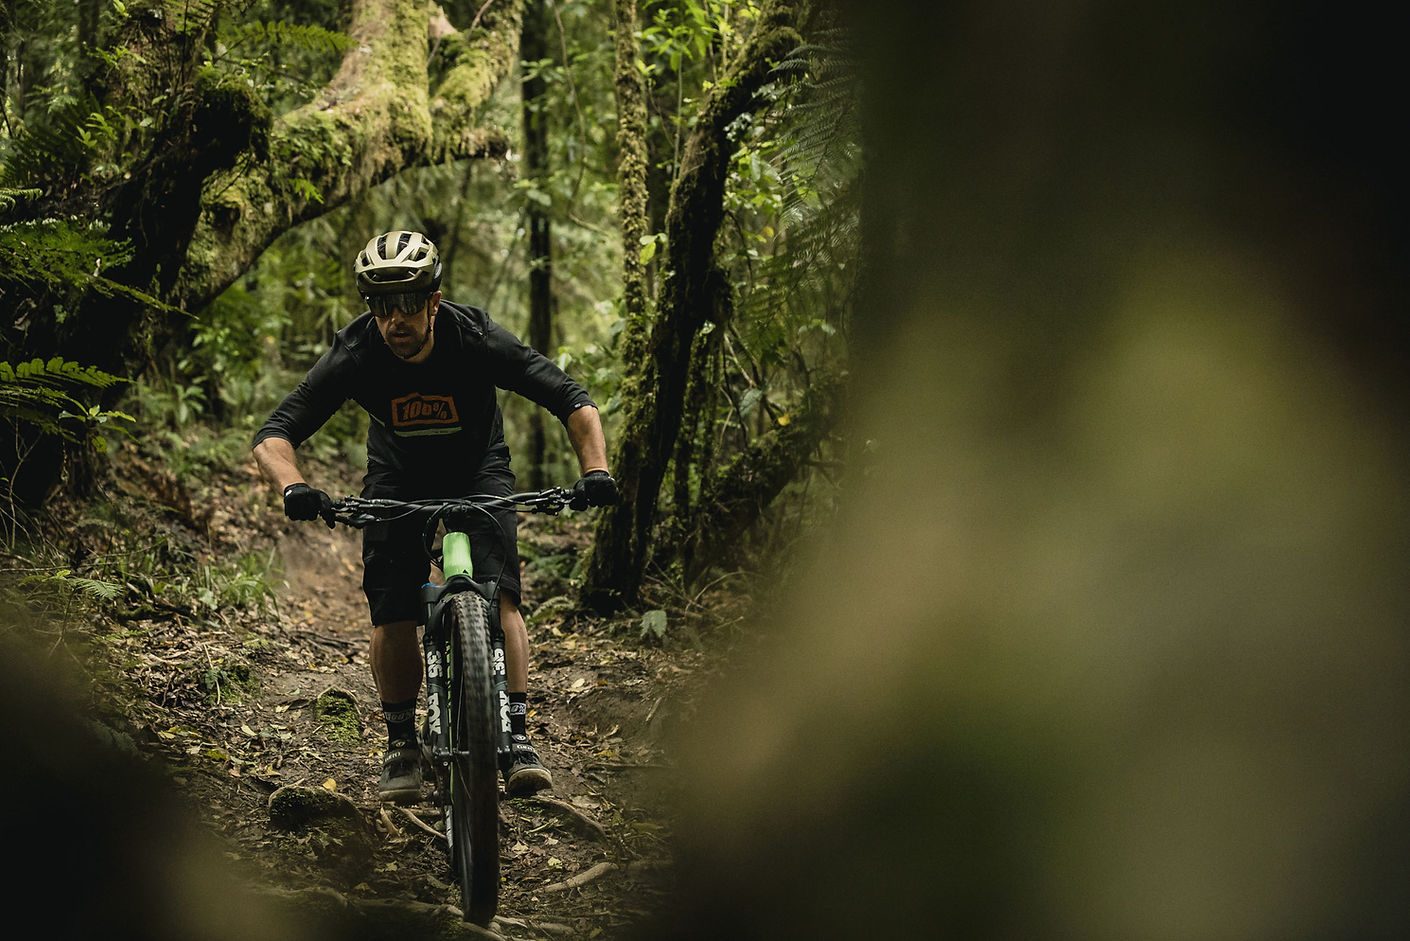
Back to the trails! It’s on the second day when Gaz wanted to showcase one of his iconic loops throughout the lush forest. This is where having local intel or someone that’s been to the area often helps. I always get a little excited about a ride like this as it’s a showcase of the local’s best stuff. You know they’ve ridden the trails thousands of times so you know what they’ll send you down will be the goods. Before we set off for the day, we headed for breakfast at Zippy Central Café. A plate of eggs and a strong black coffee had me sussed for the ride ahead. I’ll let Gaz fill in the details of the trails we did and how he stitched them all together.
“Taking a visitor for a lap of the forest is one of my favourite things to do. Somehow it refreshes my view of a place I have been riding since before there were trails. I know Liam is similar to me in that he likes a decent ride. Even on my own, I am inclined to make most rides a loop - just feels more like I have been somewhere, rather than lapping out a hill.
On this day we went up towards the top of the Tokorangi hill, via the new Forest Loop climb, but before we got where we were headed, we had a mechanical. This wasn’t with our Canyon’s it was with our photographer, Cameron Mackenzie’s bike. We returned to the start via the spectacularly rejuvenated Challenge Middle and dropped in on Ed and Lenore at Planet Bike - not only great coffee in a mid-forest location, but Ed is also a great mechanic. Sorted.
We then headed up through the remains of Chinese Menu, climbed Direct Road and Frontal Lobotomy, and then the top of Tawa Road to get to the native forest which is the roof of Whakarewarewa. My place for mental repairs and the natural trail is Tuhoto Ariki, so we did that.
After Tuhoto we turned left and climbed to Te Ahi Manawa. Another natural line, hand scratched out of the dirt and not so manicured as some others, Te Ahi dropped us on to Tikitapu Road.
We took a left again and rolled along there to Tangaroamihi, which is Grade 2 but fun. The main reason for that was so we could inhale some carrot Cake and coffee from the Airstream Cafe at Blue Lake reserve.
We then rode Feeder up to the new carpark at Te Putake o Tawa, to my amazement there was a little coffee and snacks wagon there! Note to self: give them a go.
The excellent Grade 2 Te Pou Koropu Loop trail got us to Apumoana, then we descended Hot Cross and Dragons Tail back to civilisation.”
The day was set out to be epic and it bloody delivered. What’s more, is the bike’s capability to traverse and encounter all of these trails with finesse. The pedal ability of the Spectral 29 was evident as Gaz took me on several uphill trails and fire roads. Whilst pedalling, it’s super-efficient and marches willingly forward with the rear end remaining supportive even on steep climbs. In fact, the rear shock was hardly switched, left wide open it tackled the exposed roots on the ups superbly.
That finesse I mentioned earlier is something that the bike’s given me. Tuhoto Ariki is up there for my riding ability but the bike made me feel comfortable and confident. So much so I could get across, down and around nearly all of the features on the trail. That’s something that I haven’t managed before. As the ride went on my confidence kept growing – down to the bike’s impeccable ability to handle what was handed to it.
The Spectral 29 feels planted, it’s roomy and perches you centrally. The high front end combined with the low bottom bracket integrates the rider well, creating a sense of security. Hence my ability to ride some of the steep terrains. It never made me feel overwhelmed. As we ducked and weaved in and out of the native ferns, shaded in points but the dappled light made it hard to see some the trails. Both of us hadn’t ridden the bike much beforehand but as the day’s ride ticked past three hours, we were both comfortable – that’s impressive. Gaz kept unlocking Whakarewarewa trail gems and I grew fonder of the Spectral 29.
As we pedalled our way back, we both started to feel somewhat toasty from the day’s effort. The Spectral 29 changed direction quickly, accurately and precisely and without much effort. The suspension is sensitive without being too soft. The bike generates a ton of grip but also feedback and lets you know what’s happening on the trail beneath you. The Spectral 29 is damn fun and we were both grinning ear to ear throughout the ride. On completion, we were both toast but stoked from the day’s antics. The bikes performed really well, we had a ton of fun on them and it finished with a beer in the back of Gaz’s van. What more could you ask for?!
As the pink dusk sky shrouded Whakarewarewa we headed to the Secret Spot, which is in Waipa carpark. The Rotorua Mountain Bike Club was holding a gathering. Gaz, the local in this equation knew almost everyone there. I got to see how it was to be a local within this community of enthusiastic bike riders. It’s a real bike town and you can see the absolute passion for the sport when you’re in their company. Before the day was done, we ventured to a local Mexican joint, El Mexicano Zapata. The place was authentic and the tacos were tasty. We washed them down with Mexican beer before chowing down some churros for dessert.
We both came away bloody impressed with how the Spectral 29 performs. It ticks all the boxes for a do-it-all bike – offering a ton of fun across any kind of trail. It’s versatile and capable across a wide variety of terrain, bike parks to flow trails. It’s the one bike you’ll own that really does do it all. I for one was a little unhappy about boxing it back up and returning it.
I reflected on the last 48hrs on my journey back to the big smoke. Rotorua’s a town has ample trails blended with culture and great folk that are truly passionate about their region. It’s remarkable what they’ve built there. But I suppose that’s a reflection on the sport as well as the development of trails. It feels like a real bike town and it’s great to be immersed in that culture. I felt this is what I missed most when returning home. Having the opportunity to see the region through a local’s perspective is a real treat. And, although it’s not always possible I’d recommend connecting with a local in any region you visit. They simply just give you great insights and access to their wealth of knowledge. It’s just like having the keys to the city, or rather trails.
Head to Canyon for more
Words: Liam Friary
Images: Cameron Mackenzie
Release: Santa Cruz Blur & all-new Juliana Wilder
Santa Cruz have updated the Blur ahead of the 2022 season, and Juliana have release an all-new bike, the Wilder, to fill the 'down-country' spot in their range. Read on for more!
Santa Cruz Blur


"Each weekend, at race venues the world over, there is one rider who gets hoisted upon the shoulders of the crowd and carried to the podium. Or at least leaves with a water bottle as their prize. And between each of those races, innumerable wannabes are putting in the hours on the rollers and in the gym all because they want to feel what it’s like to take the win. They know that to beat the pack every advantage needs to be acquired. That’s where the Blur fits in.
We tapped into everything we’ve learned from years of making the highest quality carbon full-suspension bikes so that we could put as little (weight) as possible into the Blur frame. The trim frame and super-efficient Superlight™ suspension will be the key to translating your input into competition beating performances.
But the Blur isn't just for the short track. Two water bottle mounts within the front triangle should keep chuggers happy. And the high quality fit, finish and carbon construction promises multi-day racers a worry free existence—meaning there's no fiddly proprietary parts that could leave you stranded in a Cape Epic or Breck Epic campsite. The carbon frame, while being light, is made to go the distance and as always the legendary Santa Cruz lifetime warranty and Rider Support team has got your back.
The Blur isn’t guaranteed to make you a race winner but being the lightest, full-suspension carbon XC bike we’ve ever made (Approx 23lb as complete. Blur frame is 289g lighter than the previous model) it might be the difference between claiming first place...or just crossing the line."
Juliana Wilder


"Saving weight means little without retaining an appropriate level of stiffness and responsiveness too. So we’ve taken all the acceleration and out-of-the-saddle sprint qualities of a carbon XC race rocket and fused them with a rear-end that still rails corners like a hardcore trail bike.
This unique XC-trail attitude is also reflected in the geometry. The head tube angle (67.1 degree) and reach (425mm) is a little steeper and shorter than a Joplin to meet the demands of aggressive climbing, yet the Wilder’s seat tube angle is a touch slacker and the chainstays a little longer than a Joplin too in order to retain that familiar Juliana confidence on descents. And talking of chainstays, each chainstay length is specific to the individual frame size; meaning riders of every height enjoy the same handling and performance no matter what.
Beyond the details, there are some bigger features that amplify this XC wild child’s abilities. Rapid rolling 29-inch wheels are paired with a 120mm fork to tame the feral lines and smooth the sketchiest of passing manoeuvres. There’s even room for two water bottles within the front triangle for bigger training and racing days."